Importing and Exporting Audio
This chapter describes:
- Revoice Pro's audio format requirements
- Simple and fast methods and workflows for getting audio from your DAW into Revoice Pro for processing and from Revoice Pro back to your DAW.
TIP: Check www.synchroarts.com regularly for updates on workflows with specific DAWs.
Revoice Pro Audio Format Requirements
Input Audio Requirements and Output Formats
- Accepted Input file formats: .WAV (normal and BWF) and .AIFF
- NOTE: AIFF does not contain timecode stamps
- Output format: .WAV (BWF with timecode stamps)
- Sample rates: from 44.1 to 192kHz
- 16 to 32 bit audio samples.
- Multi-channel audio files: with up to 8 channels are supported in some cases.
WARNING: You cannot use waveforms with different bit depths and/or different sampling rates in the same Revoice Pro Session.
Each Revoice Pro Session's Sampling Rate and Resolution (Bit Length) are set and fixed automatically to the settings of the first audio signal imported into the session. After that, Revoice Pro will offer to resample any non-matching audio file that is imported, to match that Session's Sampling Rate and Resolution.
Note for Windows users
The menus shown in this chapter are captured from the Mac OS version of Revoice Pro. However, the contents of these menus will be substantially the same for the Windows OS version (apart from file system operational differences). Any other major differences will be noted.
Back to Index
Audio Transfer between Revoice Pro and DAWs
Because Revoice Pro is a stand-alone program, we know that a critical part of your workflow is getting audio out of and back to your Digital Audio Workstation (DAW) as quickly and as easily as possible. We have tried to make the workflow with Revoice Pro meet this criteria.
The Basic Workflow steps are simply:
- Transfer audio from your DAW to Revoice Pro (click here)
- Process the audio in Revoice Pro and check it (click here)
- Transfer the processed audio back to your DAW (click here).
The audio transfer methods are summarised in two tables below and work with most brands of DAWs including Pro Tools, Logic Pro, Ableton, Cubase, Nuendo, Reaper, etc. Which method(s) you chose for transferring audio will depend both on your DAW, the methods it supports, and the amount of audio you want to transfer.
This chapter, although lengthy, has been organised so you should be able to follow the links below to skip to the sections related to the DAW, plug-in type, or specific operation you are interested in.
Also, note, starting with Revoice Pro 2.5, besides the basic descriptions below, there are also some new DAW-specific manual chapters for describing special high-speed workflows for some DAWs.
The table below - provides a Summary of the main methods, advantages, and links to sections in the manual describing these.
How to transfer audio |
|
|---|---|
| Method | Advantages/Comments |
Revoice Pro Link Plug-ins |
|
"Quick" APT Plug-in Audio Suite and AAX |
|
Copy in DAW and Paste into Revoice Pro or |
|
Drag and Drop audio files into Revoice Pro. Files can be existing .wav or .aiff, bounced or Exported from DAW to disk. |
|
How to Transfer Processed Audio |
|
| Method | Advantages/Comments |
Drag and Drop directly into DAW track |
|
Export audio to files and drag files into DAW |
|
Audio Suite and AAX Plug-ins |
|
Back to Index
Workflow Step 1: Transfer audio from DAW to Revoice Pro
As shown in the chart above, there are several methods for getting audio from your Digital Audio Workstation (DAW) into a Revoice Pro session. In the chart below, we identify some of the DAWs that are known to work with each method. The links take you to procedures both in this chapter or to a DAW-specific chapter in the case of newer functions.
Transfer Method |
DAWs (confirmed) |
Drag and drop one or more audio files into Revoice Pro. Files can be already available, or created by bouncing or Exporting from DAW to disk. |
Most DAWs. |
Cubase, Nuendo |
|
Revoice Pro Link plug-ins |
|
Pro Tools only |
The steps for each method are described below.
Method 1. Drag and Drop one or more audio files
This is a very efficient and fast method if the audio already exists in files.
Alternatively, an approach which is less efficient than the other methods is for the user to generate multiple named files from the DAW- e.g. one for each track of audio to be processed. In this approach, the first step must be to get the audio from the DAW into Revoice Pro by either Exporting or "bouncing" the audio to be processed from the DAW to one or more audio files. These can be mono, stereo or multichannel (generally less useful) files. Once exported, the user simply selects and drags one or more audio files from the Mac or Windows file system and drops them into any Revoice Pro session track(s).
TIP: If using this method, we recommend using the BWF (Broadcast Wave File format) because these files contain correct timecode information. If BWF format is not available, use .wav format.
- For information on exporting or bouncing audio, check the DAW's User Guides.
- For tips on settings in some specific DAWs, click the following link Exporting and Bouncing Audio .
Below we show an example of dragging and dropping two files into Revoice Pro.
Ready to drag two selected files into Track 1 waveform area |
After "drop", files with timecode will appear at the correct timecode. |


Using start timecodes in the Audio Files
If the user knows that the audio files being dragged into Revoice Pro have valid and useful timecode stamps, then the Revoice Pro Auto Spot switch can be enabled to use those timecodes without requiring the user to confirm the use of the timecode.
- To enable Auto Spot, click Tracks in the Revoice Pro menu bar, and select Auto Spot as shown left.
- When this window is opened again, Auto Spot will be selected as shown right.
- To disable Auto Spot, click Auto Spot again.


Main rules for Drag and Drop audio files
 If dragged waveforms have a timecode stamp, a window (shown right) will open showing the file name and timecode start and ask if the user wants to place the waveform start at the timecode stamp or at the cursor location, which can then be dragged.
Warning: .aiff files do not contain a timecode stamp.- There is an option to Apply your selection to any further files during that import.
- If you drag more than one file, the Tracks will be populated downward from the first Track you drop into.
- If you drag more files than there are Tracks in Revoice Pro, enough new Tracks will automatically be created and populated by the audio files.
- You can also drop audio into the space below the last Track and the required number of new Tracks will be added automatically.
- AUTO Track Naming - The first time you drag an audio file into a Track - that track will be given the file's name. This can save much time labelling Tracks.
- Each Revoice Pro Session's Sampling Rate and Resolution (Bit Length) are set and fixed automatically to the settings of the first audio signal imported into the session. After that, Revoice Pro will offer to resample any non-matching audio file that is imported, to match that Session's Sampling Rate and Resolution.
Back to Index
Method 2. Transfer to Revoice Pro via a Revoice Pro Link Plug-in
Revoice Pro Link Switch
![]() To transfer audio using any of the Link Plug-ins to Revoice Pro, the Revoice Pro Link Switch must be ON (green as shown left) in the destination Revoice Pro Session window.
To transfer audio using any of the Link Plug-ins to Revoice Pro, the Revoice Pro Link Switch must be ON (green as shown left) in the destination Revoice Pro Session window.
Otherwise, the Link plug-ins will display an error message.
Only one Revoice Pro Session can have this switch ON at a time.
As explained previously, there are mutliple Revoice Pro Link Plug-ins with individual details available by clicking the plug-in name below:
- Audio Suite and AAX - for Pro Tools only
(NOTE: AAX for Pro Tools 11 only, Audio Suite for Pro Tools 10 and below).
Update - there are new "Quick" versions described here.
- AU - for Logic Pro, Ableton Live etc.
- VST3 - for Cubase, Nuendo, Reaper, etc.
Update - there are also new (and faster) Copy & Paste, Drag & Drop methods for Nuendo and Cubase described here
Operation of the LINK plug-ins with other DAWs using the above plug-in standards is often possible, but depends on the full standard of the plug-in standard being implemented by the DAW manufacture. However, Revoice Link plug-in operation with other DAWs can easily and quickly be tested by the user.
Back to Index
Audio Suite and AAX Plug-ins Link (for Pro Tools)
 The Revoice Pro Link Audio Suite plug-in for Pro Tools is shown at the right. The AAX Plug-in is identical in structure and operations.
These plug-ins reside in the Pro Tools Audio Suite plug-ins "Other" folder and must be selected and running in Pro Tools to appear and operate.
At the top of the plug-in window in the Audio Suite (and AAX) "Header" are the standard Audio Suite controls. These settings will be discussed in this section last. (Detailed information about header controls is available in the Pro Tools Help system.)
The black panel below the header contains mainly instructions and a destination Track selector switch.
In the Audio Suite "Footer" controls at the bottom, the Capture button starts the copying of audio selected in Pro Tools to Revoice Pro.
Note also, this is the only Link plug-in version that can transfer audio back from Revoice Pro to a DAW (Pro Tools) apart from the new "Quick" APT and Doubler plug-ins described here.
The Spot button sends the processed audio from Revoice Pro back to the user-selected tracks and correct timecode in Pro Tools. This action is described here.
Preparation before transferring audio from Pro Tools
Before using the Audio Suite or AAX Link plug-in, make sure in Pro Tools that the Session Setup window shown below (found in the Pro Tools Setup menu under Session) is set either to 0:0:0:0 or to a desired timecode offset (a 1 hour offset is shown in the example).

This Pro Tools Session Start offset will be added to the captured audio start timecode and be used as the timecode start in Revoice Pro.
Transferring mono waveforms from Pro Tools to Revoice Pro
The section headed Pro Tools --> Revoice Pro is used to instantly transfer selected audio from a Pro Tools track to a Revoice Pro track.
Before making any transfers, once the Revoice Pro plug-in is visible, decide whether you want the individual audio regions in Pro Tools to be kept as individual regions in Revoice Pro or made into a continuous file. The Audio Suite header switches shown circled in red below will control this and will be explained further below.

The transfer operation itself is simple.
- In Pro Tools, select the region(s) of audio that you want to transfer.
In the example shown below, two audio regions and the silence between them are selected in a Pro Tools track.

The next two instructions written in the plug-in are largely self explanatory.
- Select the destination Revoice Pro Track using the drop down selector button after "1) Revoice Pro Track".
The window that appears will show the names of all the available Revoice Pro Tracks as they are labelled.
In the example below - the track in Revoice Pro labelled "Audio 4" is selected as the destination track for the audio.

- Press the Capture button in the Plug-in "Footer"

The selected audio will be immediately captured and transferred from Pro Tools to Revoice Pro.
Audio Suite and AAX Header Settings for Transfer
Using the example selected two waveform region os shown above, the settings in the Link's Audio Suite and AAX header will change the way that multiple audio regions are loaded into Revoice Pro - as shown below. (Other settings should not be used with multiple regions.). The "clip-by-clip" setting will maintain separated regions and create "silent" regions between waveform blocks.
| Audio Suite and AAX Header | Result in Revoice Pro |
|---|---|
 |
|
|
 |
Multitrack Selection and Transfer
The Pro Tools selected input can be across multiple tracks and in the example below, we have captured two regions in each of two tracks along with the silence between.

When the capture is made with either of the header settings shown below, if "multi-input mode" is selected the Pro Tools tracks are combined into a stereo waveform as shown below to the right. Again, if "clip-by-clip" is used instead of "entire selection", the results will be split into multiple regions as above for the mono signal example.
| Audio Suite and AAX Header | Result in Revoice Pro |
|---|---|
|
 |
This ends the discussion on the Audio Suite and AAX Link plug-in transfer from Pro Tools to Revoice Pro. You can now:
- Click here to continue the workflow discussion, or
- Click here to read how to use the Audio Suite and AAX Link Plug-in to send audio from Revoice Pro back to Pro Tools.
Back to Index
Audio Units (AU) Plug-in Link (for Logic Pro, etc.)
In this section, we will show how to transfer audio from Logic Pro to Revoice Pro, using the Revoice Pro Link AU plug-in.
Note: These techniques should also work with other DAWs that use AU plug-ins such as Ableton Live, etc. but check by trying it first. Or check on www.SynchroArts.com for a compatibility chart.
TIP: It is important to understand that a Link plug-in can be inserted into each track, and there is no limit to how many Link plug-ins can be inserted in the DAW. This means one or more tracks can be transferred at the same time. Transferring more tracks at the same time can greatly speed up your workflow.
Alternative (faster) Export and drag method for Logic Pro Regions
Because of the way AU plug-ins work, the Link transfer operates like a "real-time" bounce to disk and therefore will take as long as the selected audio plays. This might be efficient, if transferring several tracks to Revoice Pro at the same time.
An alternative to consider (particularly with longer files) is using a faster-than-real-time export or "bounce" of audio files containing the desired tracks, and then dragging these files into Revoice Pro, as described previously here.
For Logic Pro, to export a single Region, the Logic File menu item
File -> Export -> Region as Audio File...
will create a named audio file from the selected region that can be dragged into a track in Revoice Pro.
This may be much faster than using the Link plug-in and the exported file name will become the Revoice Pro Region name .
Preparation before using AU Link plug-ins for transfers to Revoice Pro
 Make sure the Link switch is ON (as shown right) in the Revoice Pro Session window where you want to receive the audio, because this tells the Link plug-ins where to send it.
- We recommend that you name the Revoice Pro Session tracks to names that will identify the audio received in each track.
(In our example below, we've left the Revoice Pro Tracks named Audio 1, Audio 2 and Audio 3.)  Make sure you check in the Revoice Pro View, Settings window (shown right), that Revoice Pro's DAW Timecode Offset / SMPTE Time is set to the same Offset as the Logic Pro Project Synchronization setting. Logic normally sets this by default to 1 hour, as we also do in Revoice Pro. The Time display will show the actual corresponding running time - based on the Timecode Rate.
- The DAW setting does not affect performance with AU plug-ins.
The main steps to use the AU Revoice Pro Link plug-in:
- In Logic Pro, insert the Revoice Pro Link plug ins as an Insert on each track you want to transfer audio from. Access the Link plug-in from the Audio menu as shown below.

- Once the Revoice Pro Link plug-in is set as an Insert in Logic Pro, it will be shown as below and be labelled with the name of the Logic Pro Track, which in this example is called "Guides".

In the picture above, the AU Plug-in header is presented. However, clicking the top right hand button will remove the header and make the Plug-in more compact, as shown below showing only the essential controls.

- The Revoice Pro destination track is selected in each Link plug-in by clicking the drop down bar, which will reveal a list of the track names in Revoice Pro. Select the required track. In the example above and below, "Audio 1" is selected.

- Repeat the insertion steps (1 and 2) and Destination track selection step (3) for every Logic Pro track that contains audio to transfer.
 Click on the Capture Enable switch under the label "Capture" to make it turn ON (shown in green at right).
 - ALL Capture switches in visible Link modules can be toggled ON or OFF by holding down the SHIFT key and clicking any of the modules' Capture Enable switches. Below we show two Link modules with Capture enabled.
- Line up the Logic Pro Playhead to the start of the audio you wish to transfer and start the Logic Pro playback. All of the tracks that have the Capture enabled will begin transferring the captured audio to Revoice Pro tracks.
- An elapsed time indicator will show a running total of the duration of the audio captured as shown below.

- When all of the audio to be captured has been played, stop the Logic Pro playback. The capture operation will stop and the captured audio will appear in the selected tracks in Revoice Pro.
Further information on Link modules.
- When capture stops, all the Capture switches will automatically toggle off so you don't accidentally start a capture again.
But, if you do, Revoice Pro will show overlapping audio via a Warning indicator at the right of the screen and a yellow line under the area of overlapping audio. - Lastly, the area under the Link's Track selector is where any Error Messages will appear (in Red), such as below, which occurs when you don't have any Revoice Pro Session window's Link switch On.

This ends the discussion on the AU Link plug-in transfer with Logic Pro (and similar DAWS using AU plug-ins) to Revoice Pro.
You would next Process the captured audio.
- Click here to go to the Processing workflow discussion, or
- Click here for instructions on sending the processed audio from Revoice Pro back to Logic Pro or other DAW.
VST3 Link Plug-in (for Cubase, Nuendo, etc.)
In this section, we will show how easy it is to transfer audio from Cubase to Revoice Pro, using the Revoice Pro Link VST3 plug-in.
Note: These techniques should also work with other DAWs that use VST3 plug-ins such as Nuendo, Reaper, etc. but check by trying it first. Or check on www.SynchroArts.com for a compatibility chart.
IMPORTANT UPDATES: If using Nuendo or Cubase versions 5 and up, we recommend using the newest Copy and Paste or Drag and Drop operations described in this Manul here and also regularly updated on our website here.
ALTERNATIVE: Because of the way VST3 plug-ins work, this transfer operates like a "real-time" bounce to disk and therefore will take as long as the selected audio plays. This might be efficient, if transferring several tracks to Revoice Pro at the same time. An alternative to consider is using a faster-than-real-time bounce to disk audio files of the desired tracks, and then dragging these files into Revoice Pro, as described previously here.
TIP: It is important to understand that a Link plug-in can be inserted into each track, and there is no limit to how many Link plug-ins can be inserted in the DAW. This means one or more tracks can be transferred at the same time. Transferring more tracks at the same time can greatly speed up your workflow.
Preparation before making audio transfers to Revoice Pro
- Make sure the Link switch is ON (as shown right) in the Revoice Pro Session window where you want to receive the audio, because this tells the Link plug-ins where to send it.
- We recommend that you Name the Revoice Pro Session tracks to names that will identify the audio received in each track.
(In our example below, we've left the Revoice Pro Tracks named Audio 1, Audio 2 and Audio 3.)
The main steps to use the VST3 Revoice Pro Link plug-ins are:
- In Cubase, insert the Revoice Pro Link plug ins as an Insert on each track you want to transfer audio from. Access the Link plug-in from the Audio menu as shown below.

- Once the Link plug-in is set as an Insert, it will be shown as below and take on the name of the Cubase Track. In the example, it is called "Guide Voice".

- The Revoice Pro destination track is selected in each Link plug-in by clicking the drop down bar which will reveal a list of the track names in Revoice Pro. Select the required track. In the example below, "Audio 1" is selected.

- Repeat the insertion steps (1 and 2) and Destination track select steps (3) for every Cubase track that has audio to transfer.
 Click on the Capture Enable switch under the label "Capture" to make it turn ON (shown in green at right).
 - ALL visible Link modules can be toggled ON or OFF by holding down the SHIFT key and clicking any of the modules Capture Enable switches. Below we show three Link modules all with Capture enabled.

- Line up the Cubase Playhead to the start of the audio you wish to transfer and start the Cubase playback. All of the tracks that have the Capture enabled will begin transferring the captured audio to Revoice Pro tracks.
- An elapsed time indicator will show a running total of the duration of the audio captured as shown below.

- When all of the audio to be captured has played, stop the Cubase playback, the capture operation will stop and the captured audio will appear in the selected tracks in Revoice Pro.
Further information on Link modules.
- All the Capture switches will automatically toggle off so you don't accidentally start a capture again.
But, if you do, Revoice Pro will show overlapping audio via a Warning indicator at the right of the screen and a yellow line under the area of overlapping audio. - Lastly, the area under the Link's Track selector is where any Error Messages will appear (in Red), such as when you don't have any Revoice Pro Session window's Link switch On.
This ends the discussion on the VST3 Link plug-in transfer from Cubase (and similar DAWS using VST3 plug-ins) to Revoice Pro.
You would next Process the audio.
- Click here to go to the Processing workflow discussion, or
- Click here for instructions on sending processed audio from Revoice Pro back to Cubase or other DAW.
Back to Index
Workflow Step 2: Do the Processing in Revoice Pro
Once the audio is loaded in Revoice Pro, the waveforms can be processed (with APT or Doubler processes) and/or Edited. In Revoice Pro, you will normally send the processed audio into Output Tracks.
- You will often need to create these output tracks and we recommend that you name these tracks with “Out” (or something similar) in the name. (e.g. "Out-Lead 1" or "Out-Actor 1"
- Do your Revoice Pro processing into these Output tracks.
- You then will need to get the transfer the Processed Output audio back to your DAW.
This is described in the next workflow section.
Back to Index
Workflow Step 3: Transfer audio from Revoice Pro to DAWs
There are three simple methods for getting audio out of the selected Revoice Pro Session window and back to your DAW.
- Drag and Drop individual processed regions from Revoice Pro directly into your DAW tracks.
- Export one or more tracks of processed Revoice Pro Audio to files and drag these into your DAW.
- If using Pro Tools, you can use the Revoice Pro Link Audio Suite plug-in or the "Quick" APT and Doubler plug-ins described here.
NOTE: After using method 1 and 2, you will probably need to use a DAW command to shift the audio to the right start time.
Instructions for each of these methods follows.
1. Drag a Waveform region from Revoice Pro and drop it into your DAW
This approach is intuitive, quick and will probably work with most DAWs.
- Select Revoice Pro's window with the processed audio.
- Hold down the SHIFT and ALT (Mac) / SHIFT and Ctrl (Windows) keys on the keyboard.
(Do not press the mouse first or you might move the waveform.)  LEFT CLICK on the processed waveform and keep holding down the LEFT mouse key.
The white (.wav) document symbol shown at the right should appear.- You should now release the keyboard keys (for compatibility with some DAWs).
- Keeping the LEFT mouse button held down, drag the document icon into a track in your DAW. Release the LEFT mouse button.
The waveform will go to a position near where you "dropped" it, but not necessarily to the correct start timecode. If that's the case, the next step will move it to the correct start timecode. - Use your DAW's "Spot", "Move to Original Timecode" or equivalent function to snap the dragged audio to the correct timecode.
We list examples of the specific command below for a few DAWs.
Table of "Spot" Commands to move audio to correct Start
| DAW | Command | Notes |
|---|---|---|
| Cubase / Nuendo | After dragging in audio to DAW track, select the Cubase Edit menu that shows "Move to", and select "Origin” option. |
You can also set and use a quick key command. For example: |
| Logic | Select the menu that shows “Move to Recording Position” (or “Move Region to Original Recording Position”) and click that option. |
You can also use the corresponding key command, default assignment: SHIFT-CMD-R |
| Pro Tools | RIGHT CLICK dragged audio and chose "Spot" from pop-up menu. This will bring up the "Spot Dialog" box. Click the "Original Time Stamp" selector and press OK. |
Set "Auto-Spot" (if available) in Options menu. |
| Other Editors | Look for similar commands to "Spot" or "move audio start to timecode stamp". |
Back to Index
Illustrated Example: "Spotting" audio dragged from Revoice Pro in Pro Tools to correct timecode
 |
a) Processed audio from Revoice Pro is dragged into Pro Tools track in bottom track
|
|---|---|
 |
b) Pro Tools Spot function is selected |
 |
c) In Pro Tools "Spot Dialog" window, select "Use Subframes", if available. d) Select "Original Time Stamp" Dialog and click OK |
 |
e) Processed audio snaps to correct position. |
Back to Index
2. Export Selected Tracks from Revoice Pro as files and Drag files into DAWs
This method is another approach to Step 3 in the Example Workflow and provides extremely fast and efficient transfers of all or selected portions of Revoice Pro's Processed audio tracks.
- Revoice Pro Tracks are automatically named when exporting.
- Entire tracks can be selected, or the start and stop area exported can be defined by setting a Playback Range.
- Multiple exported tracks can be dragged together to the DAW at one time.
- Most DAWs will place each dragged Revoice Pro track into one of the DAW's Tracks.
- If these tracks are NOT initially at the correct timecode when dragged in, a single command in the DAW will usually be sufficient to place each imported audio track at the correct timecode.
When ready to export audio from Revoice Pro, select the File menu in Revoice Pro and select Export Audio as shown in the Mac menu (left) or Windows menu (right). Alternatively use CMD E (Mac) / Ctrl E (Windows).


Either the small or extended version of the Export Audio As... window will appear with the small version shown directly below. Clicking the control indicated by the red arrow will switch the view from the small to the extend version shown in the next picture, and vice versa.

The extended version of the Export Audio window shown below allows more options for finding folders and devices and displaying file information.

For the rest of this example, we will show how to export a selection of tracks from the Revoice Pro Session shown below where the last 8 tracks of the session are visible.

 With the above session, when Export Audio is selected, the (small) Export Audio As ... window similar to that shown right will appear.
Note that no tracks or options are selected yet.
The destination folder is shown as "Shine Session". This can be changed as appropriate.
We will next look at track selection and the auto file naming system.
In the picture below, we have selected tracks 8,9,10 and 12.

Note that the names of the Files that will be created are shown in the "File Name" column. These have been automatically named by combining the Track Name and the default Save As: prefix name "Audio".
In addition, the number of channels contained in each file is shown.
We can make the name of the file more relevant by changing the "Prefix" name in the Save As window. In this case, we have changed it to "Shine" and the Files names are automatically changed to include this prefix as well.
Note that the option "Export Selected Playback Area" is NOT checked, so all of the audio in the selected tracks will be exported. The time range of export is shown following the "Export Starting at ...." message.
Using a Playback Range to define audio export range
If we select the option Export Selected Playback Area, as shown below, we can see that the time range being output is now modified to only include the audio within the Playback Range (defined by the yellow bar at the top of the Session).

Lastly, if we select the option "Save selected tracks as a [N] channel file", where N will be the total of the number of channels in all the selected files and one file will be saved. In the example below - there are 4 mono tracks, so a 4 Channel file will be saved. If there were 4 stereo tracks, an 8 channel file would be saved.
Note that not all DAWs would be able to use such multi-channel files.
Saving the files
When all the options and file names are set as required, click SAVE. The named audio files will be saved into the directory shown in the "Where" window.
Importing the files into your DAW
- Once the files have been output, they can be located in the destination folder
- Go to the directory you selected for the output, and drag ALL the files exported from Revoice Pro to the desired destination tracks in the main editing window of your DAW.
- The audio tracks should populate your DAW’s tracks but might be at the wrong timecode. (Most DAWs will create additional tracks if necessary for each file being dragged in.)
- Once the tracks are dragged in, they may need moving to the correct time code using the commands in the Table shown above for various editors. Click here to go to that Table. (Some DAWs will apply that correction to all selected imported files simultaneously.)
This completes the operation for Exporting audio in multiple selected tracks from Revoice Pro to your DAW.
Back to Index
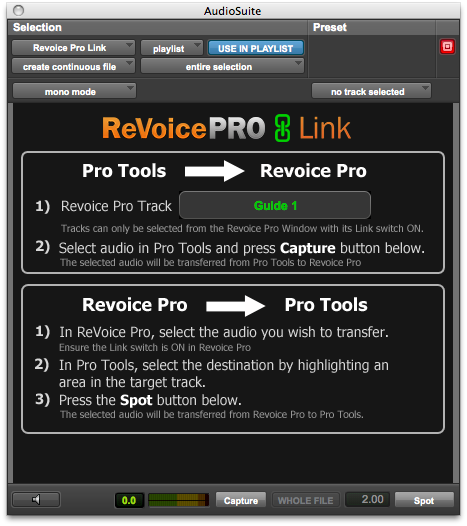
3. Transfer audio from Revoice Pro to Pro Tools using Revoice Pro Link Audio Suite or AAX Plug-in (Pro Tools only)
 The Revoice Pro Link Audio Suite (shown right), can instantly transfer and "Spot" a single audio region from Revoice Pro to the correct timecode in a designated Pro Tools track.
NOTE: The AAX version operation and appearance is identical.
This is an extremely quick method for transferring processed regions individually.
This plug-in resides in the Pro Tools Audio Suite plug-ins "Other" folder and must be selected and running in Pro Tools to appear and operate.
![]() In order for transfers to take place, the Revoice Pro Link (Audio Suite) plug-in must be running in Pro Tools and the Revoice Link switch in Revoice Pro must be ON (green) in the source Revoice Pro session's window (as shown right).
In order for transfers to take place, the Revoice Pro Link (Audio Suite) plug-in must be running in Pro Tools and the Revoice Link switch in Revoice Pro must be ON (green) in the source Revoice Pro session's window (as shown right).
TIP: We recommend that the Pro Tools Audio Suite or AAX Header controls (at the top of the Link plug-in window) should be set mainly according to the image below.

There are only some variations of these switches that will work correctly:
- If "Playlist" is selected in the Link plug-in, then the user can also select the destination Pro Tools audio Track from the drop-down selector showing "no track selected" in the image above.
- If USE IN PLAYLIST is not selected (e.g. blue as above), when SPOT is pressed, the transferred audio will only go into the Pro Tools CLIPS window.
- If the Selected Track display shows "no track selected" then the audio will be placed in the same track as the cursor used to "select some audio" in the Pro Tools window (as required for an Audio Suite plug-in to operate.) If a track is selected instead, the audio will go to that track.
The lower section of the Link plug-in shown above, in the section displaying Revoice Pro -> Pro Tools, provides the three simple steps which we explain further below.
1) In Revoice Pro, select the audio you wish to transfer.
NOTE: Audio may already be selected automatically after processing - so you often do not need to do this step.
 2) In Pro Tools, select the destination by highlighting an area in the target track.
(See the image at right.)
The red arrows show where a range in track "Audio 3" has been marked to select that track (but not the start time).
3) Press the Spot button (shown right)![]()
 The selected audio in Revoice Pro will be transferred to the selected track at the correct timecode start in Pro Tools as shown right in Track Audio 3.
If a Pro Tools track is selected in the Link's header, then the audio will be placed there.
TIP: If the timecode position of the audio spotted in Pro Tools is wrong, make sure the Sample Rate settings for the Pro Tools Session and the Revoice Pro Session are the same.
Back to Index
Notes on Bouncing Audio from DAWs
Workflow and settings for three popular DAWs
are given below, but the issues raised will apply to all DAWs.
Pro Tools (V10)
- In Pro Tools, Select File, Bounce To, Disk...
- A Bounce setup window will appear similar to that shown below.

- Make sure the File Type is set to WAV.
- If the Revoice Pro Session already contains audio, make sure that Bit Depth and Sample Rates are the same as in the current Revoice Pro Session.
- Complete the Bounce operation.
- Drag bounced files into Revoice Pro.
Cubase (V5 and higher)
(Similar instructions for Nuendo and other DAWs might apply)
- In Cubase, Select Project menu and Project Setup.
- As shown in Cubase Project Setup window, make sure the Project Setup "Record File Type" is set to Broadcast Wave File as shown in image below left.
- In Cubase, select the audio region(s) to Bounce (can include across multiple tracks).
- Select Cubase Audio menu and choose Bounce Selection as shown below right.
- Complete bounce.
- Drag bounced files into Revoice Pro.


Back to Index
 Logic Pro (V8 and higher)
To use Export or Bounce (to disk) functions in Logic Pro, select the Logic Pro FILE menu and then chose Export or Bounce at the bottom of menu as shown on the left below (for Logic Pro 8).
The user should be familiar with the various options and settings required.
For use in Revoice Pro, the we recommend outputting to .wav or Broadcast Wave File formats in mono or stereo PCM.
 In the Bounce menu (shown for Logic Pro 8 at the right) there are several options that must be set correctly, such as PCM in Destination and Wave in File Format. Resolution, Sample Rate and other settings are up to the user.
File Type: Split is useful for generating files that will go to separate Revoice Pro tracks.
Additional options such as Mode: Offline (instead of "Realtime") makes the generation of the audio files be done in significantly less than real time .