Presets and Working in Basic Mode
- Working with presets
- Loading a preset
- Inspecting the Results of Processing
- Modifying the preset
- Manually Changing Control Settings
- Saving and managing presets
Working with presets
VocAlign Ultra’s preset library is organised in a task-based hierarchy that makes it easy to find the right setup for the job at hand, be it tightening up a vocal harmony, matching a voiceover artist’s overdub to the original actor’s dialogue, or bringing cohesion to a horn section.
A VocAlign Ultra preset is really just one particular configuration of all its parameters, made to help you complete a specific music or post-production task. The factory presets should be useful as starting points for most cases.
Of course, the specifics of your source material may well necessitate the tweaking of those parameters to some extent, so presets should be viewed as highly targeted starting points rather than ‘set and forget’ instant fixes. Having edited a preset to tailor it to your needs, if you want to use it again, be sure to save it as a User Preset (giving it a helpful name) so you can try it on similar material in the future.
Loading a preset
To load a preset, click the preset menu at the top of the interface

and browse through the menu structure to the preset with the name that most closely describes the source material and results you’re aiming for.
The menu hierarchy is not rigid, but an example of presets for Vocal Doubles is shown below:
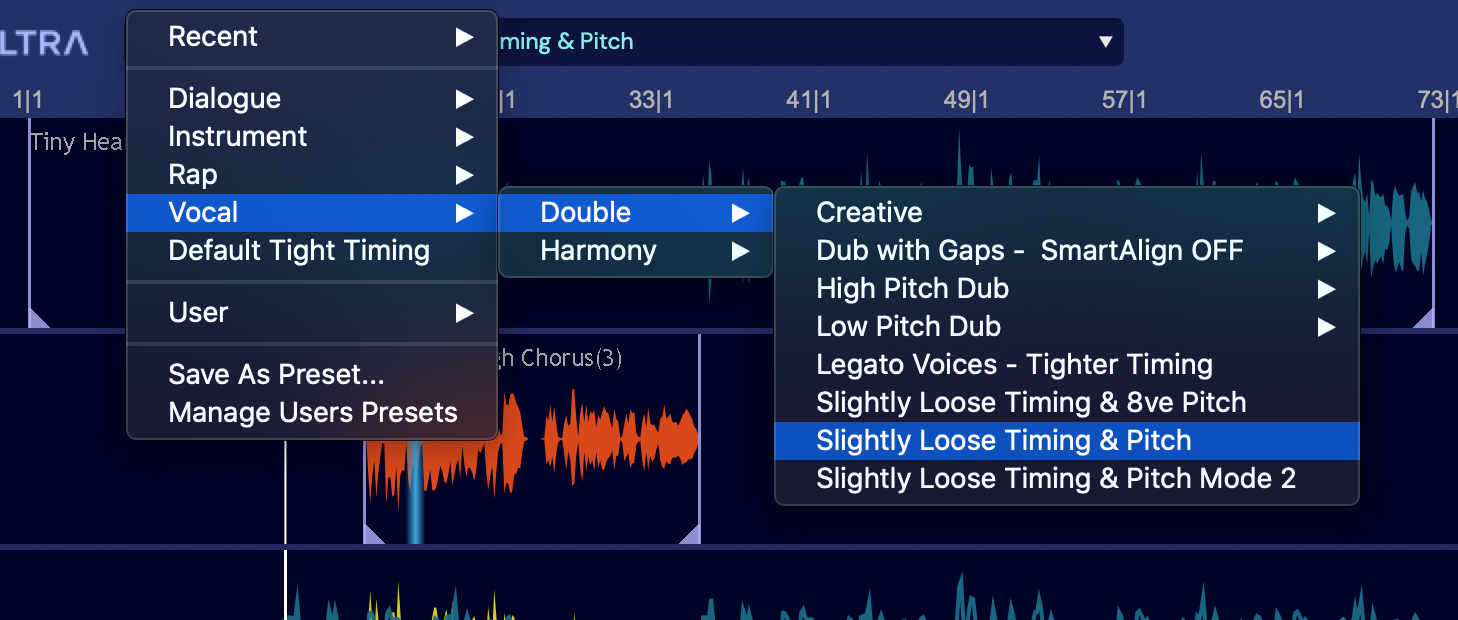
The heirarchy largely follows the levels described below:
- Tier 1 – signal type: Choose Vocal (sung), Instrument (melodic or percussive instruments) or Dialogue (spoken word).
- Tier 2 – Relationship or Task: Here’s where we specify the relationship between the Guide and the Dub, from a range of options including vocal and instrumental Doubles and Harmonies, Rap vocals, and Dialogue Replacement and Inflection Transfer.
Many tasks are further divided into subcategories, such as describing different pitch ranges of source material – Low Pitch Dub and High Pitch Dub, for example. These are used to deliver better quality editing for signals or used to set controls for situations like “Dub with Gaps - SmartAlign OFF”.
- Tier 3 – tightness: Each task is presented at several degrees of ‘tightness’, governing how strictly the timing and pitch of the Dub are aligned with the Guide. For example, the basic Vocal Harmony task comes in Slightly Loose and Tight Timing options.
Exceptions to this are the Creative Vocal presets, which are described in terms of upward or downward pitch and formant shift, or, simply, Make monotone. These unusually detailed ones are mainly included to indicate some possible options the user might find useful to know about.
- The Recent folder will show the last 5 presets you have used which have their original settings when they were created (and not changed versions).
- User Presets - are where you can create and save your own presets, which would also show up in Recent after you use it.
Inspecting the Results of Processing

|
You need to understand when VocAlign Ultra automatically processes (which helps speed up your workflow):
|
The Output appears in the bottom of the three default waveform views, as a solid yellow waveform overlaid with a blue outline of the Guide waveform to show time alignment of the Output relative to the Guide.

Further visual confirmation of the time and pitch alighment can be seen in the pitch view, shown against the piano keyboard note grid, with the yellow Output pitch trace alongside the blue and orange Guide and Dub pitch traces.
These pitch traces can be individually turned on or off with "eye" switches to provide a clear understanding of the changes both needed and made.

NOTE: Immediately after starting VocAlign Ultra, when the screens are empty, if you select a preset before capturing the first Guide and first Dub, you won’t be able to adjust any of VocAlign Ultra’s controls until a Guide and Dub have been captured. However, the selected preset will be applied automatically as soon as the Dub is captured.
The Guide and Dub aren’t part of the preset, so you don’t have to recapture them when you select a new preset. Changing preset with a Dub and/or Guide clip loaded reprocesses the Dub instantly according to the parameters of the new preset to create a new Output.
|
|
WARNING: If you are going to use a different preset on a new Guide and Dub, if you change the preset before you capture the new Guide, it will be applied to the current Dub, which you might not want to happen. |

|
TIP: Change presets as much as you want only after you capture a new Guide, not before. |
Modifying the preset
Be sure to try modifying the controls and see what happens in the timing and pitch displays as well as in the sound. You may find you need to make at least minor adjustments to the controls to make a new preset to adapt to your source material. If you do that and want to keep that preset, save it as a User Preset with a good descriptive name.
Manually Changing Control Settings
Overview
VocAlign Ultra has two versions of its right hand control panel: Basic and Advanced.
You will sometimes need to make at least minor adjustments to the controls after starting from your chosen presets' to adapt the processing better to your source material, or modify the results you hear in the Output to get a better or different results.
Often, you won’t need to go beyond the default Basic control panel to get what you need.
The Advanced control panel is useful to learn more about, because everything you can change that affects the whole signal is shown here.
Basic Mode
Basic mode offers just three controls: Max Difference [Match Timing], Tuning Match [Match Pitch] and Formant Shift.
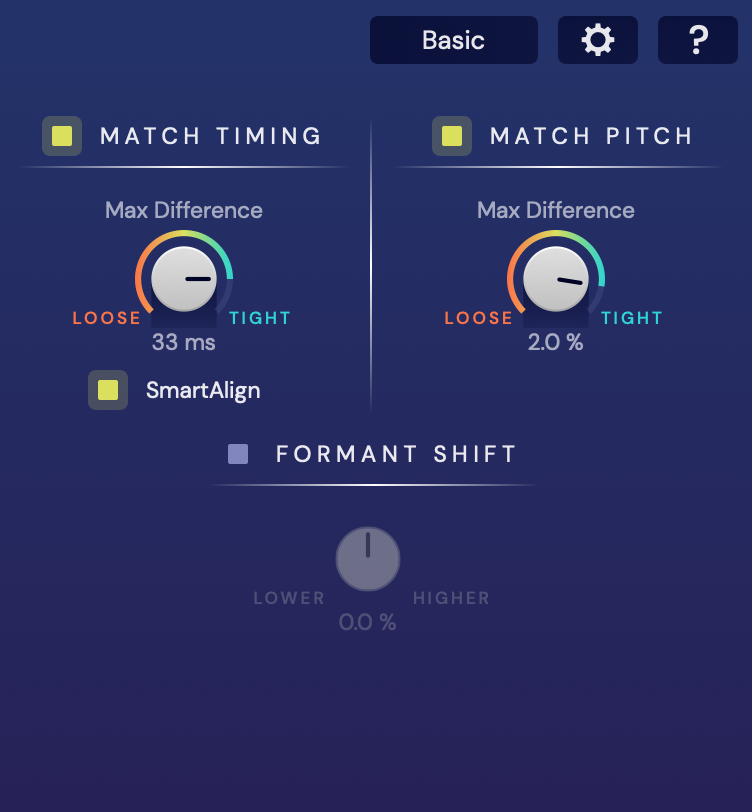
If MATCH TIMING is ON:
Max Difference: Determines how tightly the timing of the Dub is aligned to that of the Guide, from perfectly locked at the Tight (fully-clockwise) setting, to deviating by no more than 200ms at the Loose (fully-anticlockwise).
As you would expect, when the timing difference between similar events in the Guide and Dub is less than the Max Difference, no time alignment is applied.
NOTE: When the timing difference is set to less than TIGHT (0ms) less editing will be done and the signal will retain more of its original variations from the Dub.
If MATCH PITCH is ON:
The control under MATCH PITCH will be one of two different controls, either Max Difference or Tuning Match, depending on an Algorithm switch in the Advanced controls (which will be discussed later).
Max Difference: (Tight/Loose) sets maximum allowed offset in pitch differences.
Tuning Match: When the algorithm setting (in the Advanced control page) is Mode 2 the Max Difference control becomes Tuning Match. Designed for use with Dubs that whose pitch is fairly close to the Guide’s pitch, this aligns long term average pitch of the Dub to that of the Guide when Tight (100%) or keep the Dub average pitch when Loose (0%).
Formant Shift: If ON, at the centre (0%) the Formant knob has no effect. Twist it anticlockwise to lower the resonances’ frequencies of the Dub signal, making a vocal sound more ‘masculine’, or clockwise to raise them, for a more ‘feminine’ tonal character.
The algorithms at work behind each of these three top-level parameters are more controllable in Advanced editing mode , which is discussed in depth in the section User Interface and Operation.
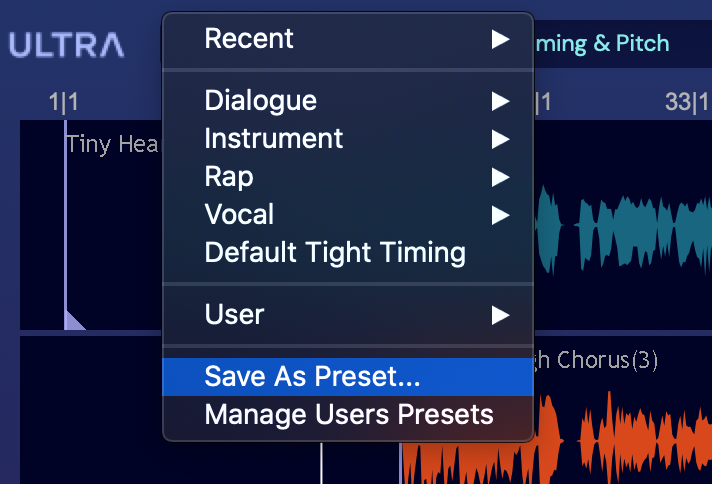
Saving and managing presets
To save all the current VocAlign Ultra control settings as a new preset, click the preset menu and select Save As Preset, then give your preset a name and click Save.
Selecting Manage User Presets from the same menu opens the user preset folder in macOS Finder or Windows Explorer, where you can rename and back up your presets.