VocAlign Project 5 Quick Start Guide for Pro Tools AAX Plug-in
Quick Start for Pro Tools using AAX (AudioSuite)
Overview
In this Quick Start Guide, you will learn how to open the VocAlign Project 5 plug-in in Pro Tools, transfer audio from Pro Tools into VocAlign Project 5, process the audio, and return the processed output to Pro Tools.
The procedure might seem a little complex at first, because you have to tell the plugin which track contains the Guide and which track(s) contain audio that need their timing adjusted by VocAlign Project 5 to match the Guide's. But it's actually quite simple.
Note that because we use the AAX (AudioSuite) plug-in standards, you will only be able to align audio at in one Pro Tools track at a time to the Guide track.
For users of VocAlign Project 3 - please read these instructions because, with the new SmartAlign in VocAlign Project 5, you will find your alignment tasks become much simpler.
We won’t go into details of the control panel or displays here, as those are described in the Using VocAlign Project 5 sections of the main User Guide shown on the left.
One last note: because we started long ago in the film industry, we call the audio to be modified and output the “Dub”.
Before we let you do the work, here's a video that shows the basic steps you are going use in VocAlign Project 5.
Installation and Initial Setup
-
You should have already downloaded, installed and authorised the VocAlign Project 5 plug-in on your computer.
See Installation and Authorization if you haven't.
- Download the Tiny Heart Demo Project V5 and follow along with the operational instructions below.
- Mono and Stereo - VocAlign Project 5 will work with both mono and stereo audio segments as Guide or Dub inputs and will output mono or stereo to match the Dub input. Note, however, that it will use the left (first) channel of a stereo Guide track as the timing reference.
Let's Start Processing
Here, we’ll describe the VocAlign Project 5 workflow steps of selecting a preset, capturing the Guide and then the Dub audio from Pro Tools, processing the Dub audio and sending the processed Output back to Pro Tools. We're using the Tiny Heart Demo Project Sesthat you should have already downloaded. We'll also look at changing presets and settings. We are using Pro Tools 2020.11.0 for these instructions.
SmartAlign will be ON in all the Presets we suggest, and later we tell you how to work without it as well.
- In Pro Tools, open the ‘Tiny Heart Demo Project' Session (download link is given above).
- Load the VocAlign Project 5 plugin by opening Pro Tools’ AudioSuite menu, selecting the Other submenu, then selecting VocAlign Project 5 as shown below.
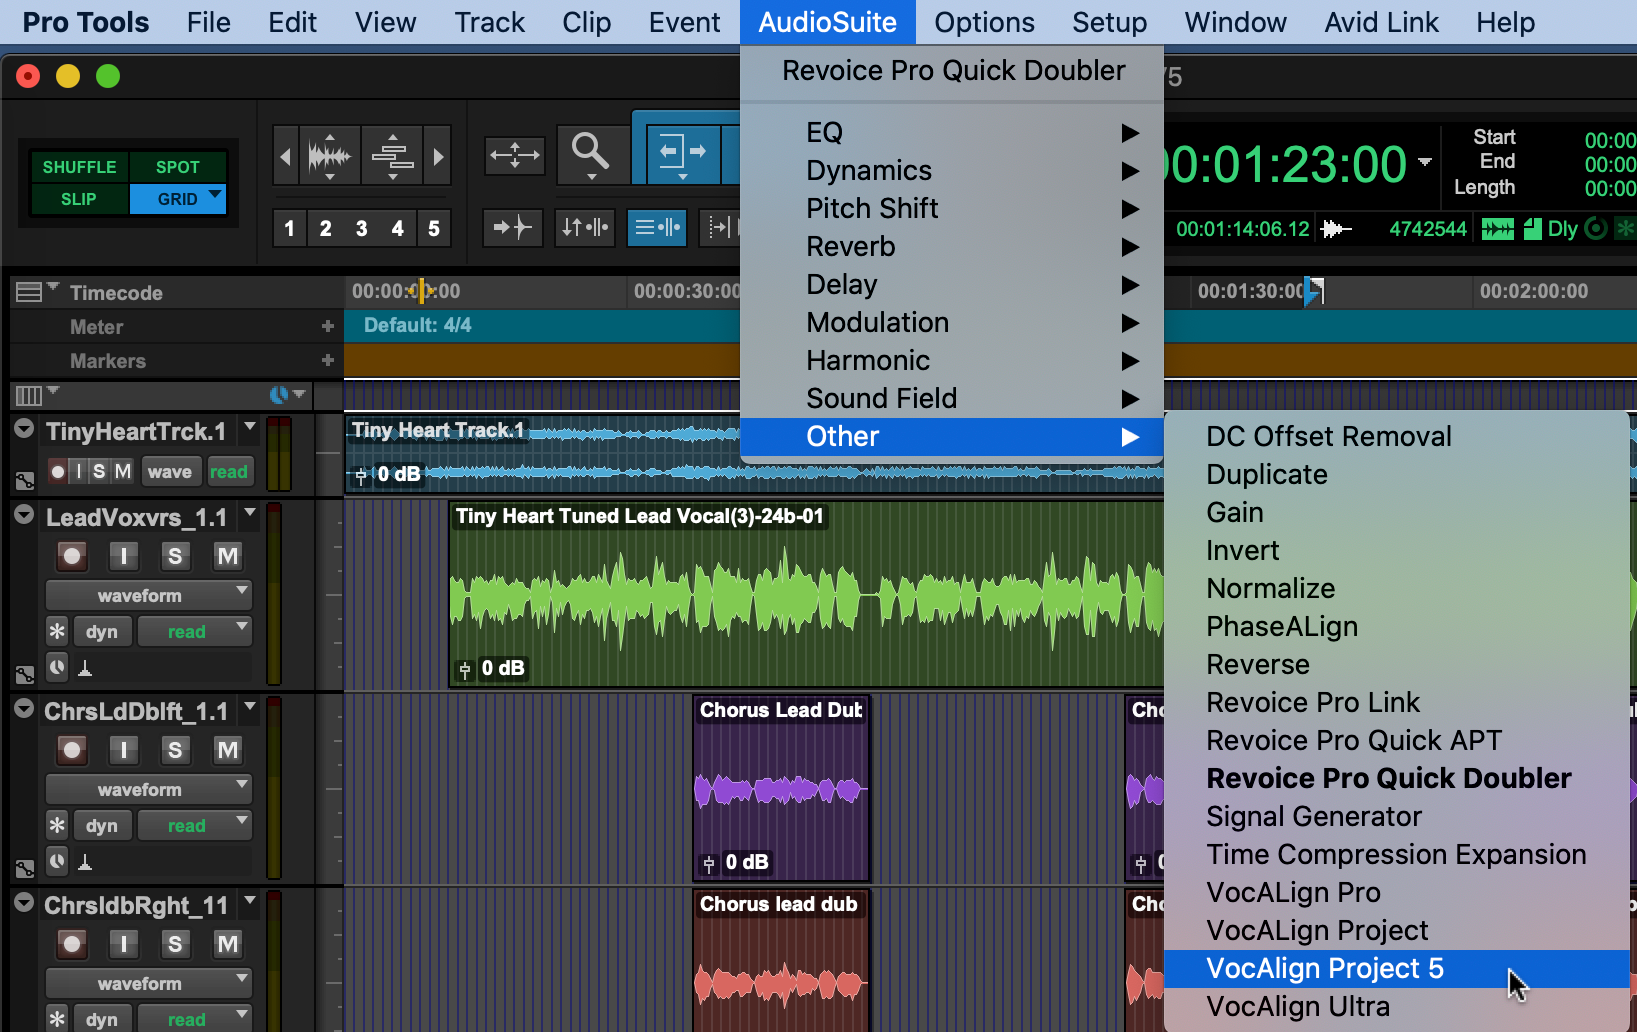
NOTE: If you have both VocAlign Project 3 and VocAlign Project 5 installed, you’ll see both of them listed in the AudioSuite menu, as VocAlign Project and VocAlign Project 5, respectively.
Also, always remember that VocAlign Project 5 is not a real-time plugin, so it does NOT appear in channel inserts.
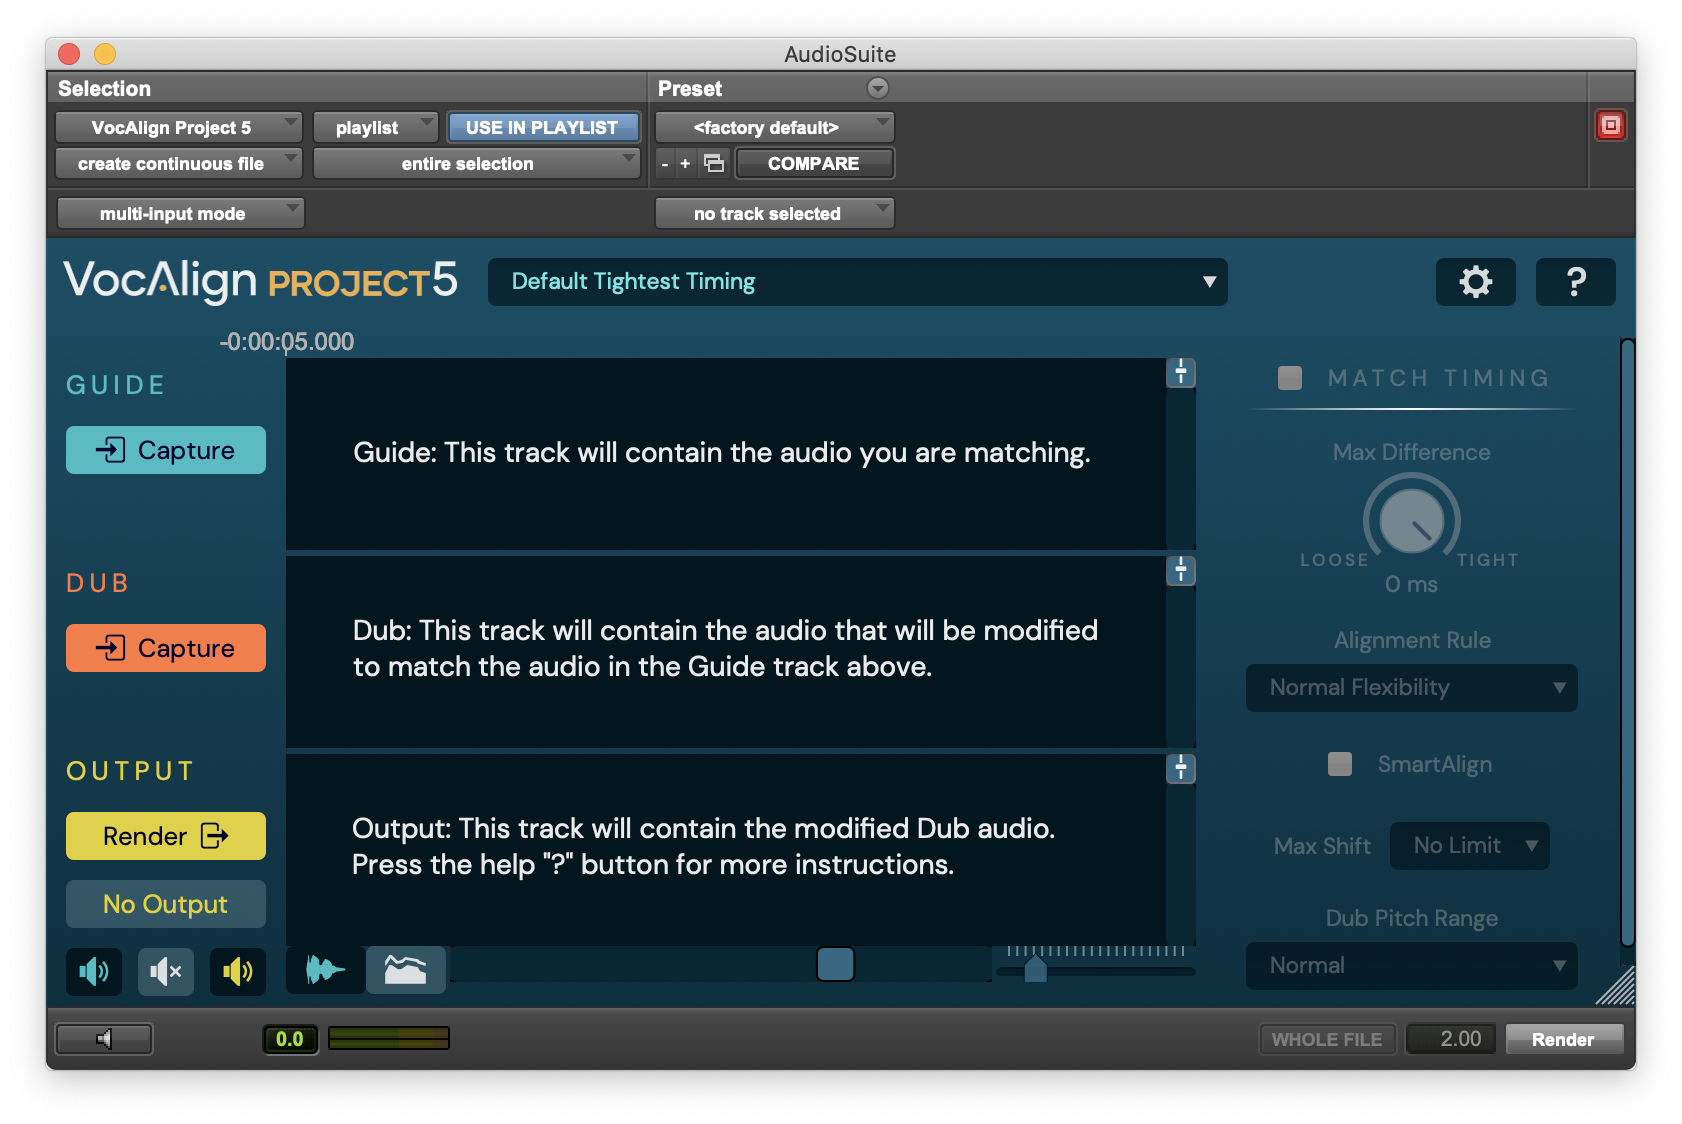
- VocAlign Project 5 should open and look similar to the picture below.
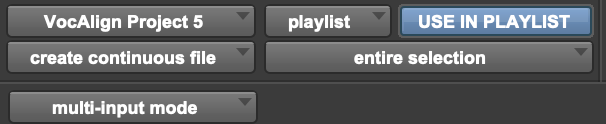
- In the AudioSuite menu at the top of the plugin, make sure USE IN PLAYLIST is activated (in blue), as shown below. If it is not activated, the Rendered audio returned from VocAlign Project 5 will not appear in the Pro Tools tracks (Playlist).
- In Pro Tools, you can now play any of the tracks in the Session against the 'Tiny Heart Tuned Lead Vocal' track to get an idea of what the parts sound like and what needs to be done to them. We will only be using a couple of these tracks to get you started. Also, note that this first example is around 2.5 minutes of audio. We will later show that selecting smaller sections will process more quickly and can sometimes be more appropriate. This will be discussed later.
Process your first Guide and Dub
- In Pro Tools, select the 'Tiny Heart Tuned Lead Vocal' track. This will be our Guide audio.


|
Note: You can also select any smaller sections of audio within a Pro Tools track to be Guides or Dubs. If you do this, be sure to leave at least 0.25s of silence or low level audio before the start of the main audio tracks being aligned if you can, to allow the audio to be moved if necessary. |
- In VocAlign Project 5, click the Guide Capture button to load the selected audio signal into the Guide section, as shown below. The outline of the Guide waveform is also shown in the Output track as a timing reference.

- In Pro Tools, select the three sections in track BV_2.1 (5 tracks below the Guide) as shown in picture below. This will be the Dub audio. We are choosing this track because you easily can hear the timing is off and it changes from a double to a harmony part. Plus there are large gaps between the 3 sections.
TIP: In Pro Tools, you can press the ; key to shift the selected range down from the track above. (If required you can Press P to shift a selected range up.)

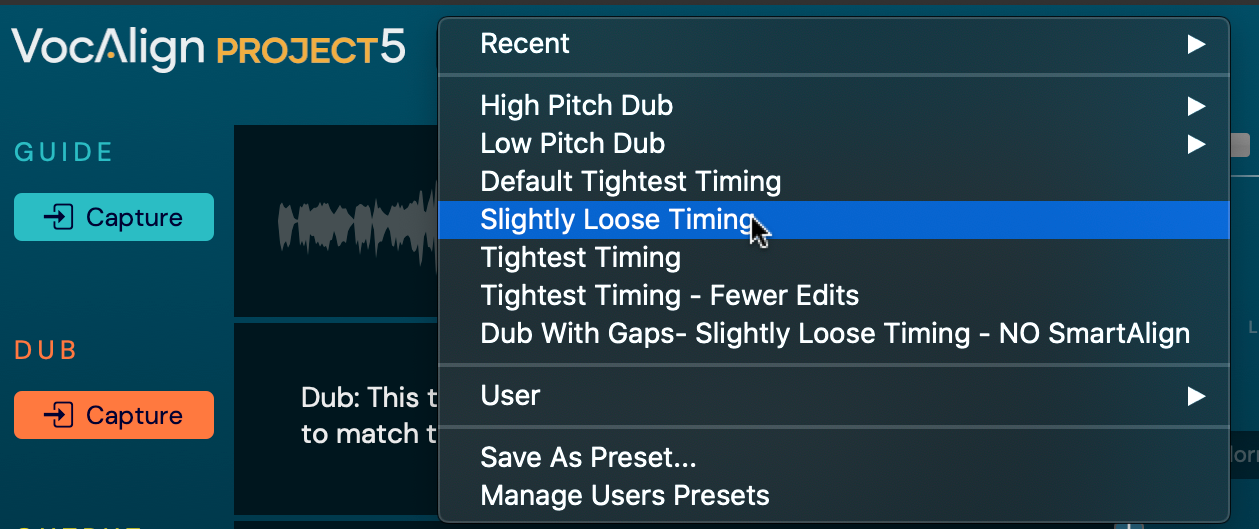
- In VocAlign Project 5, click on the Preset drop down menu at the top of the plug-in and select the Slightly Loose Timing preset before Capturing the Dub. This ensures that the Dub will be processed with this setting as soon as it is Captured. See the picture below. The Preset choices are discussed in this Manual section Presets . SmartAlign is set ON in all the presets shown except "Dub With Gaps".
- In VocAlign Project 5, click the Dub Capture button to load the selected signal into the Dub section and automatically process the Dub based on the control settings established by the Preset. Given that the audio selections are over 2.5 minutes long, it will take a little while to analyse the signals for the first time.
(Note: If this is the first time you have run VocAlign Project 5, you will see the process controls become active just before the processing begins).
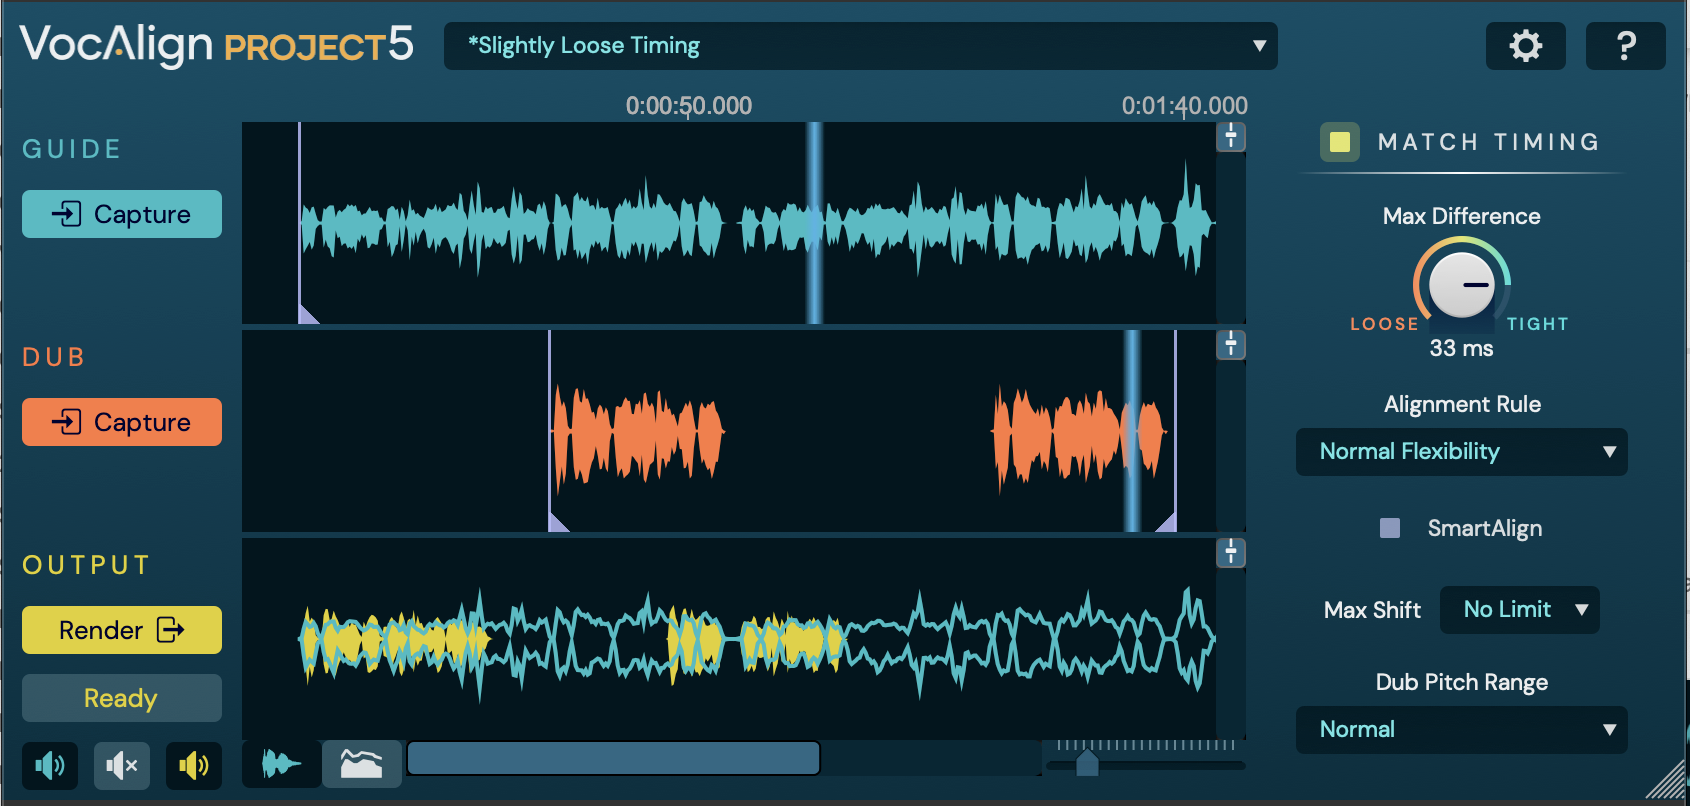
- The Dub and Output (processed Dub) signal waveforms appear as shown below, and the activated control settings to the right are applied.
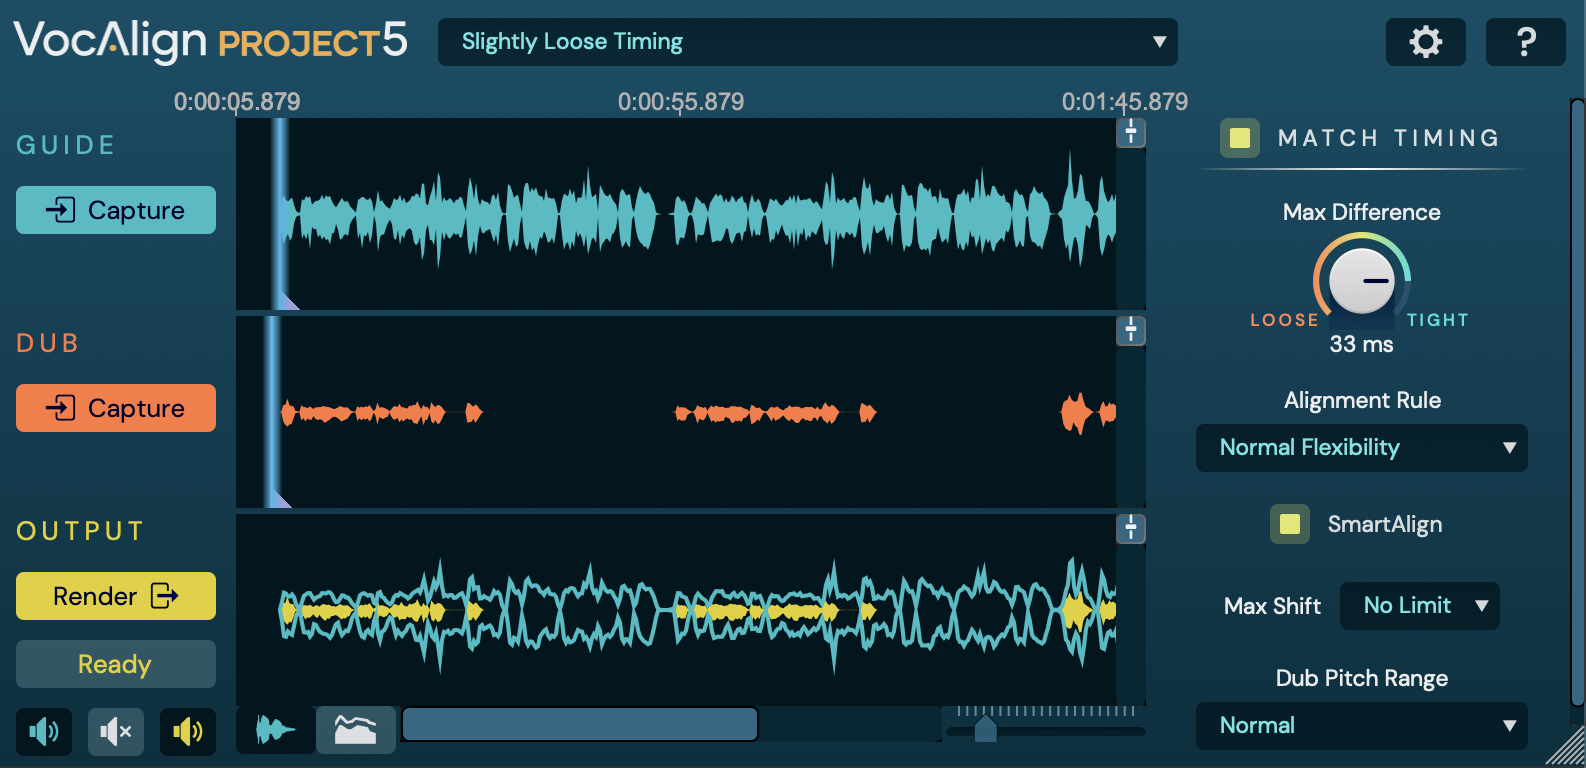
The Output display at the bottom shows the processed signal waveform overlaid with an outline of the Guide’s waveform for timing accuracy reference.
 |
NOTE: At this point, the audio has been processed but not yet returned to Pro Tools. |
- You can zoom in the time scale to see more detail by using the scale slider at the bottom or hold down your keyboard Option/Alt key and use your mouse wheel (or other equivalent). We have done so in the picture below.
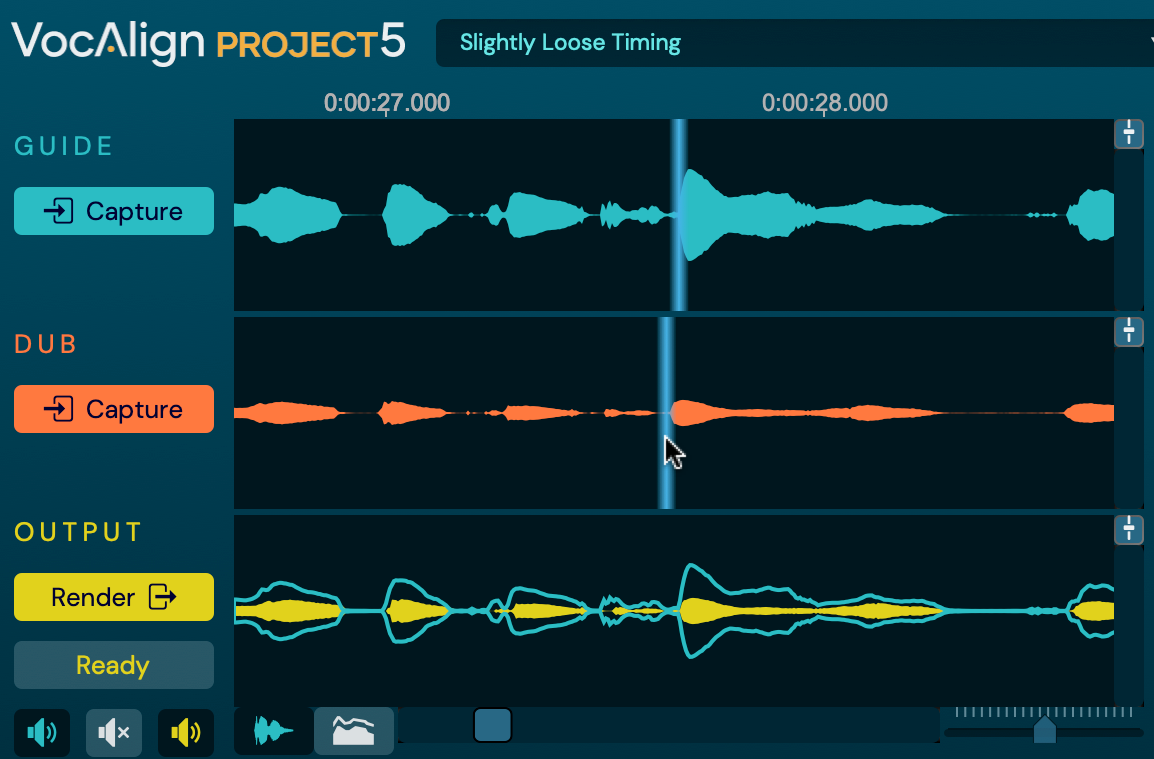
The light blue lines follow the mouse pointer along the Guide and Dub waveforms to show the calculated offset between matching features of the Guide and Dub that the settings are aligning. In the picture above, the Dub at its blue line starts ahead of the Guide at its blue line, but the output Dub (in Yellow) is shown aligned.
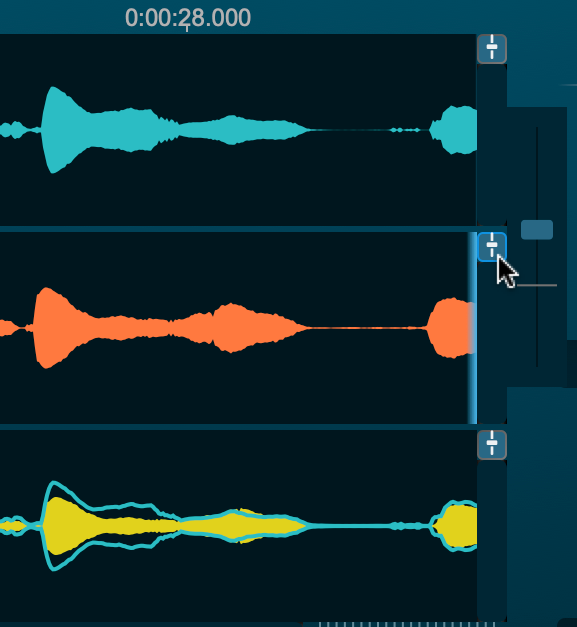
You can also change the vertical scale of each waveform by clicking on the "volume controls" at the right side of each VocAlign Project 5 track as shown below and move the pop-up slider up and down with your mouse to make it easier to see the waveform's alignment before and after.
Rendering and auditioning the Output in Pro Tools
-
You now have two Options for getting the processed audio back to Pro Tools:
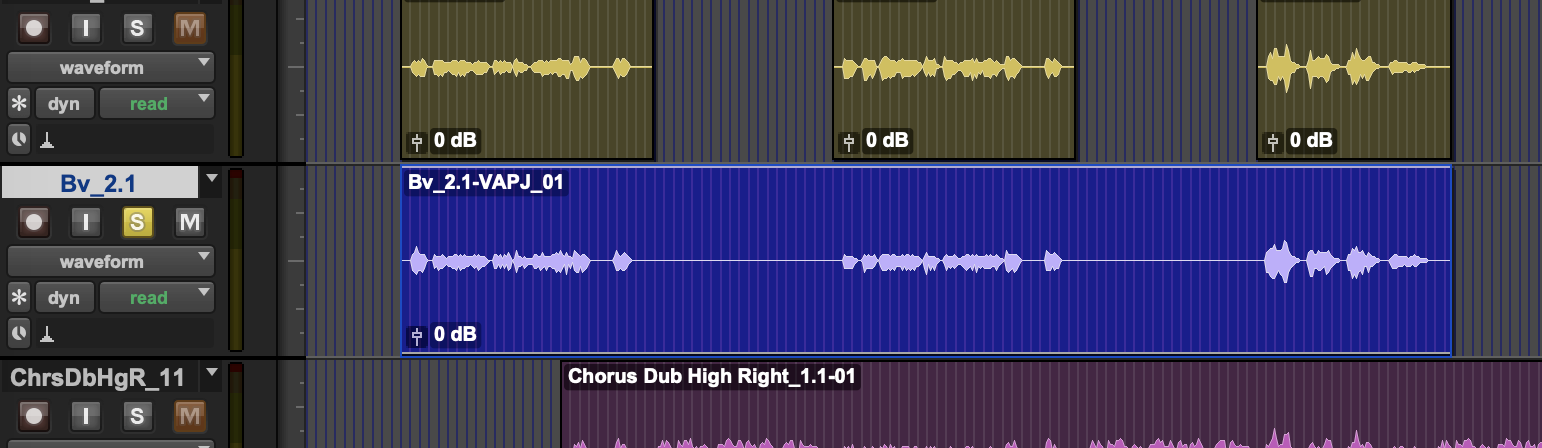
- Overwrite the original Dub Audio: If the Dub you captured in Pro Tools is still selected and If the Output (yellow) audio waveform in VocAlign Project 5 looks like it is matching the Blue outline of the Guide in the Output window, then you can press VocAlign Project 5's Render button to render the output over the original Dub in Pro Tools as shown below.
Note that the original name now has "-VAPJ_01" added as a suffix indicating it has been processed by a VocAlign Project AudioSuite plug-in. This has the advantage of using the Pro Tools track's plug-in processes that were active on the original Dub.
b. Or, before you press Render, select an empty track range in Pro Tools and select a small time-range in it with the Pro Tools selector tool, and then in VocAlign Project 5, press the Render button.
c. Optionally, you can set the Audio Suite Track Selector (showing "no track selected" in the bottom right of picture below) to select a destination track before pressing the Render button.

Once you have returned the processed Dub audio to Pro Tools, it can be auditioned with the Guide audio and/or other tracks to decide if the alignment is as required.
 |
CAUTION: Be sure to make the correct target track selection before hitting the Render button. Otherwise, it’s likely that you’ll still have a range selected on the Dub source track, which will be overwritten when the Render is performed. |
Auditioning using AudioSuite Preview in VocAlign Project 5
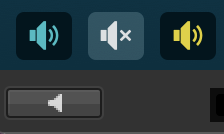
If, and ONLY IF, the captured Guide and Dub start markers are at exactly the same time in the VocAlign Project 5 interface, you can use the Pro Tools' AudioSuite Preview button (the tiny speaker at the bottom left of the plug-in) shown below, to audition the Guide and aligned Output together. Use the three colour- coded Solo buttons to hear any combination of the input and output signals. In the picture below, the Guide and Output signals will be heard and the Dub (middle) speaker is shown off, so the original Dub will not be heard.
Modifying the Alignment
Once you have auditioned the Dub, you might decide you would like it to have tighter or looser alignment, or perhaps less time compression and expansion that make the output sound aligned but slightly unnatural. There are a few controls that you can use to try and create a different result, but the alignment algorithm sometimes won't change as much as you might expect and you have to experiment a bit.
The main controls are shown below. The Presets will set these for you, but you can always change them and the Dub will be reprocessed and you may need to return it to Pro Tools to audition it.
The descriptions below will be brief and you can read more about these topics in the section Using VocAlign Project 5.
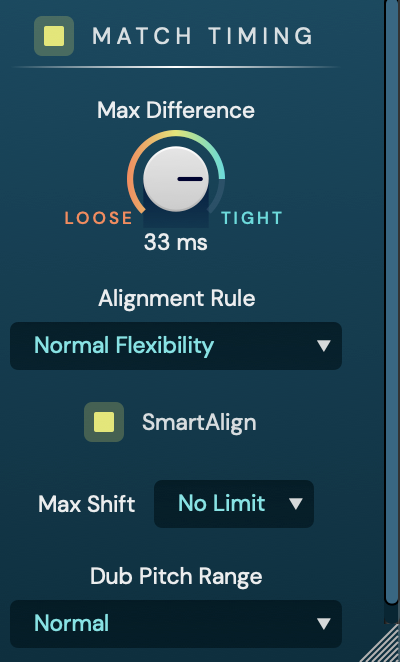
Match Timing
The one control that will always make a difference is the Match Timing switch at the top of the control section. If you turn it OFF, no processing will be applied; i.e. the Output audio will be the same as the Dub input. You can use this for A/B comparisons, but if you can't use the AudioSuite Preview buttons (as described above), you must Render each output to Pro Tools to audition it.
Max Difference
You can also adjust the Max Difference control to tighten or loosen the timing alignment. With each change, the Output is reprocessed and the Output waveform redrawn, and you can audition it as described above.
Bear in mind that the alignment process will NOT make a signal looser than it was originally - only tighter.
Alignment Rule
This setting tries to controls how much time compression and expansion is allowed when aligning, and the analogy used is thinking of time like a spring which can be stiff or flexible. The more flexibility, the more automatic editing can take place. The less flexibility, the fewer the edits to the audio.
SmartAlign
This is the newest feature in Synchro Arts' alignment products and is turned on in most of the presets you will use. It means you don't need to worry about pre-selecting or aligning your Guide and Dub audio. However, in Pro Tools, it is easy to select Guide and Dub sections that do start and end at roughly the same times, but keep SmartAlign.
If you do have an alignment problem where starts and ends don't match, you can turn it off and see if that helps, but in most cases it will.
SmartAlign Off Example
Below, we show capturing two separated sections of a Dub ("Chorus Lead Dub") that starts much later than the Guide ("Tiny Heart Tuned Lead Vocal"), that SmartAlign would work with correctly. But we turned SmartAlign turned OFF, as shown. You can see the Dub has now been pushed to the left to start where the Guide starts and both sections are not aligned correcty, which is not what you'd want.
You can fix this by doing two things, which might give results that are similar to Smart Align - but also might be slightly different.
- Move the Guide start marker to the right to closely match where the Dub start marker is so the audio at the start of both is similar.
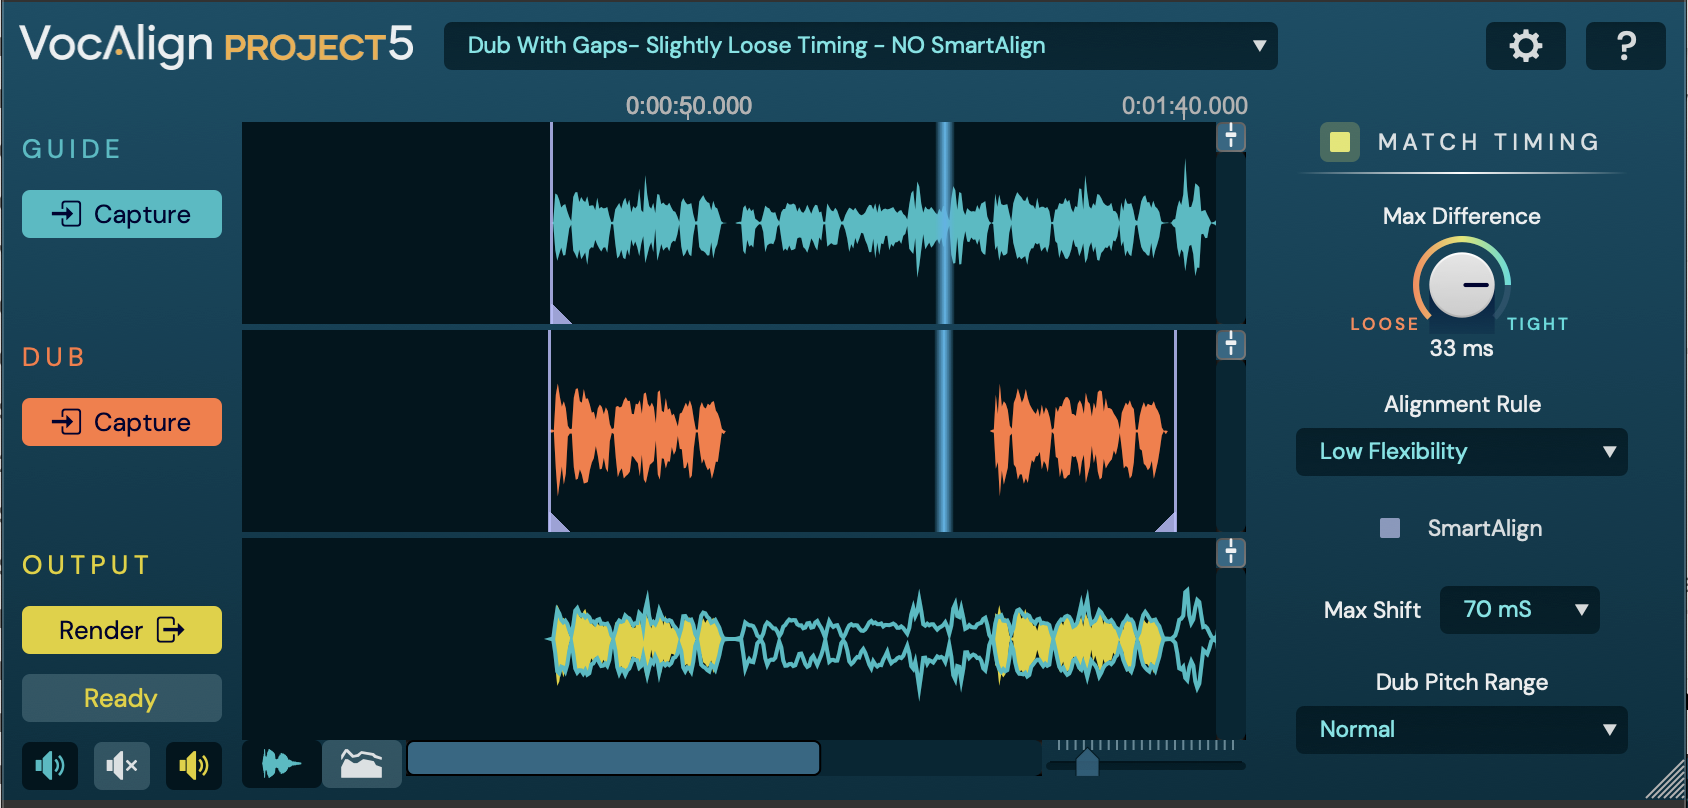
- Select the Preset "Dub with Gaps- Slightly Loose Timing" (which has SmartAlign OFF).
You will get the correctly aligned results shown below and can also modify the alignment settings if you want further adjustments.
|
|
TIP: To store any modified control changes to use again, click the Preset dropdown menu and save them as a User Preset. Give the Preset a name that tells you what is special about it. |
Audition the end result
If you have time aligned all the tracks to the Guide, and returned them over the original tracks, you can play them all together to hear the vast differerence you will have made with VocAlign Project 5 in a very short time.
CONGRATULATIONS!!
And finally…
There's always more to learn, so head to the sections of the full User Guide at the left in the Using VocAlign Project 5 folder, for much more information on VocAlign Project 5's controls and displays, and for the latest videos and tips, click this link: VocAlign Project 5 with Pro Tools.