VocAlign Ultra QuickStart for DAWs using VST3 plugins
- Quick Start for VST3-compatible DAWs
- Overview
- Installation and Initial Setup
- Two Versions of VocAlign Ultra VST
- Using the VST3 ARA version of VocAlign Ultra
- Using the real-time VST3 version of VocAlign Ultra
- More details on saving my output audio
Quick Start for VST3-compatible DAWs
Studio One, Cubase, Nuendo, Ableton Live, Reaper, Cakewalk
For OTHER DAWS you can check here for an up-to-date list of DAWs compatible with VocAlign Ultra
Overview
In this Quick Start Guide, you will learn how to set up your VST3-compatible DAW and the VocAlign Ultra plug-in to be able to load audio into VocAlign Ultra, process it, and return the processed output to your DAW.
What about my DAW?
We will show how this VocAlign Ultra works using Studio One as an example.
However, very similar procedures apply to Cubase, Nuendo, Live and many other DAWs using VST3.
 | IMPORTANT: Whenever there is a difference in operations from Studio One and the other DAWs listed, we will provide links to EACH DAW's specific instructions for you to follow, after which, you will be returned to this main section to continue to follow the instructions in Studio one, but common to all DAWs mentioned. |
If you are new to our products, the audio transfer procedures might seem more complex at first than other plug-ins.
This is because you have to tell VocAlign Ultra which track is the Guide and which track(s) are the ones that need their timing and/or pitch adjusted by VocAlign Ultra to match the Guide's.
We won’t go into details in this Quick Start about the control panels or displays, as those will be described in detail in the sections in the folder Using VocAlign Ultra.
One last note - because we started long ago in the film industry, we call audio to be modified and output the “Dub”.
Installation and Initial Setup
| | To continue, you will need to have downloaded, installed and authorised the VocAlign Ultra plug-in on your computer. If you haven't done all of these, go to Installation and Authorization for instructions. |
Ready to go? Let's get a sample session to work with.
Click the Download link below for your DAW:
- STUDIO ONE - Download Song
- CUBASE / NUENDO - Download Session
- LIVE - Download Session
and then load the Session/Song into your DAW.
Two Versions of VocAlign Ultra VST
VocAlign Ultra loads as a VST3 plugin in Studio One, Cubase and other VST-compatible DAWs.
Two different versions are loaded.
- VocAlign Ultra VST3 (Real-time capture)

|
This should run in most DAWS that support VST3 Side-chains. |
- VocAlign Ultra VST3 (ARA)
| | This will only run in more recent VST3 DAWS which will be listed in instructions below. |
The two plugins both feature the same processing controls, presets and parameters, and are identical in terms of the end results they deliver.
They differ only in the way audio signals are brought into VocAlign Ultra and how the Output is returned to the DAW.
Remember, not all DAWs support ARA, so you may only find the VST3 (Real-time capture) version in yours.
- The VST3 (ARA) plug-in is applied in most VST3 DAWs to "events"/"Clips"/"Segments" etc. that you want to process in both Guide and Dub tracks, and the user “Captures” the digital audio directly as the designated Guide or Dub in an "instant transfer” process. However, in other DAWs, you will apply it in a track.
- It's important to understand that the ARA version loads as a single 'extension' in the host DAW, and although it might appear that you're adding the plugin to each discrete event or region being processed, you are in fact adding those events or regions to the same single instance of VocAlign Ultra ARA.
- We recommend using this approach if your DAW supports it.
- The main advantages of this approach are that the capture is faster than real-time and you can bounce the processed audio to disc.
- A disadvantage is that the bypass function does not work in the ARA version, but it works in the VST version.
- The VST3 (Real-time capture) plug-in version is a track insert plug-in and involves making a real-time playback to capture both the Guide (as a side chain input) and the Dub simultaneously.
- The main advantage of this approach is that you can start and stop the capture of Guide and Dub at any points in your session.
- The main disadvantage is that if you export the Output to replace the input Dub it removes the plug in and there is no undo to restore the plugin to modify the processing.
For more detailed comparisons between these two approaches, go to this section VocAlign Ultra Plug-in Versions and DAWs.
If your DAW only supports the VST Real-Time Capture click Using the VST3 Real-time version of VocAlign Ultra
Using the VST3 ARA version of VocAlign Ultra
[Updated video for VocAlign 1.1 in Studio One with SmartAlign workflow forthcoming]
This section explains how to use VocAlign Ultra as an ARA plug-in with audio editors that support ARA.
Because ARA is relatively new, sometimes only newer versions of DAWs will support this method. Your DAW instructions will probably make it clear that yours has this feature.
For most audio editors such as Studio One or Cubase Pro, VocAlign Ultra needs to be added to each clip of audio (Audio Event) as an effect (Event Fx), whereas others such as Reaper, VocAlign Ultra can also be added as a track effect (Fx).
|
|
The steps below describe how to use VocAlign Ultra as an ARA plugin in Studio One. The steps for using VocAlign Ultra with the other DAWs are identical, apart from Step 2, which describes how to add VocAlign Ultra to an Audio Event in Studio One (i.e. a region, clip, segment of audio in other DAWs. |
Define the audio to process
To follow these instructions, make sure you have downloaded and opened the session for your DAW described above if listed.
1. We want to align the out-of-time Lead Vox High Chorus double track with Lead Vocal, so Lead Vox High Chorus is our Dub and Lead Vocal is our Guide. First, we need to load VocAlign Ultra ARA. Here, we'll show you how to do that in Studio One, but to learn how to add VocAlign Ultra VST ARA plug-in to
- Cubase/Nuendo - click here
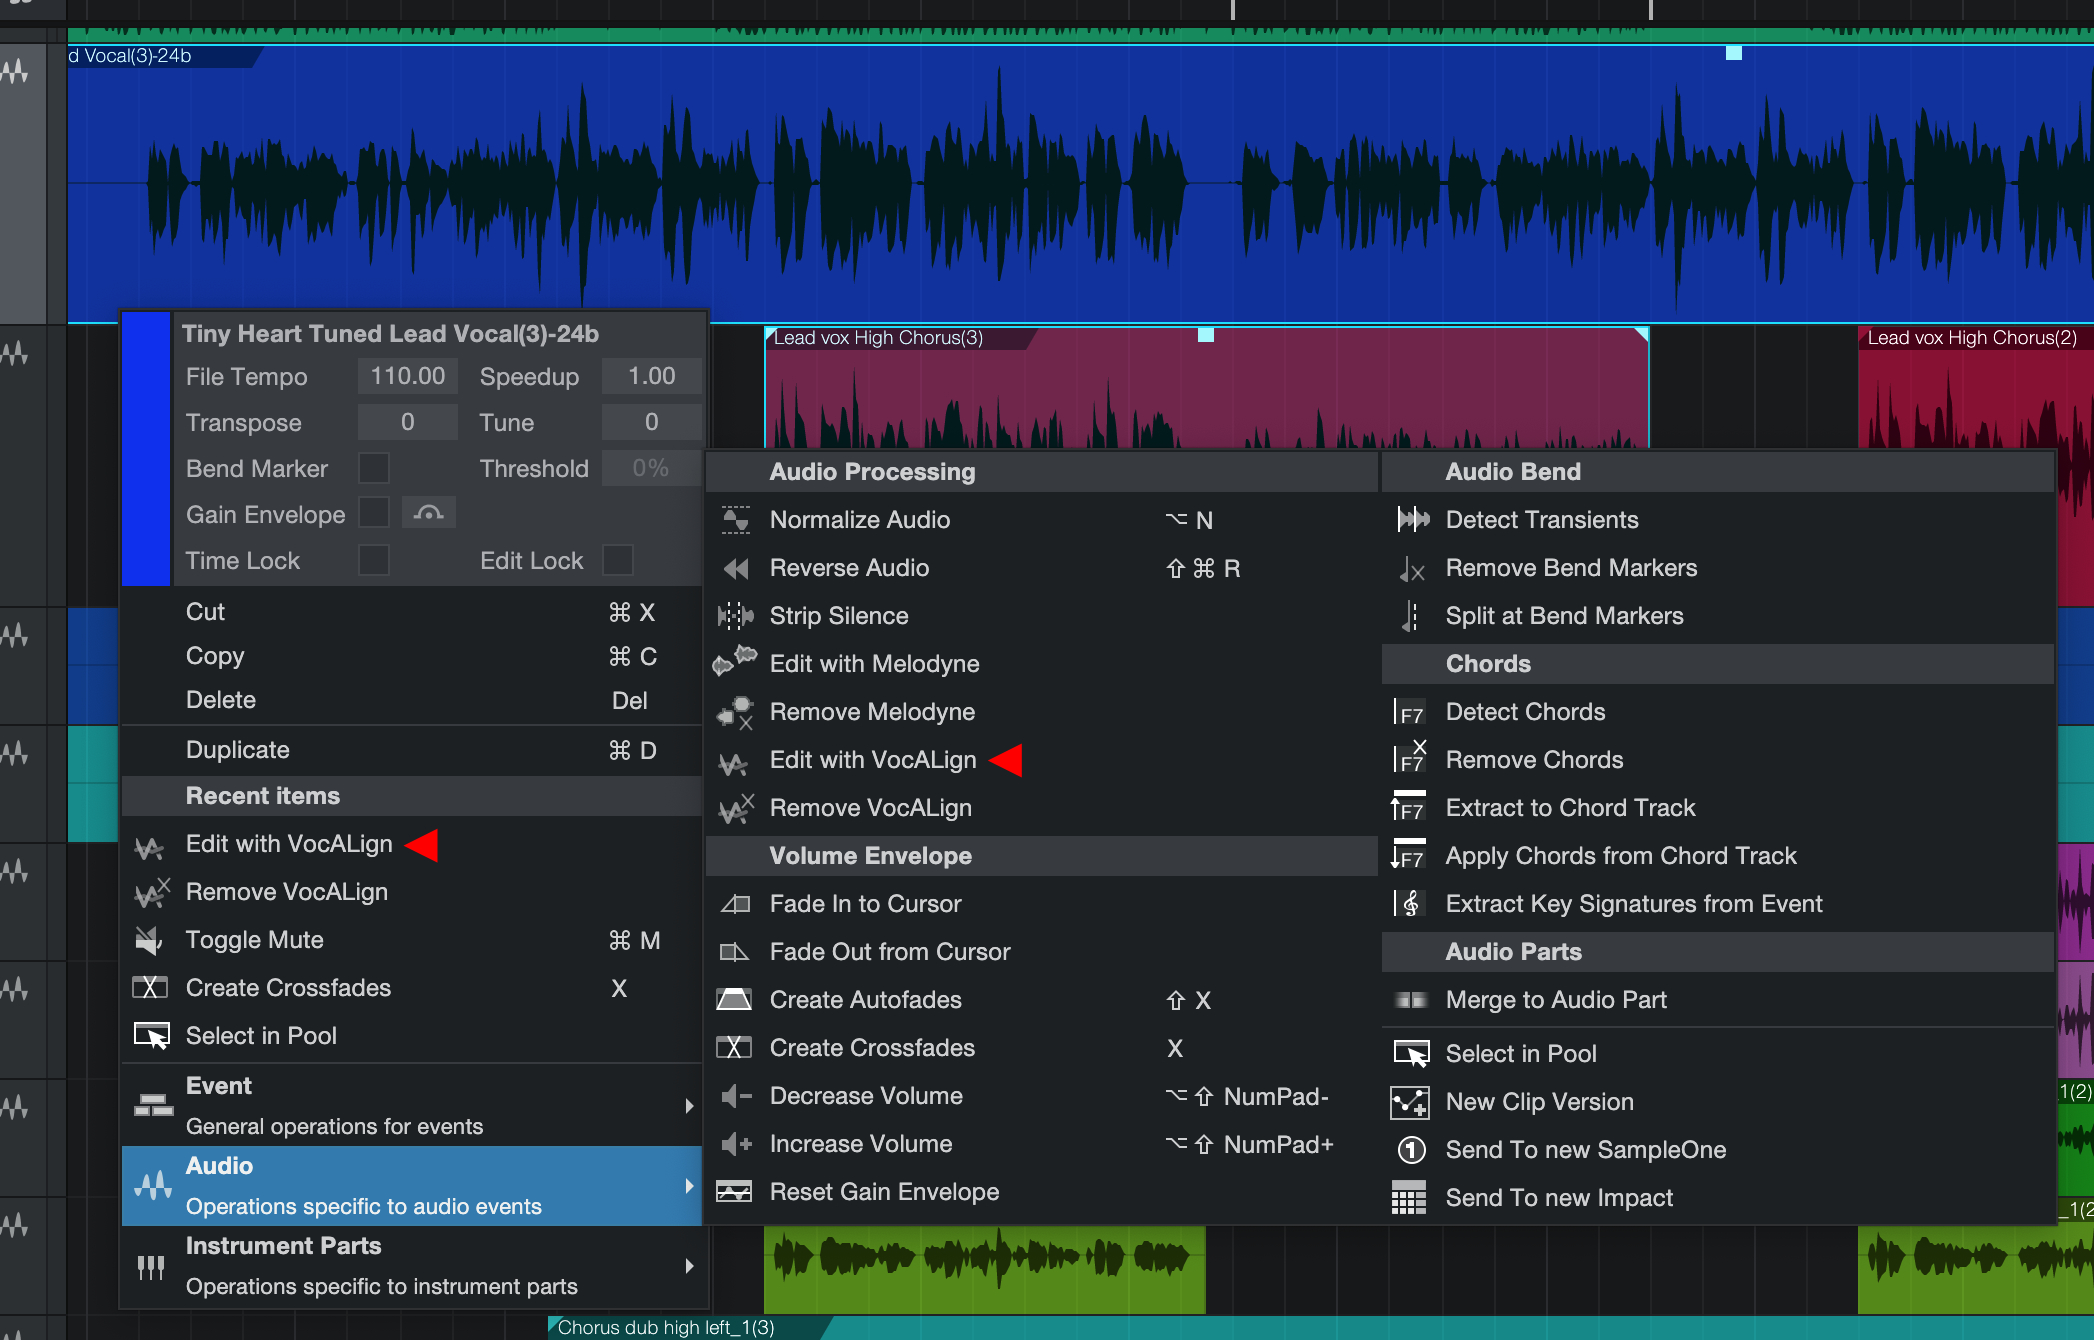
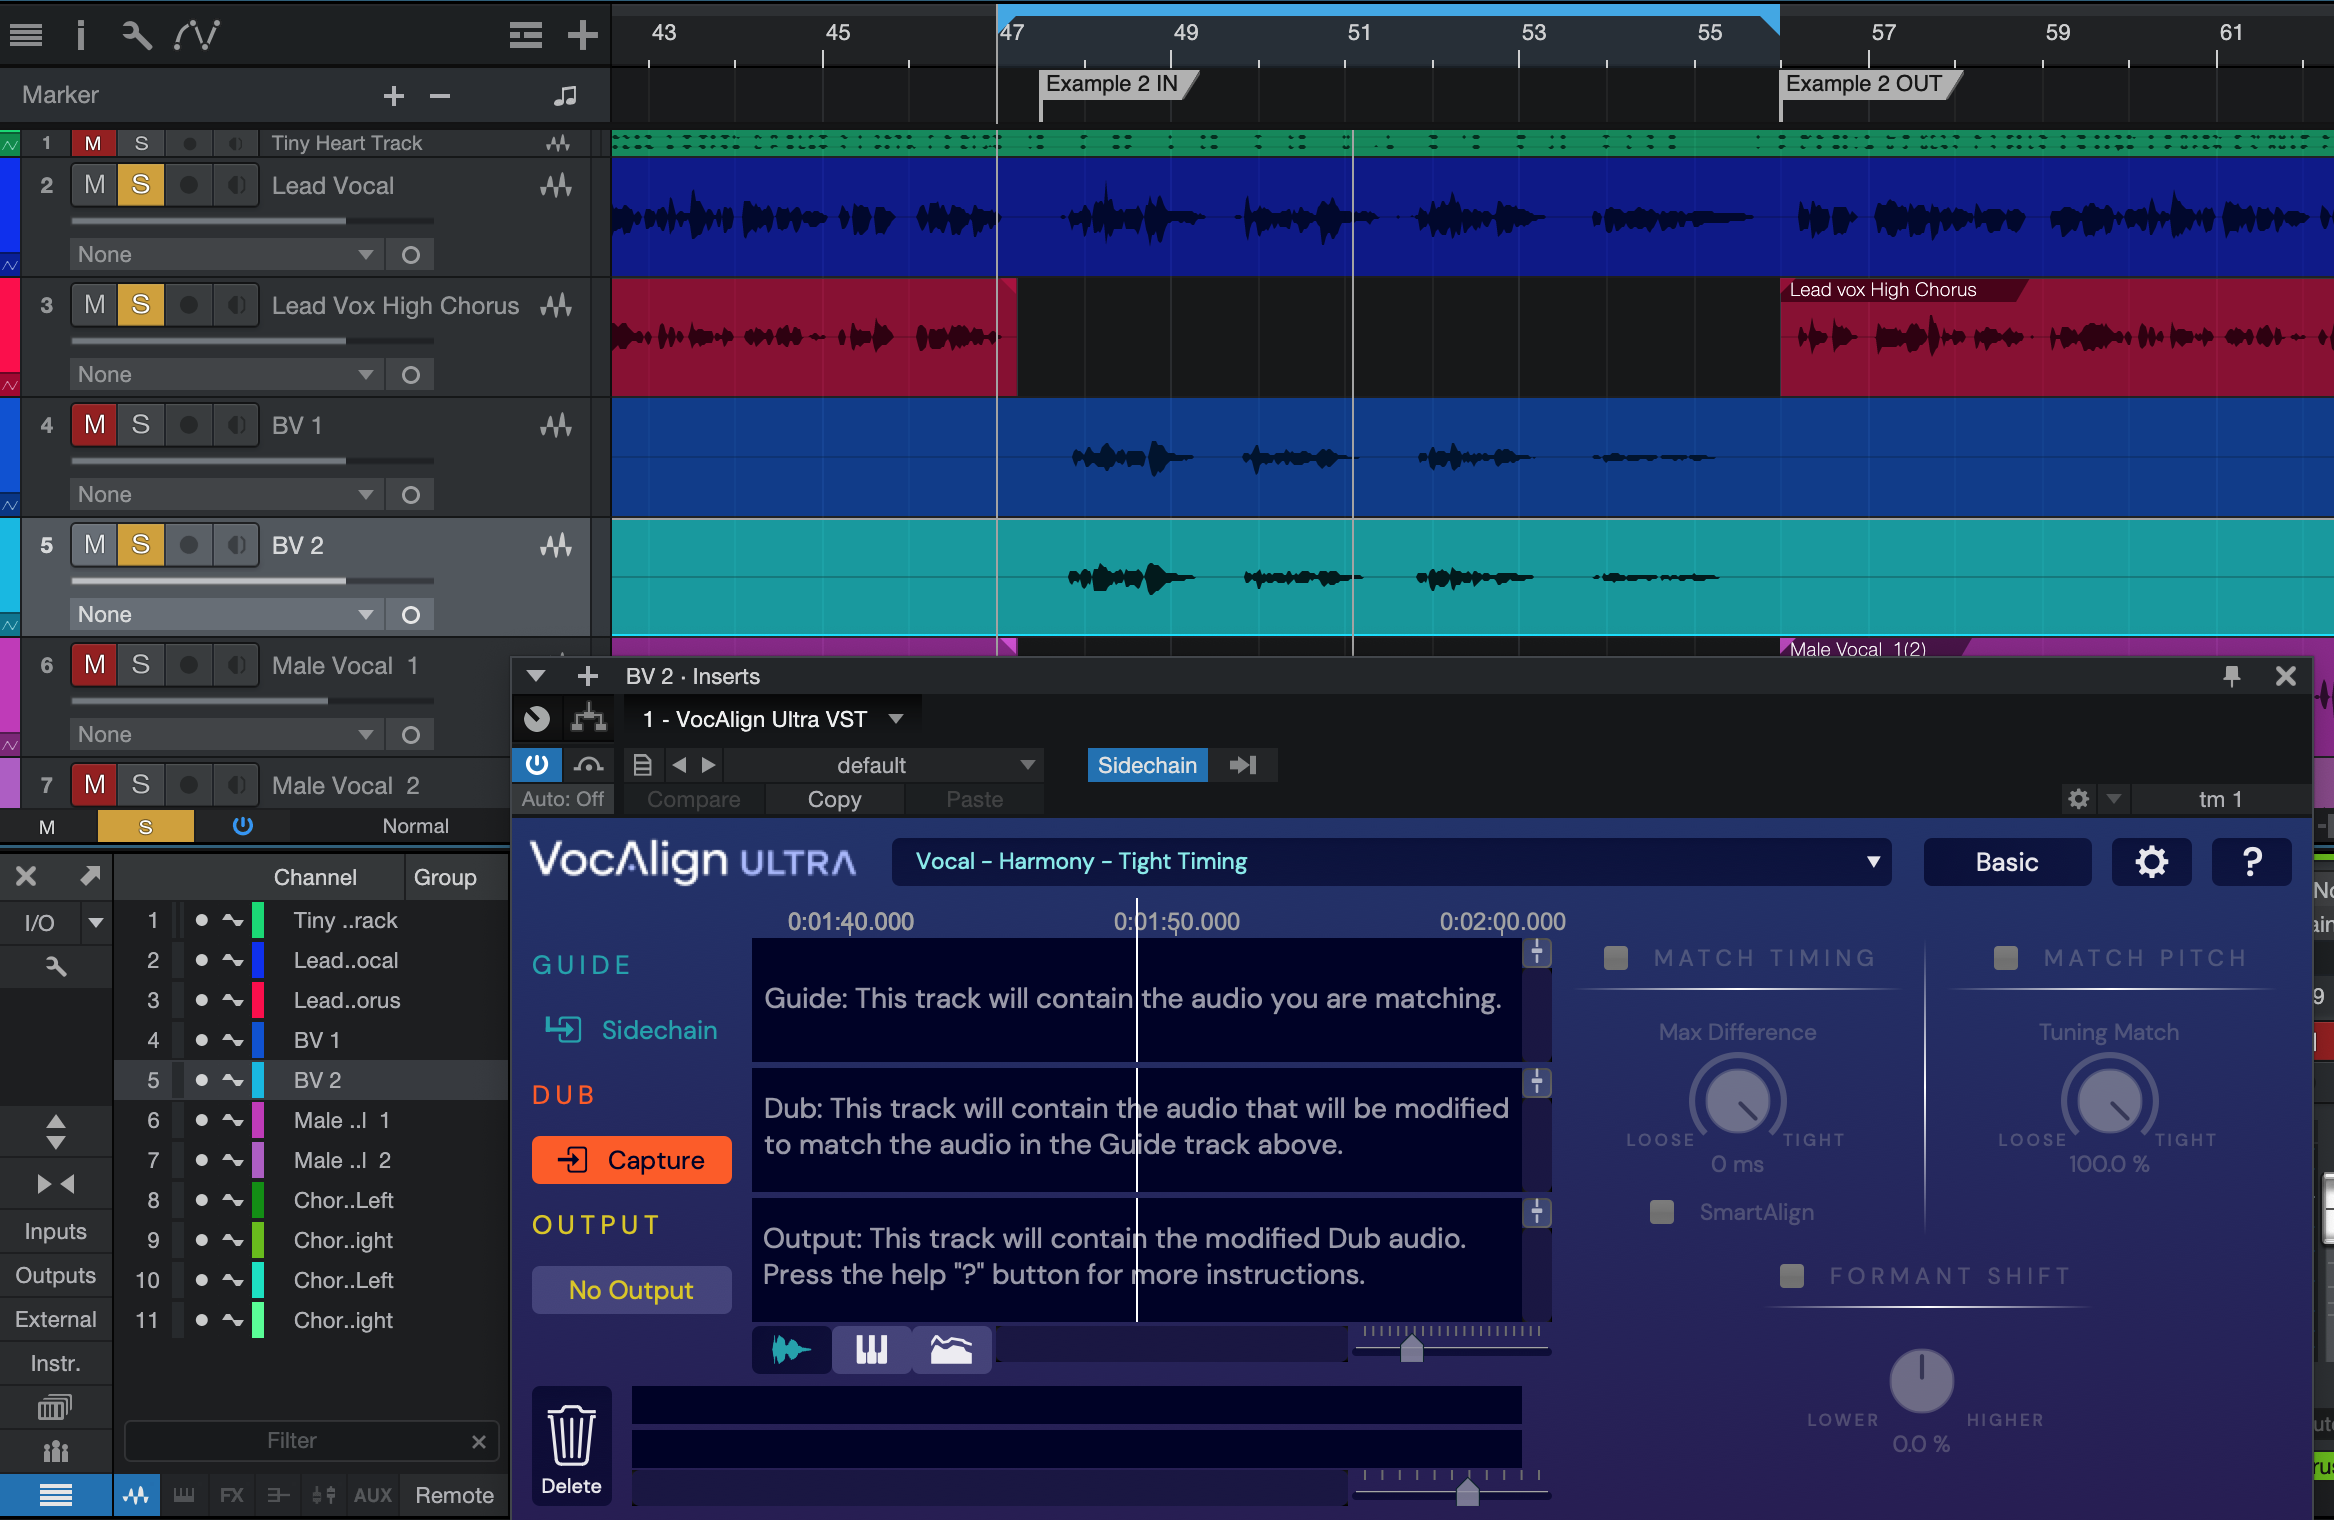
2. In Studio One, VocAlign Ultra is added to Audio Events as an Event FX.
| | If Studio One Professional 5 does not show the Edit with VocAlign command in the Audio menu after installing VocAlign Ultra, please update to Studio One version 5.1.2.62686. The Edit with VocALign command will appear in the Audio menu and VocALign Ultra will respond to it. In Studio One Professional 4, you can still use VocAlign Ultra as an ARA plug-in: hold down the Option key on your computer keyboard and drag the VocAlign Ultra VST plug-in from the Effects Browser onto all the selected Audio Events you want to process - Guides and Dub(s). |
Select the Guide (Lead Vocal) and Dub (Lead Vox High Chorus) Audio Events in Studio One.
Then, depending on what version of Studio One you have, from Studio One’s Audio menu, select Edit with VocAlign, or drag the VocAlign Ultra VST plugin onto any selected Audio Event from the Browser while holding down the Option key.
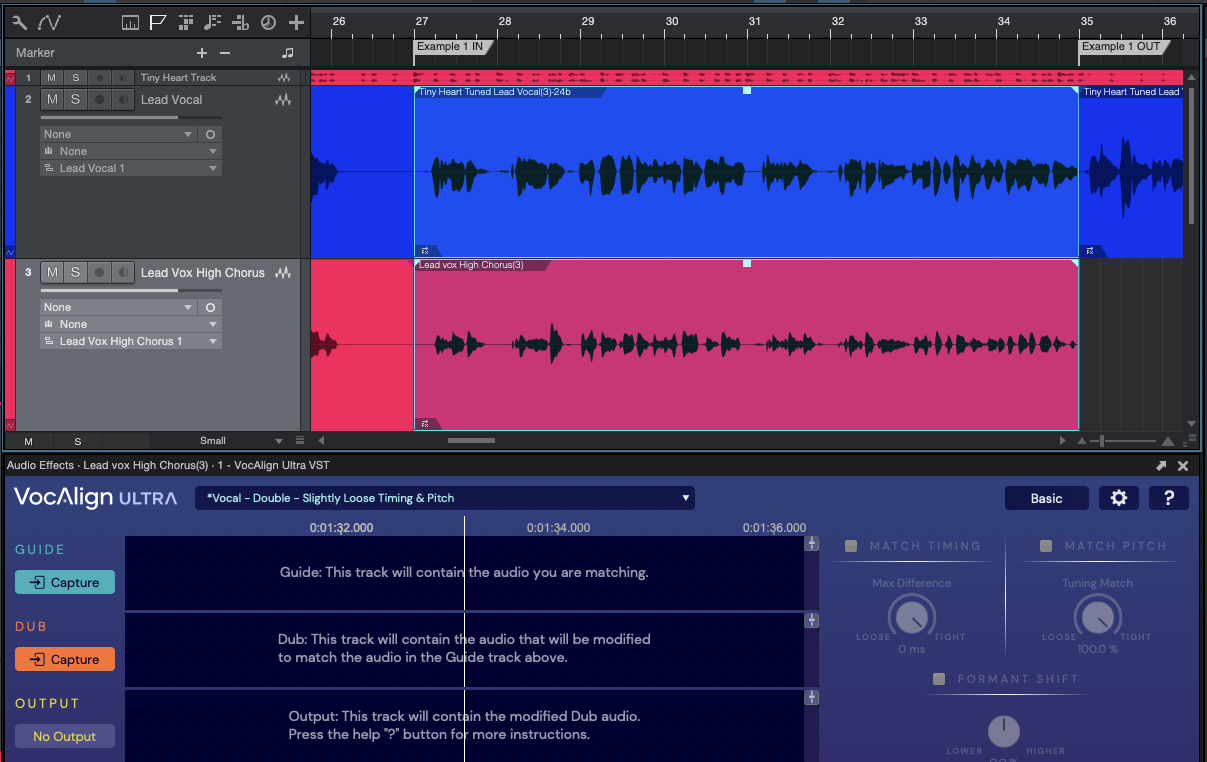
This will add VocAlign Ultra to both selected Audio Events, and selecting either of those Audio Events will open the VocAlign Ultra interface in the Studio One Edit panel.
2a. If you are not using SmartAlign, do the following before moving to step 3:
- Solo the Lead Vocal and Lead Vox High Chorus Tracks if you like, and set your DAW’s Cycle range from bar 27-35 to loop the section you’ll be working on.
- Split the Lead Vocal region at bars 27 and 35, and the Lead Vox High Chorus region at bar 27 to isolate the required sections.
| | NOTE: We've only capturing a single Dub here, but with ARA you can capture multiple stacked Dubs at the same time which will initially be processed by the same Preset. This will be detailed in the main User Guide. |
How to Align a Double
(Remember, we’re using Studio One as an example, but the steps taken to process the Dub audio are now exactly the same in all other VST3 ARA plugin hosts.)
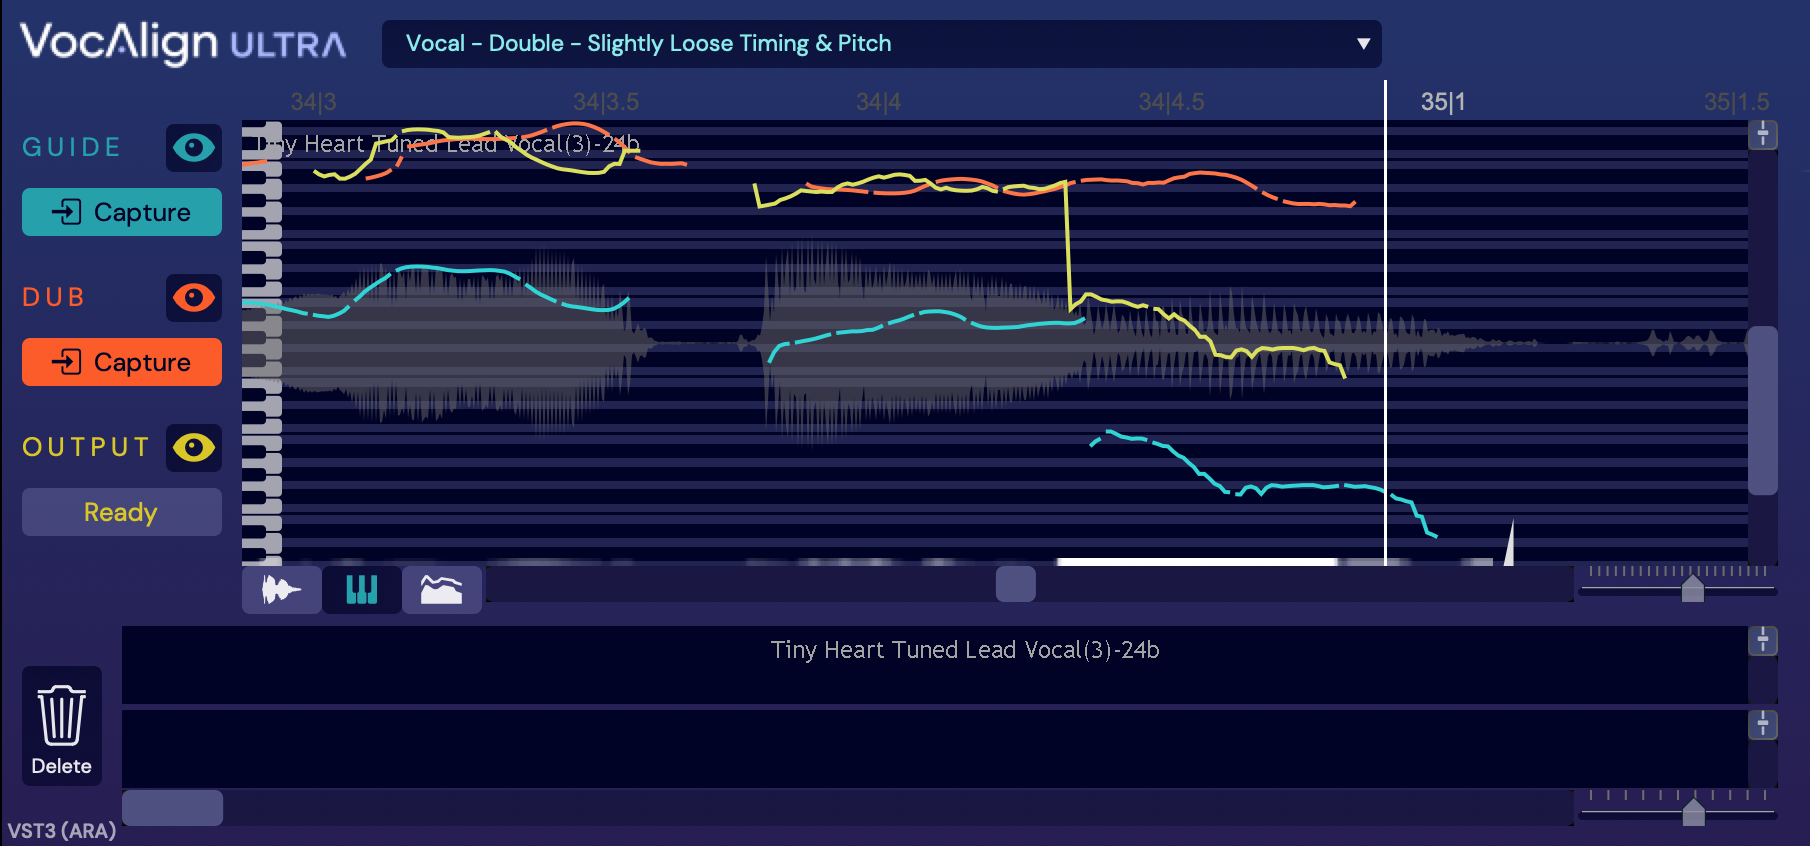
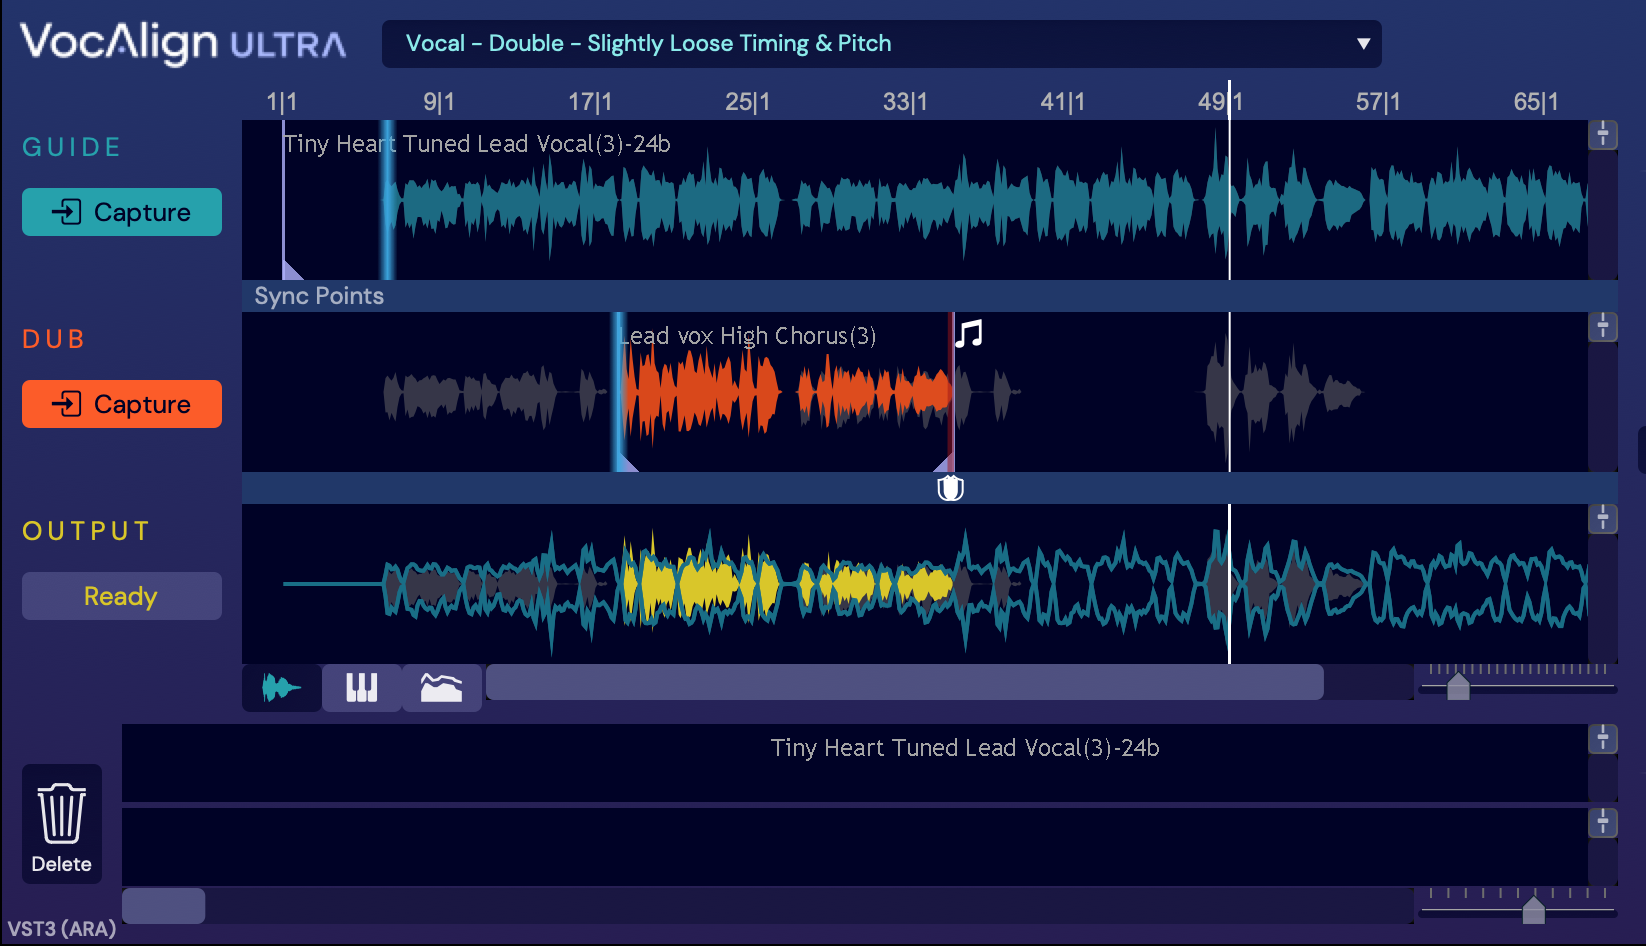
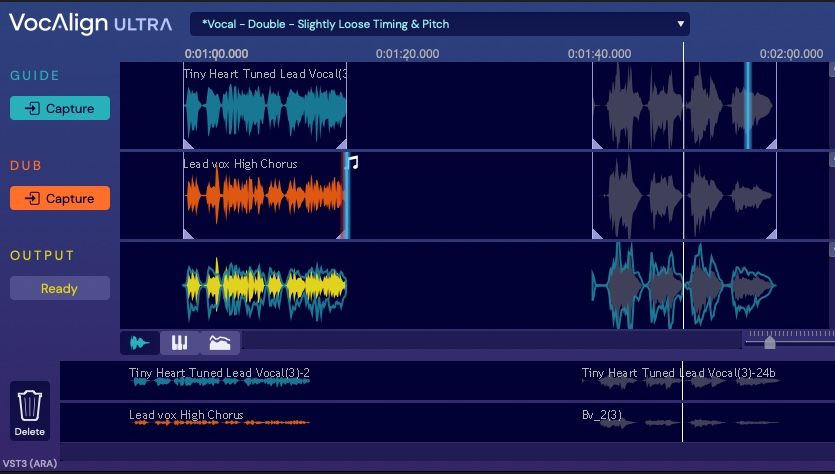
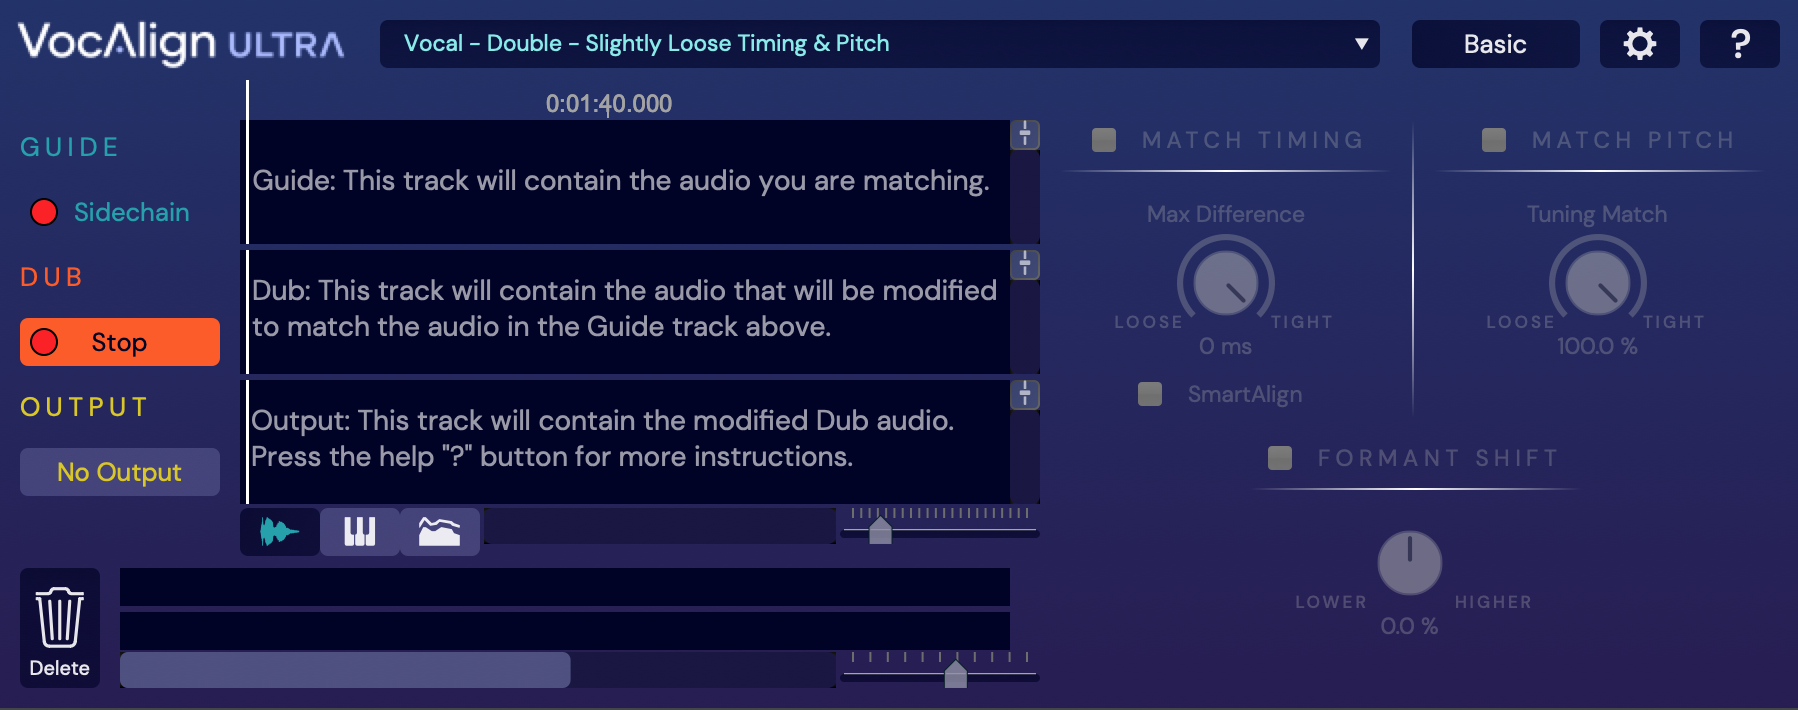
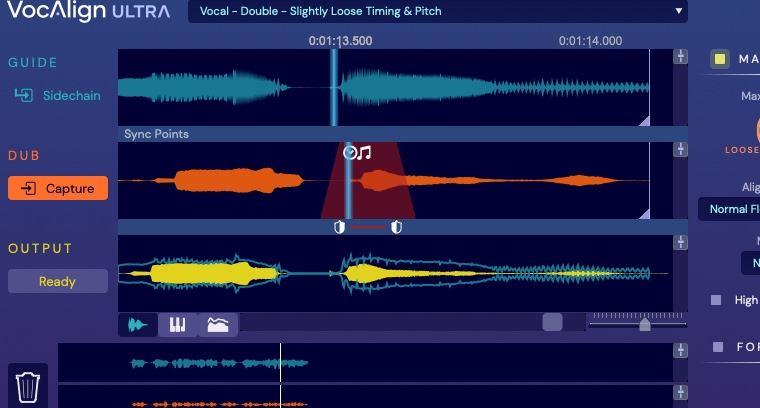
3. In VocAlign Ultra, select the Preset Vocal > Double > Slightly Loose Timing & Pitch .
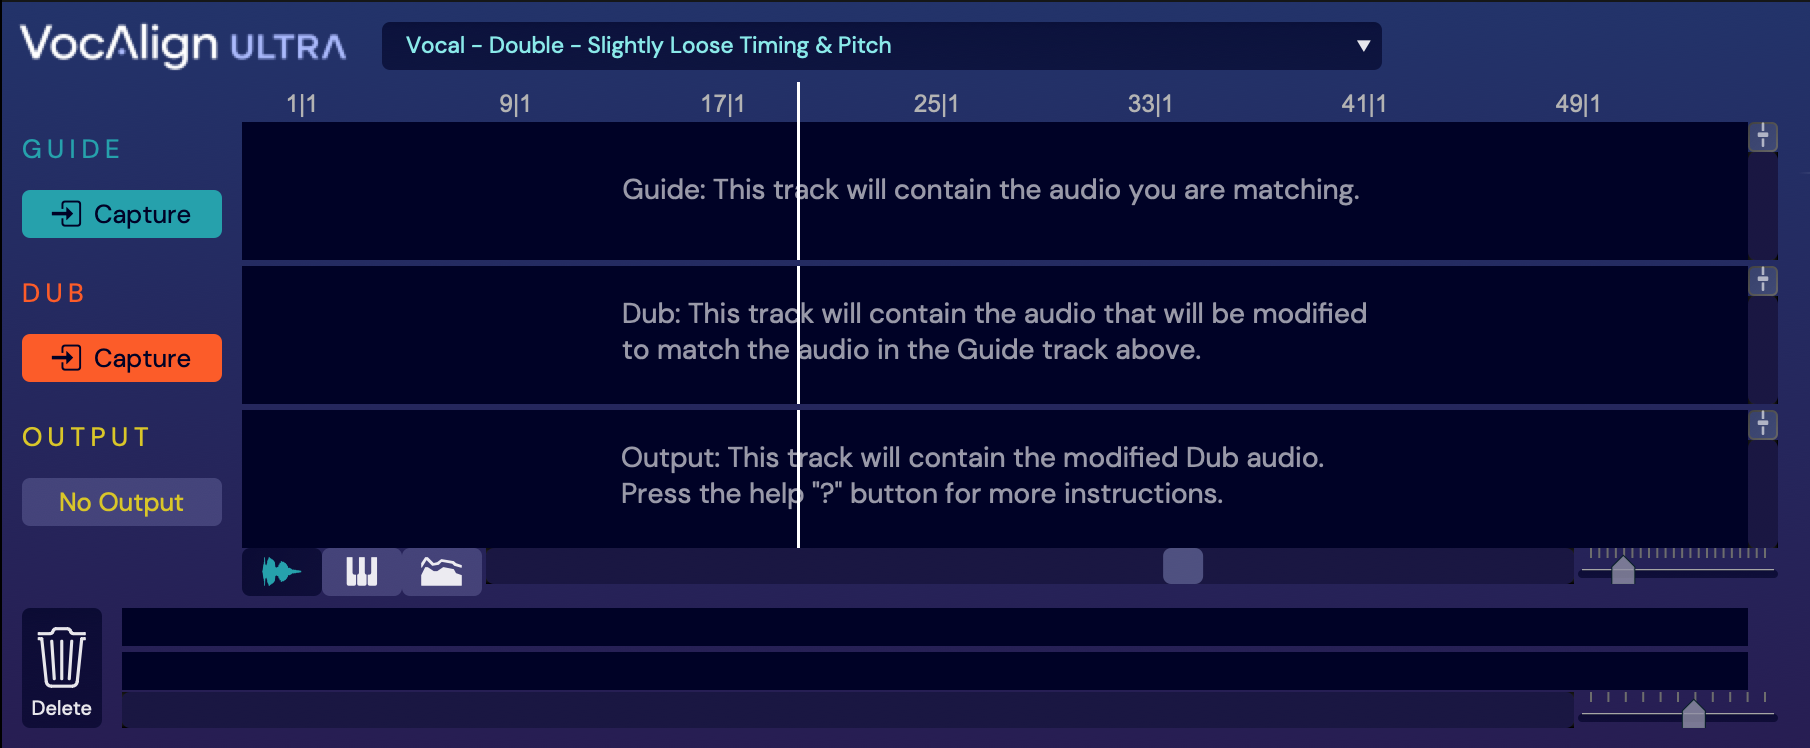
![]()
4. Next, in your DAW, select the Guide audio – that’s the Audio Event (Clip, Segment, etc.) on the Lead Vocal track.
|
|
If you are working with a preset that specifies SmartAlign OFF or you have disabled SmartAlign, the Guide Audio Event (Clip, Segment) must match the start and end time of the Dub. We prepared this in step 2a. |
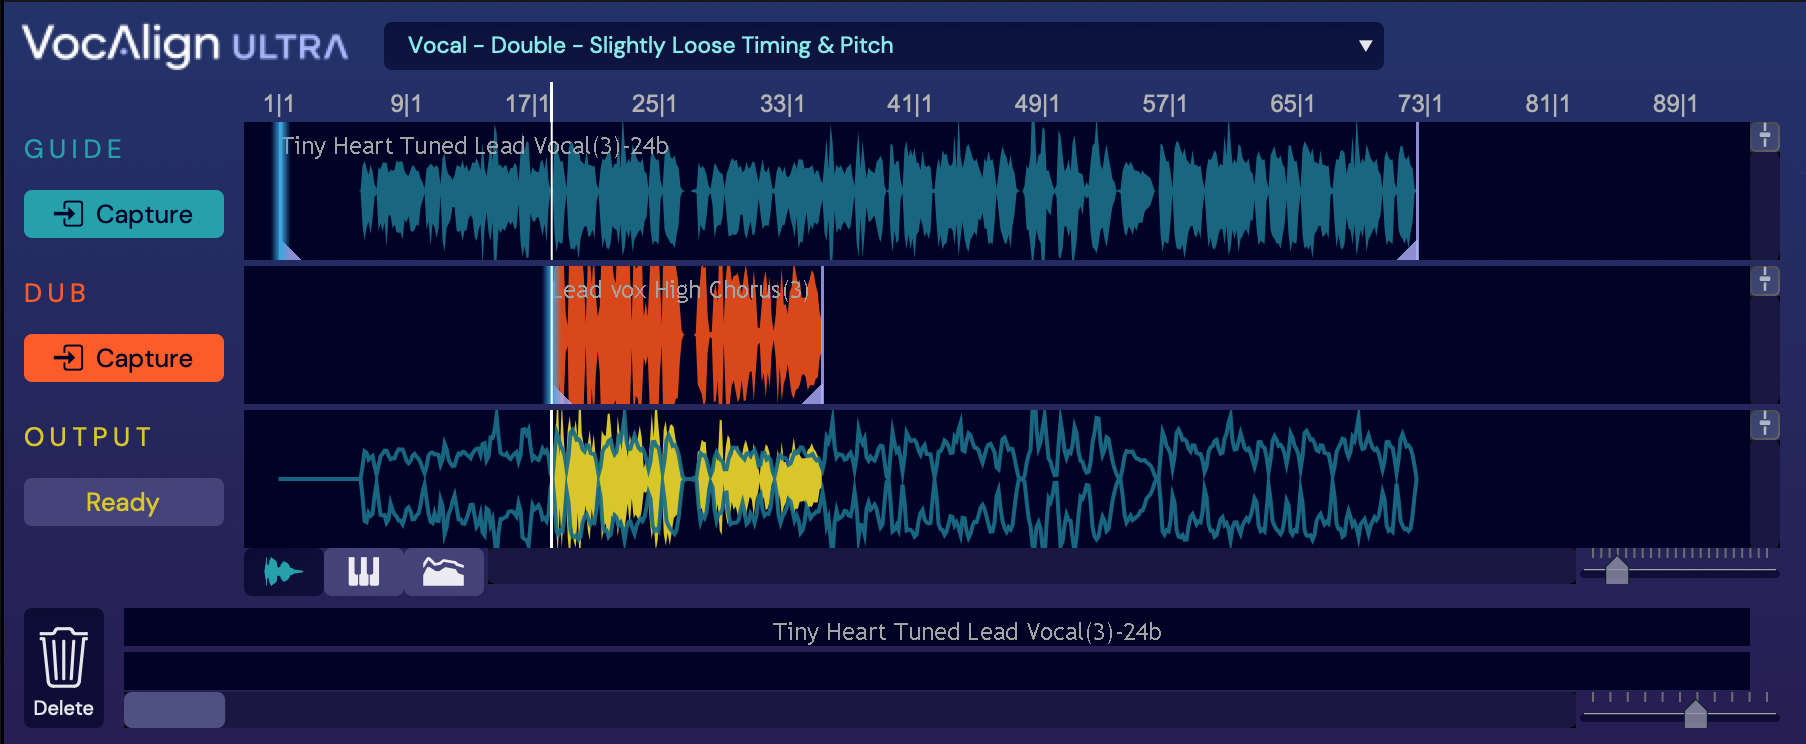
Then press the Guide Capture button.
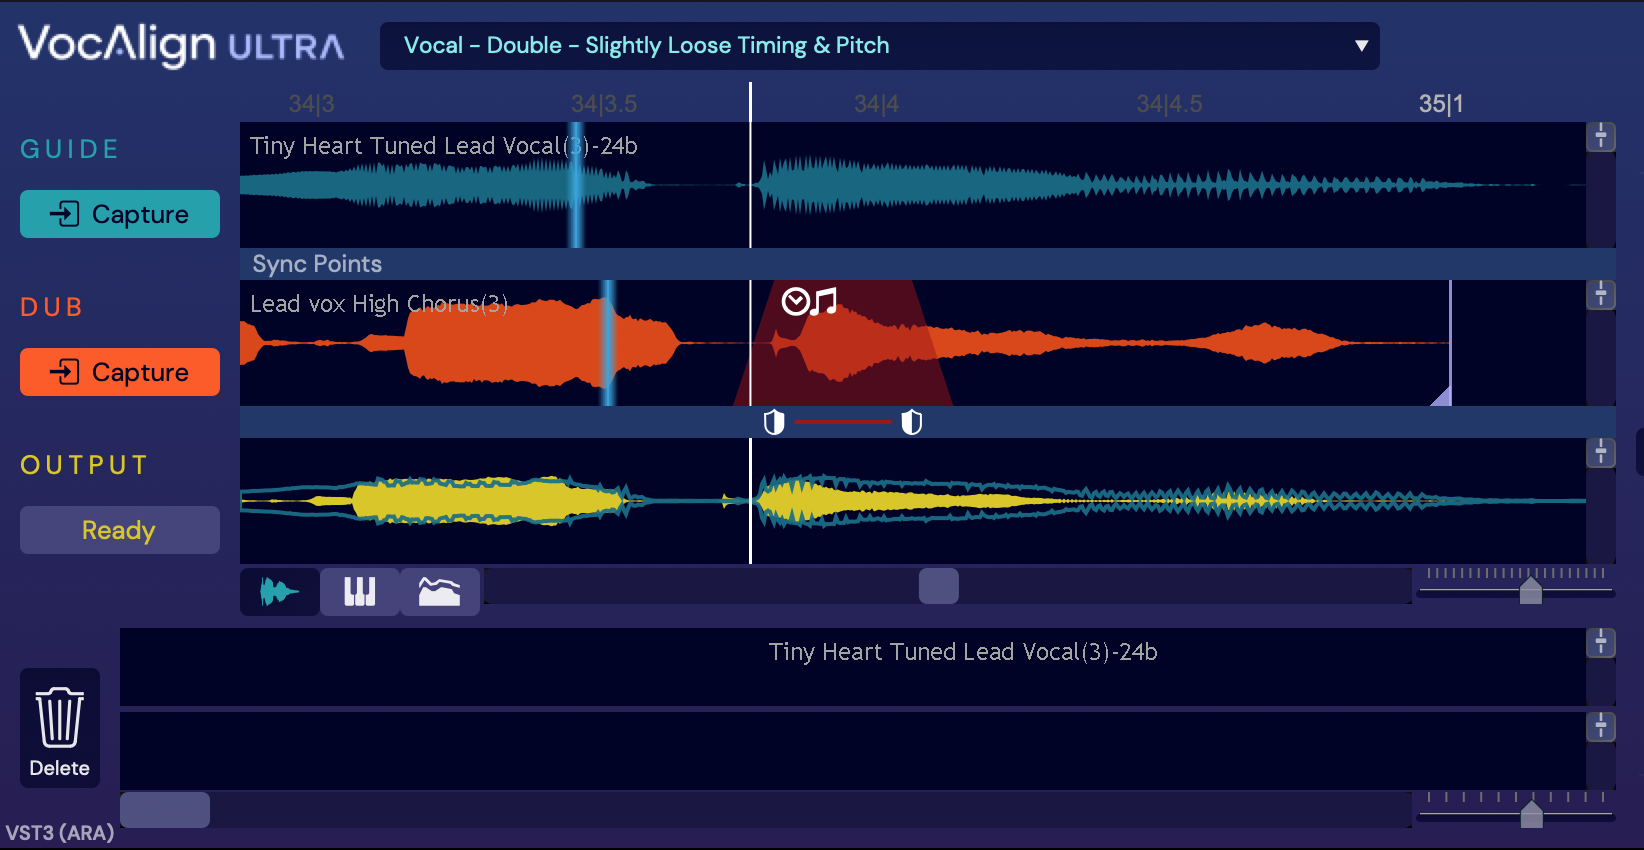
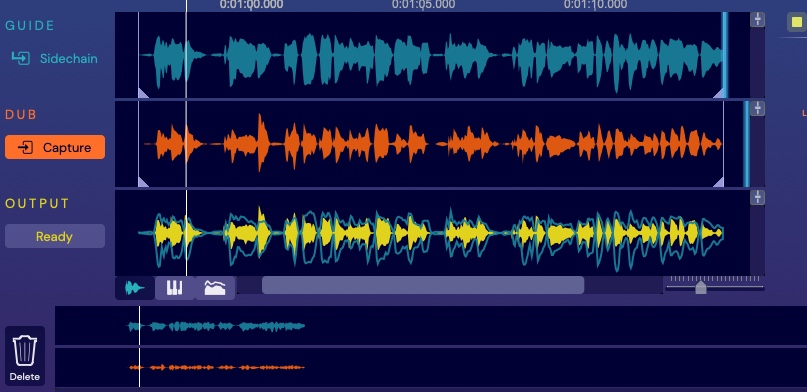
The audio waveform will appear in the Guide section and an outline will appear in the Output track for comparison with the Output, when it is created.

5. Select the corresponding Audio Event on the Lead Vox High Chorus Track. The press the Dub Capture button.
The Dub waveform appears in orange in the Dub section, and VocAlign Ultra automatically processes the Dub to the Guide and creates the aligned Output, represented by the yellow waveform in the Output section.
Start playback in your DAW to hear the Lead Vox High Chorus track play the aligned Output signal from VocAlign Ultra.
6. Because we’ve chosen an input with ‘typically’ uncertain pitch in a few places (ie, vocal ‘creaks’ at the end of some phrases), when VocAlign Ultra makes the Dub match these areas of ‘incorrect’ Guide pitch, it will affect the Output at these points.
We can fix these by creating Protected Areas within the Dub. These are areas that maintain the original Dub’s pitch, timing or both.
The most audible anomaly in our example happens in the word “again” at the very end of the phrase.
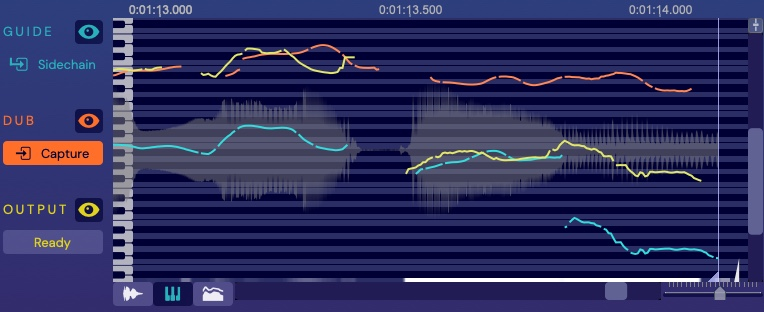
For a visualisation of the signals' pitches, switch to the Pitch Profile View by clicking the keyboard button below the main display, and zoom in on the very end of the Dub. Use the vertical slider at the right of the display and the Scale control above it. You’ll see the Guide (blue) pitch shows an octave drop when it gets ‘creaky’, which affects the pitch quality in the Output signal (the yellow trace).
You can see the issue if you toggle the Match Pitch button off and on and the last section of the Output will jump between the natural pitch of the Dub and the incorrectly aligned pitch.
7. Double-click in the Pitch Profile display at the start of the pitch drop to set the playback head at that point, then switch back to the Waveform view by clicking the waveform button next to the Pitch Profile keyboard button.
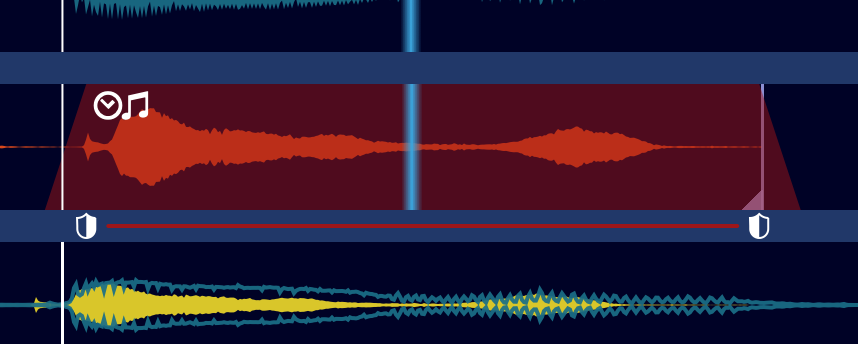
Click the Basic edit mode button to switch to Advanced mode, then click the dividing bar between the Dub and Output waveforms at the playhead position to create a new Protected Area.
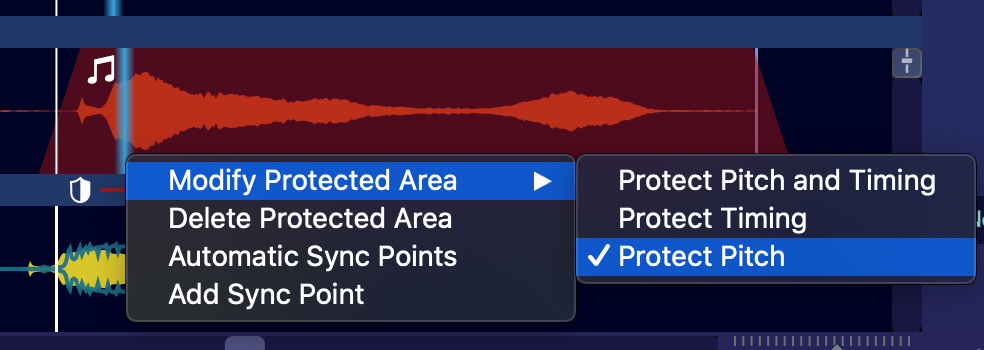
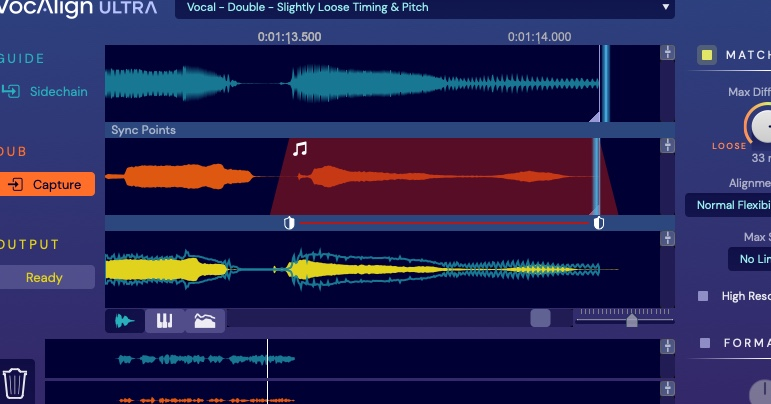
8. Drag the ‘shield’ handle at the right hand end of the Protected Area to encompass the last ‘piece’ of the Dub waveform, then right-click in the Protected Area and select Modify Protected Area > Protect Pitch – now the timing will be aligned but the pitch won’t.
As an exercise, work back through the Dub, adding further Protected Areas where required.
How To Align a Harmony
9. Now let’s align a harmony vocal. Select the BV2 audio event, and capture it as a new Dub. Since the ARA version can work with multiple Dubs, we do not need to change the guide.
|
|
If you need to change which Dub region you are working with, select the audio event in your DAW, or right click the dub waveform track and Select Audio as described in User Interface and Operation. |
9a. If you are not using SmartAlign, do the following instead:
First, split the Lead Vocal and BV2 tracks at bars 47 and 56, and set your DAW’s Cycle markers to cover the resulting range.
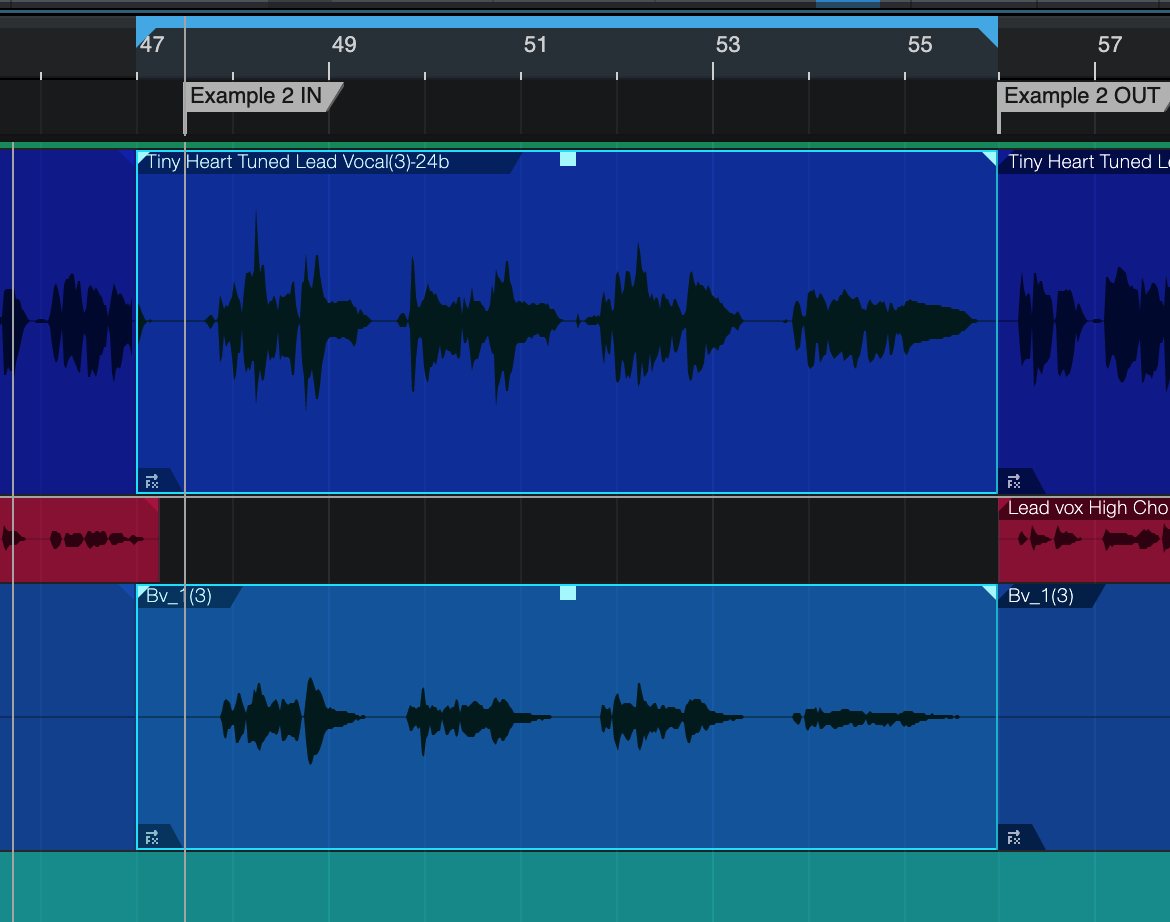
Then select both Audio Events and add VocAlign Ultra as an Event FX on each, as described in Step 2 above.
Then select the Lead Vocal event and Capture it as your guide. Continue to Step 10.
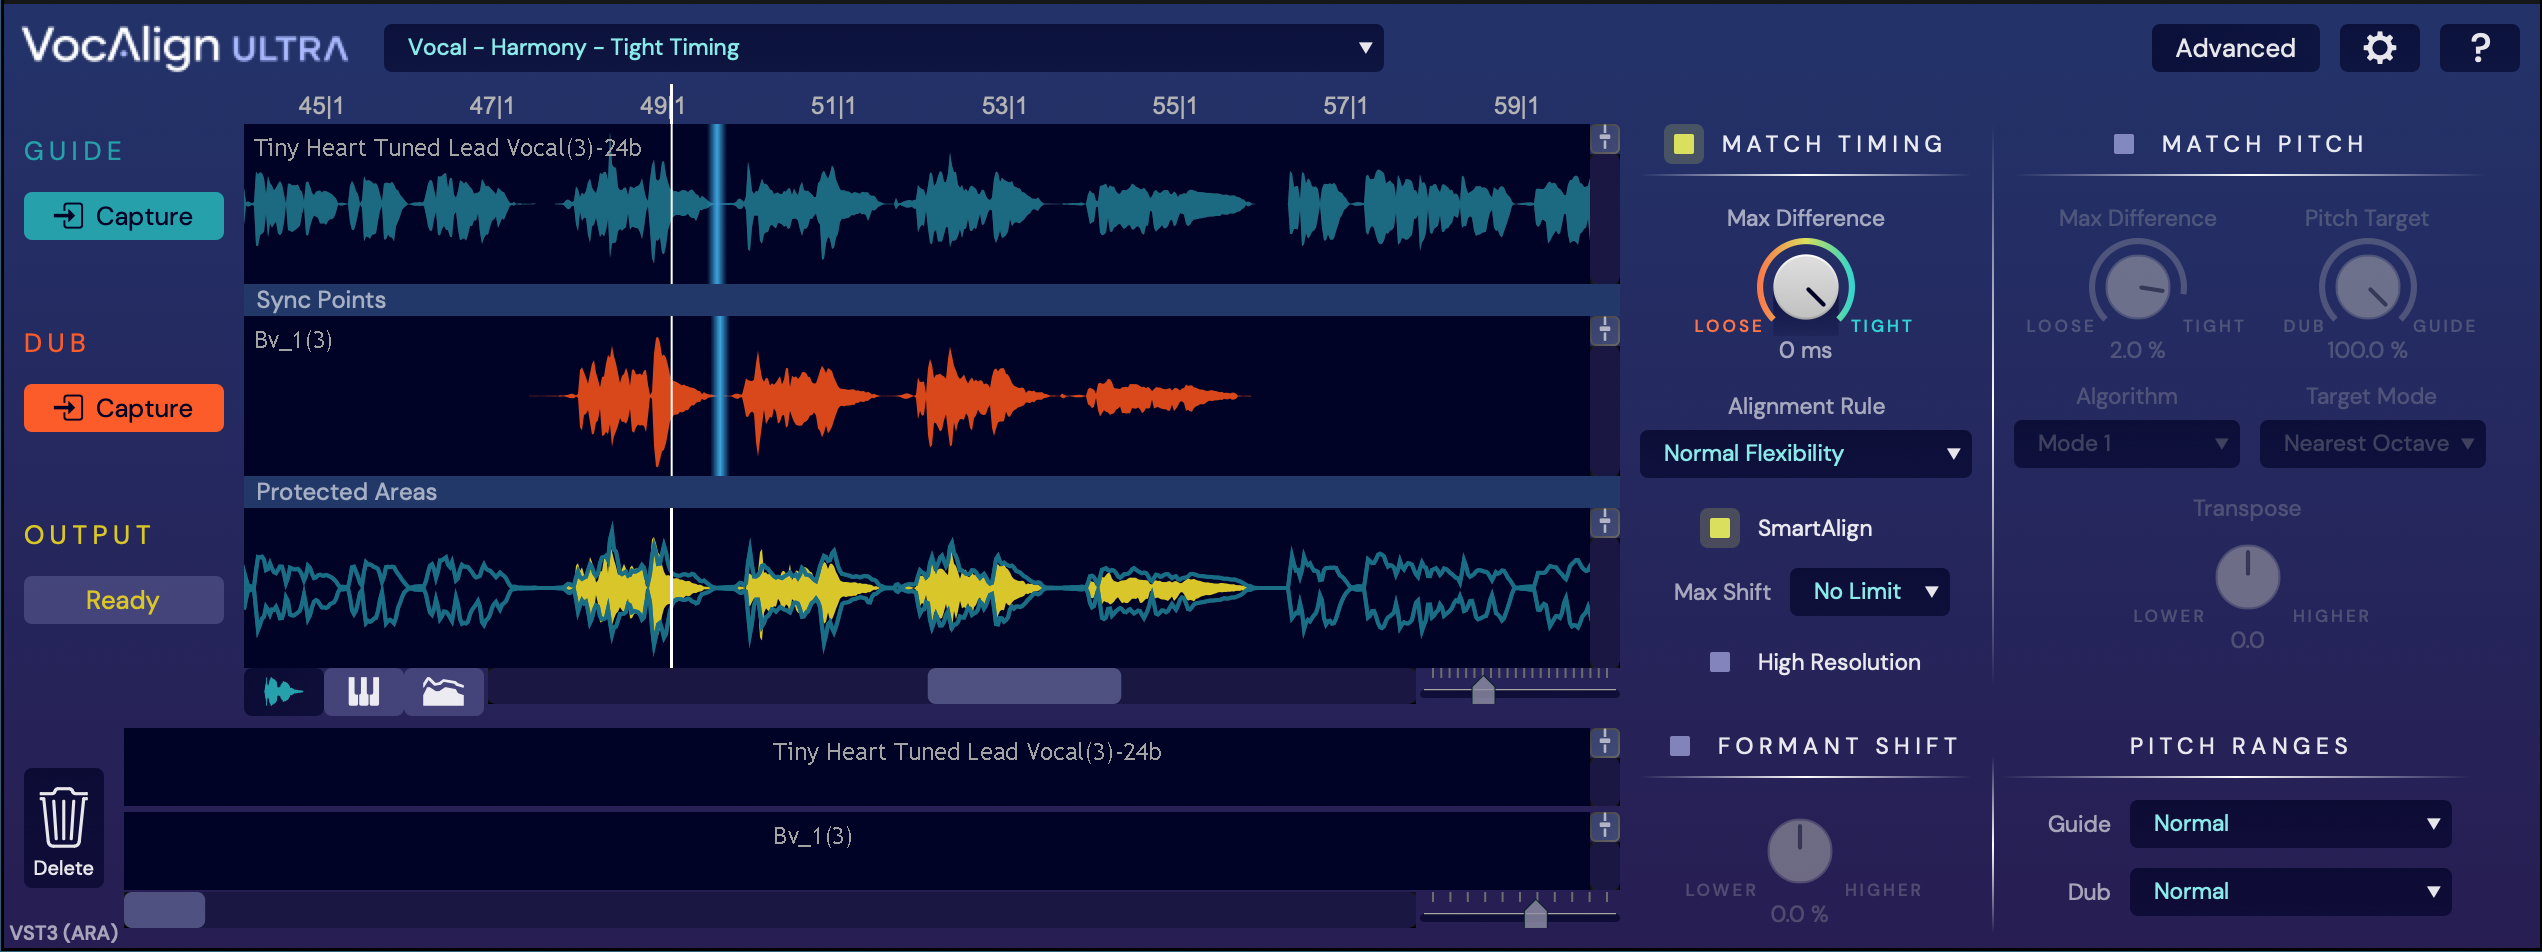
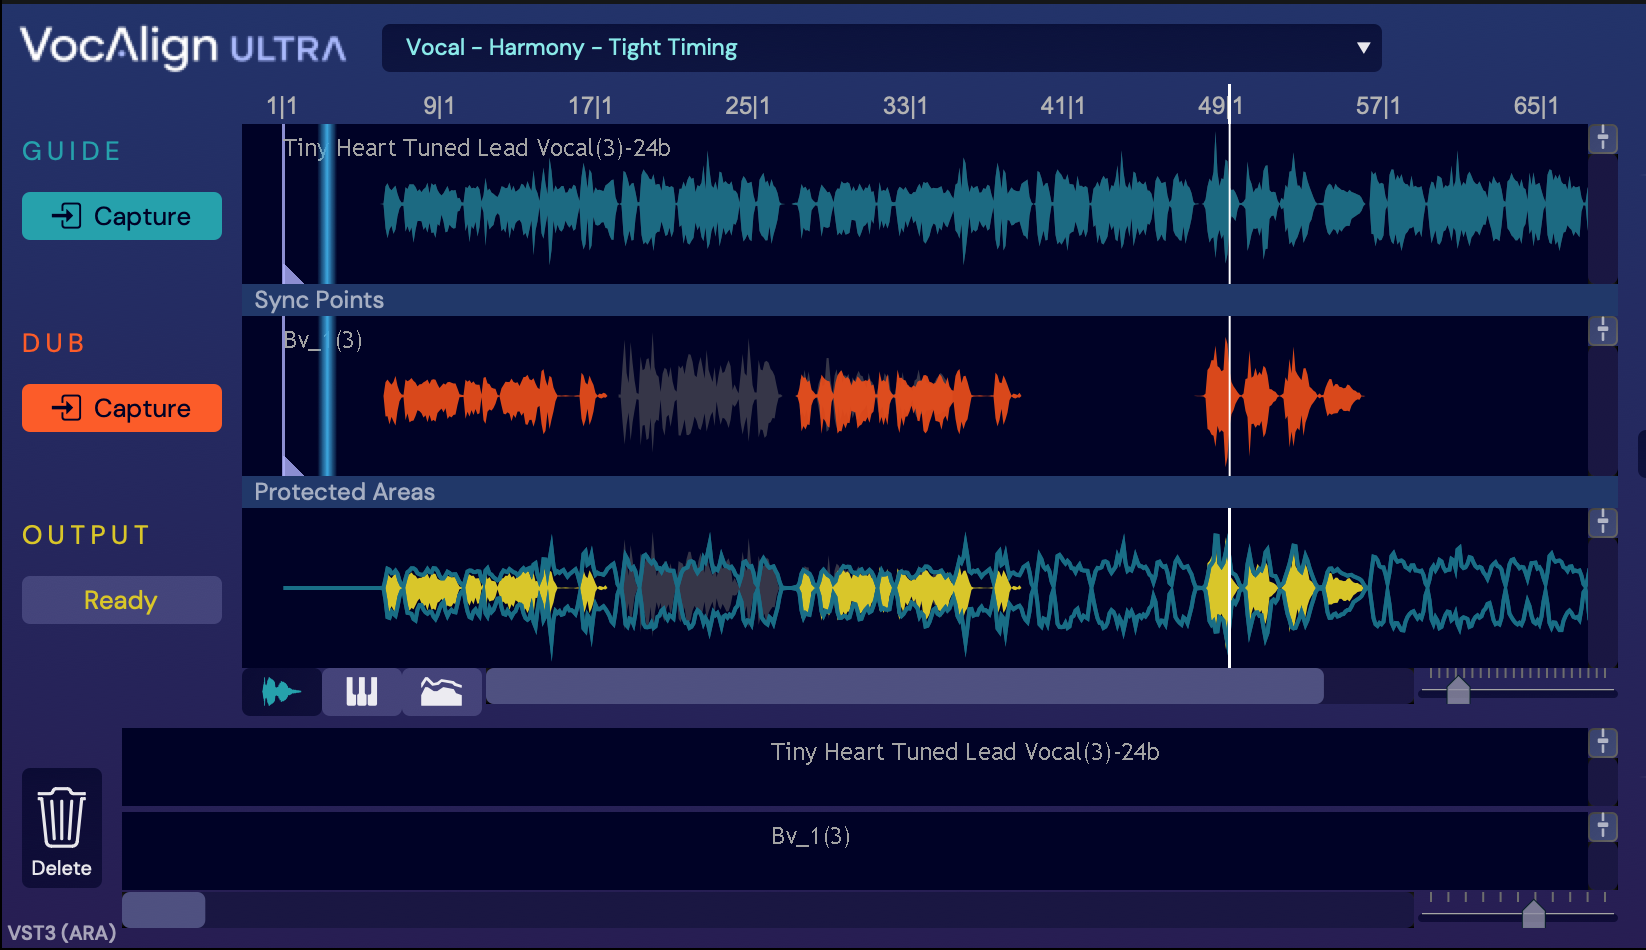
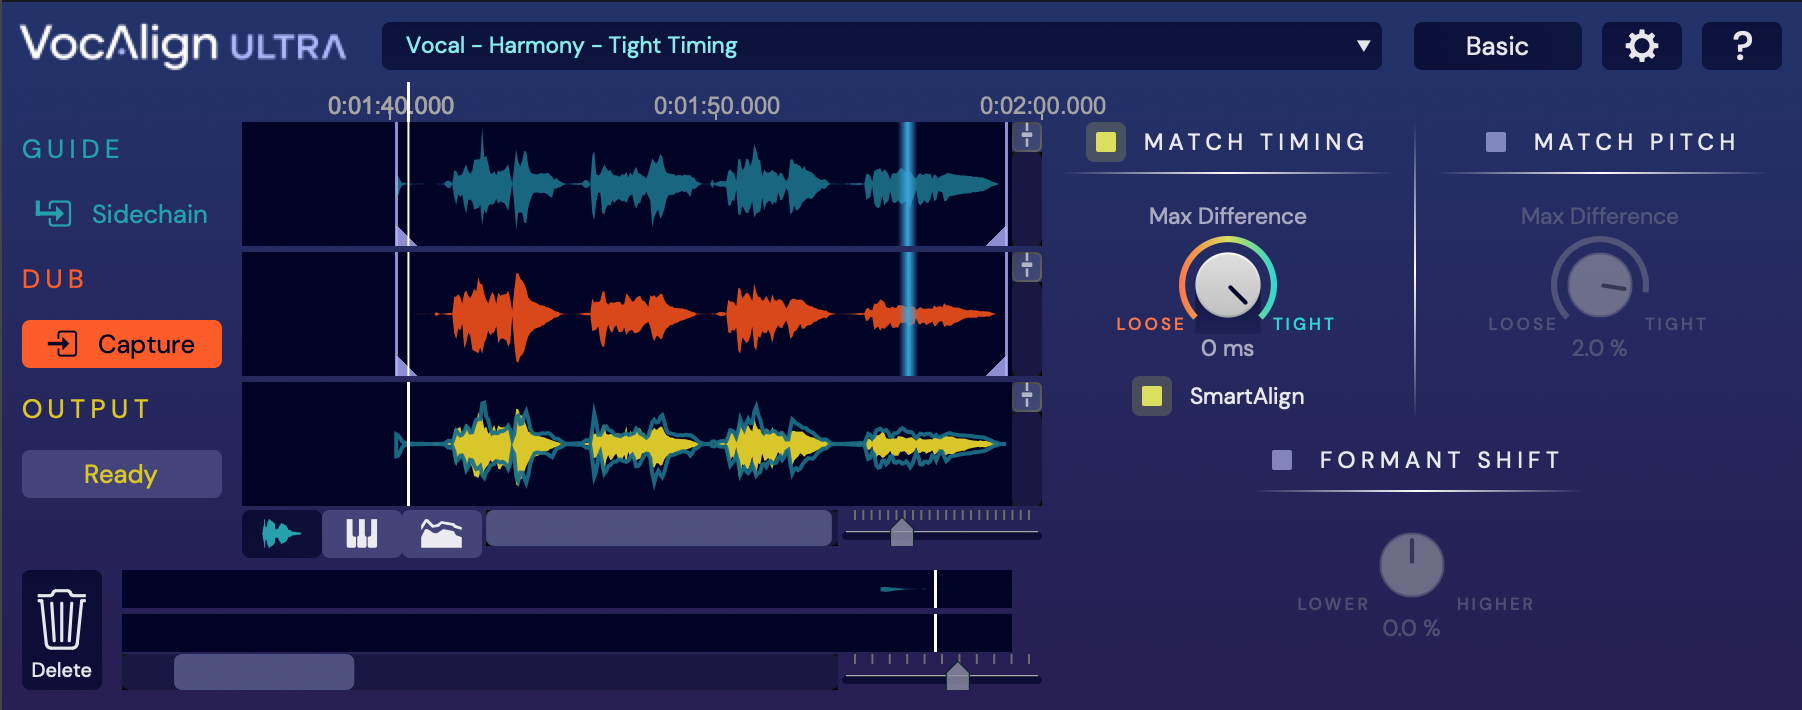
10. Click the Preset menu and load the Vocal > Harmony > Tight Timing preset to lock the BV2 region’s timing, but not pitch, to that of the Lead Vocal region. VocAlign Ultra automatically processes the Dub to the Guide and creates the aligned Output, represented by the yellow waveform in the Output section.
10a. If you are not using SmartAlign, do the following instead:
Click the Preset menu and load the Vocal > Harmony > Tight Timing preset to lock the BV2 region’s timing, but not pitch, to that of the Lead Vocal region.
Now select the BV2 audio event and press the Dub Capture button. The Dub will be captured and VocAlign will create the aligned Output, represented by the yellow waveform in the Output section.
 | REMINDER: Do not change the Preset or ANY control before you’ve Captured a new Guide or you will, in fact, be reprocessing the previous Dub audio. Here is the safest order in which to perform your operations:
|
11. VocAlign Ultra now contains two separate Dubs sourced from two different tracks, each set to a different preset.
Switch between them for editing by selecting them in the main display or Overview, or by selecting their source regions in the host DAW's arrange page. You can also right-click the waveform and highlight Select Audio. The selected area will be coloured in, while all unselected areas will be greyed out.
High Chorus Double selected:
BV2 selected:
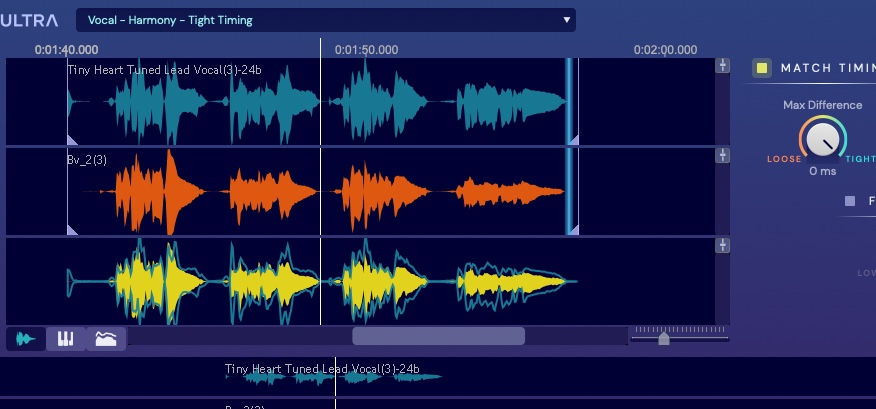
If you are using the non-SmartAlign workflow, you will see a screen similar to this:
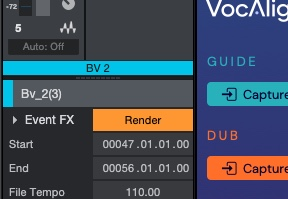
12. To render the aligned audio permanently in Studio One, select the Dub audio event, then press Render in the audio event’s Event FX information panel. This is normally visible at the bottom of the left side of Studio One’s main display, if the Inspector is enabled in the View menu. The Render button becomes the Restore button once rendering is complete: click Restore to undo the render and recall the original audio Event, with VocAlign Ultra ARA in place.
Please see your DAW's manual for instructions on rendering ARA plugin outputs if you're not using Studio one.
|
|
TIP: Unless you render the aligned audio, it will continue to be applied as a real-time effect, until the effect is turned off. This means that you will continue to hear it as it was originally aligned, even if you edit the original audio. To avoid any such confusion, render the effect before changing any audio in Studio One and it will then replay reliably. You can Restore the real-time effect after rendering in Studio One if you change your mind. |
Processing a "Stack" of Dubs at the Same Time
If you have several Dubs that all have similar audio (i.e. either Doubles or Harmonies - but not both at the same time), you can select the Dub events and process them at the same time with the same settings. However, you will have to change the process setting for them individually after that, by selecting either the Dub in your DAW or right clicking in the VocAlign Ultra Dub window and selecting the Dub you wish to modify, one at a time.
Alternatively, you can use the Delete command to remove the Dubs and their Guide from VocAlign Ultra and then recapture them with a different setting, which the Dubs will all received at the same time and create new Outputs with the new setting.
END OF VST ARA INSTRUCTIONS
Using the real-time VST3 version of VocAlign Ultra
Although VocAlign Ultra can capture Audio Events almost instantly in ARA mode using the Event FX method described above, it can also be operated in Basic VST mode. The plugin is used as an Insert on the Dub track and the audio is captured in real time while playing. This can allow for finer control over what’s captured, as you can select the exact start and end points required.
The steps below describe how to use VocAlign Ultra as a VST3 plugin in Studio One.
The steps for using VocAlign Ultra in the other DAWs are identical, apart from Step 2, which describes how to set up the sidechain input to VocAlign Ultra for capturing the Guide. We will provide a DAW-based jump to the instructions for this step.
| | NOTE: If VocAlign Ultra does not appear in Ableton Live for Windows, Click "Show More" below |
You will need to set Custom folder path:
C:\Program Files\Common Files\VST3\VocAlignUltra.vst3
in the Live Preferences, as shown in this image
 :
:
How To Align a Vocal Double
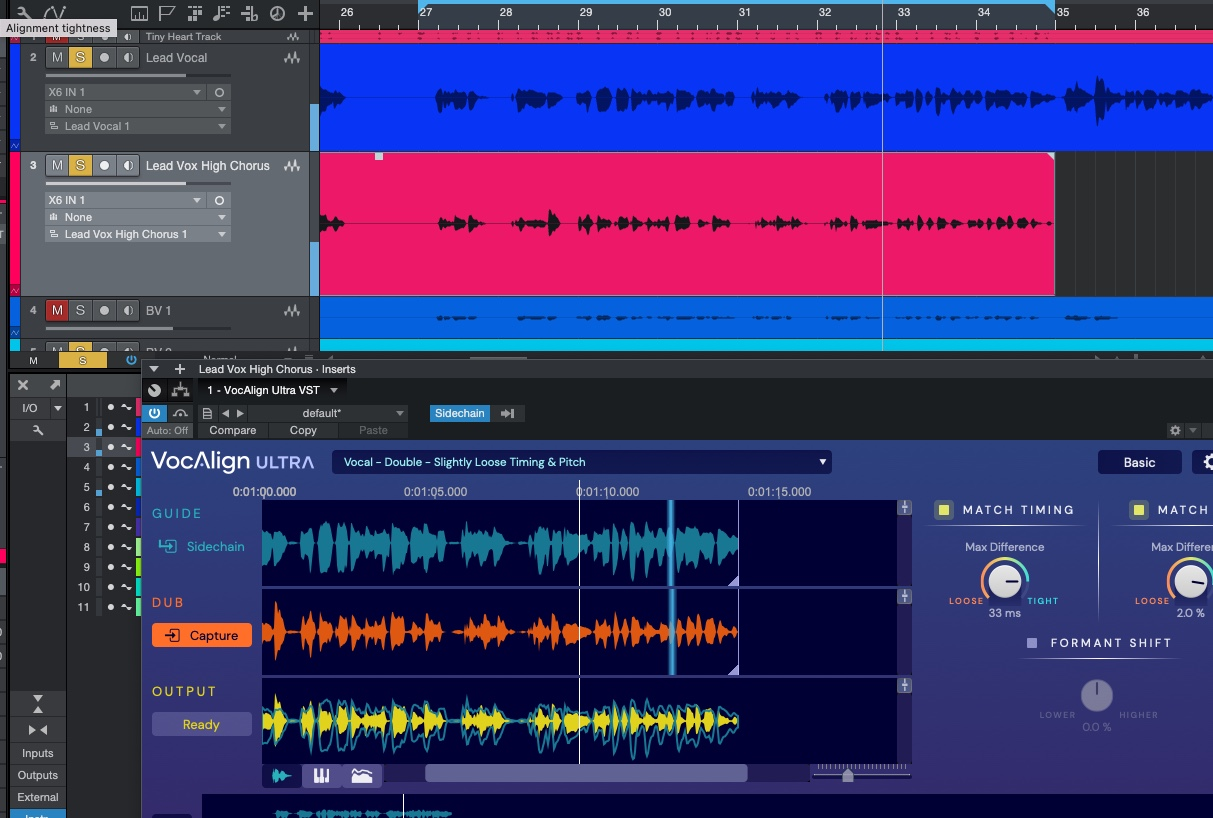
1. Add the VocAlign Ultra VST3 plugin as an Insert effect on the Lead Vox High Chorus track using your DAW's usual plugin loading system.
In Studio One, you can drag it onto the track from the Effects Browser, or load it via the Mixer. The Lead Vox High Chorus track will be our Dub.
Select the Vocal > Double > Slightly Loose Timing & Pitch preset in VocAlign Ultra.

Setup a Guide Sidechain Input
To learn how to set up the Guide Side-Chain input for:
Studio One - click here
- Cubase/Nuendo - click here
- Ableton Live - click here
For other DAWs, consult your DAW User Guide.
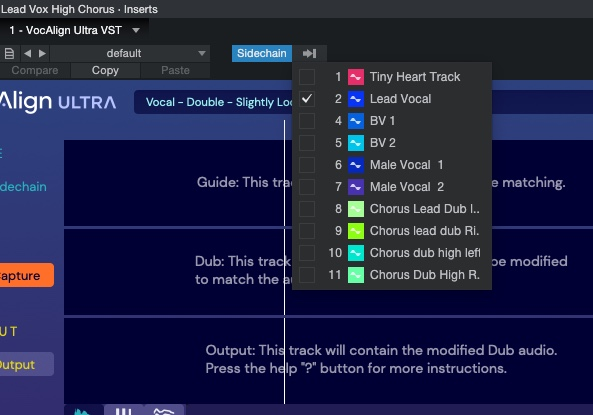
2. At the top of the VocAlign Ultra window set the Sidechain input to the Lead Vocal track. This will be our Guide.
Start Capturing the Guide and Dub Audio
3. Move the play head in your DAW to the point at which you want your capture to begin, which in our case is bar 27, or set the Cycle range to encompass the whole area to be captured (bars 27-35).
Click the Capture button in VocAlign Ultra. It will wait for audio input.
Start playback of the Guide and Dub in your DAW.
The Capture button will change to Stop and capture will begin as shown by the flashing red lights under the Guide and Dub labels .
Note: the audio on the two captured tracks should start at roughly the same time.
Stop Capturing Audio
4. Stop playback in your DAW and click the Stop button in VocAlign Ultra – it will change back to the Capture button.
The captured audio waveforms should appear in the Guide and Dub sections of the display, and the aligned Dub will appear in the Output section.
Check the Output Audio
5. Start playback in your DAW – you’ll see the playhead in VocAlign Ultra move in tandem with its DAW counterpart.
As long as playback is within the captured region you’ll hear the Output signal from the plugin. When playback is outside the captured region, you’ll hear the unprocessed audio on the track directly.
Find any issues
6. Because we’ve chosen an input with ‘typically’ uncertain pitch in a few places (ie, vocal ‘creaks’ at the end of some phrases), when VocAlign Ultra makes the Dub match these areas of ‘incorrect’ Guide pitch, it will affect the Output at these points.
We can fix these by creating Protected Areas within the Dub. These are areas that maintain the original Dub’s pitch, timing or both.
The most audible anomaly in our example happens in the word “again” at the very end of the phrase. For a visualisation of the signals' pitches, switch to the Pitch Profile View by clicking the keyboard button below the main display, and zoom in on the very end of the Dub. Use the vertical slider at the right of the display and the Scale control above it.
You’ll see the Guide (blue) pitch shows an octave drop when it gets ‘creaky’, which affects the pitch quality in the Output signal (the yellow trace). You can toggle the Match Pitch button off and on to see the this problem in the last section of the Output jumping between the natural pitch of the Dub and the incorrectly aligned pitch.
Add Protected Areas to Fix Problem
7. Switch back to the Waveform view by clicking the waveform button next to the Pitch Profile keyboard button. Click the Basic edit mode button to switch to Advanced mode, then click the dividing bar between the Dub and Output waveforms at the start of the dodgy pitch drop to create a new Protected Area.
8. Drag the ‘shield’ handle at the right hand end of the Protected Area to encompass the last ‘piece’ of the Dub waveform, then right-click in the Protected Area and select Modify Protected Area > Protect Pitch – now the timing will be aligned but the pitch won’t. As an exercise, work back through the Dub, adding further Protected Areas where required.
Align a Harmony
9. Now let’s align a harmony vocal. First, load VocAlign Ultra as an insert effects onto the BV 2 track and select the Lead Vocal track as the Sidechain input, as described in Step 2 above. Set your DAW’s Cycle range to cover bars 47-56.
10. Capture the Lead Vocal track as the Guide and the BV2 track as the Dub from bars 47-56, as described in Steps 3-4.
Then select the Vocal > Harmony > Tight Timing preset to perfectly lock BV2’s timing from bars 47-56, but not pitch, to that of the Lead Vocal region.
Process More Audio
11. You can add multiple Captures to any instance of VocAlign Ultra by simply repeating the Capture process at a different point on the timeline, using the same or a different Sidechain input as the Guide. You'll then be able to apply different Presets and settings to each Capture, if required, by clicking a Capture to select it, then making your changes.
Preserving Processed Audio
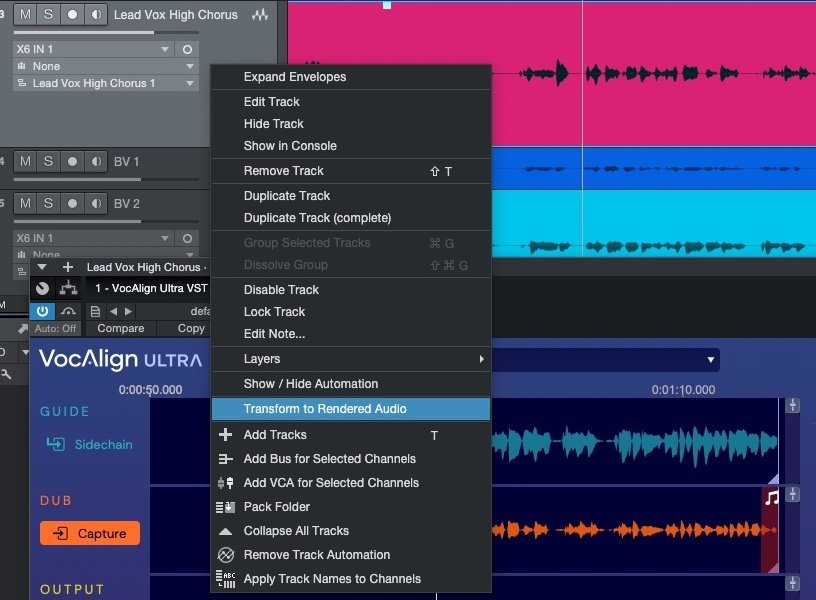
12. To render the aligned audio permanently in Studio One, right-click the track header in Studio One and select Transform to Rendered Audio. Keep the Preserve Realtime State option checked so that you can return the track to its real-time processed state, with VocAlign Ultra re-inserted, if necessary. Please see your DAW's manual for instructions on rendering VST2 plugin outputs if you're not using Studio one.
More details on saving my output audio
For a complete explanation of the options for saving VocAlign Ultra's output audio read this chapter.