User Interface and Operation
- Interface overview
- Main Window (ARA)
- Overview Window
- Top Controls
- Processing Status
- Undo and Redo Buttons
- Bypass indicator
- Screen Lock
- Settings
- Keyboard Shortcuts
- Resize controls
- Multichannel audio
- Heat Map of Processing Effort
Interface overview
Once you have installed RePitch, inserted it as an Insert or FX process in your DAW, and captured audio (either using an ARA or Realtime Capture), you will see an interfaces similar to the one below (which is the ARA version interface). This will contain audio waveforms, different colour pitch traces and boxes similar to the picture below, which also has most of the outer border and screen items labelled.
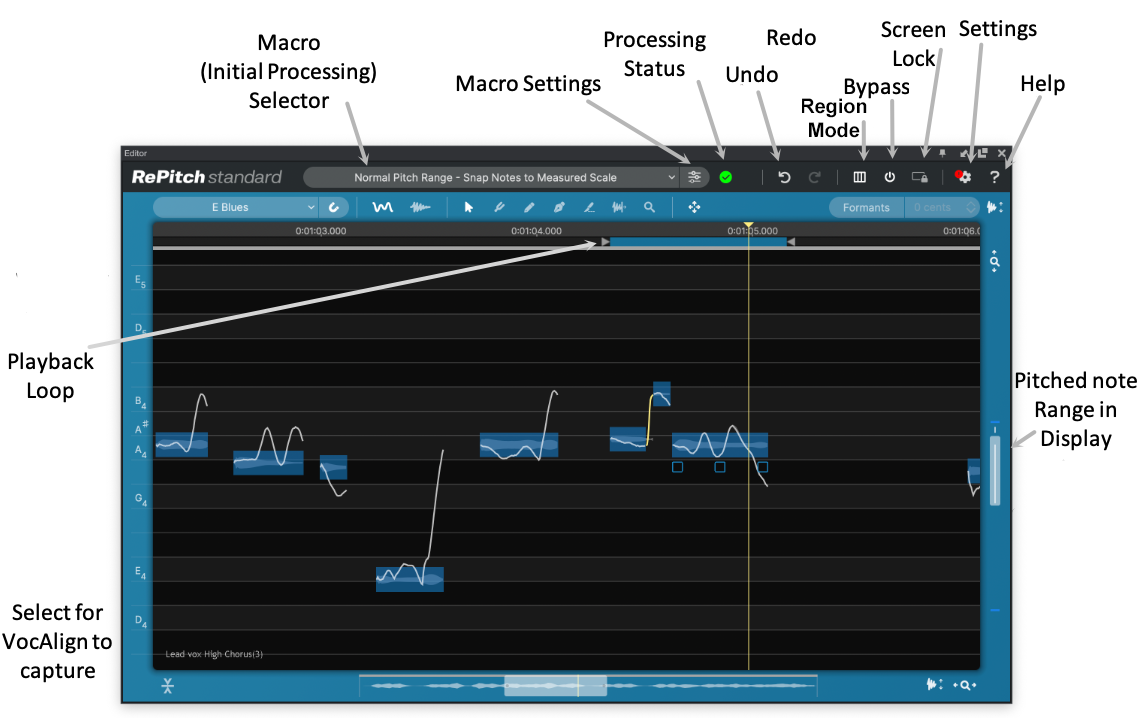
Main Window (ARA)
This usually contains a small range of your audio, which normally will have been analyzed and separated into notes based on the white and orange pitch traces and further classification of where the waveform contains audio with Pitch, or no Pitch (unvoiced) or silence. We will look at this in further detail later. There is also a yellow playhead that moves through the audio.
All of your manual editing will take place in this Main Window.
Overview Window
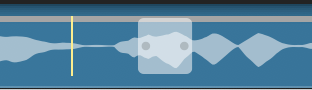
The small range in the section of the Overview Window shown below, identified by a light coloured "box" with two control marker dots, shows the location and range of the audio that will be displayed in the Main Window. This box (sometimes called a "thumb" can be moved as well as lengthened or shortened to manipulate the position and time range of Main Window view.
The grey line across the top indicates it is the Selected Region which will be explained shortly.
There is a separate playhead line (the vertical yellow line, as shown above) which indicates where the playhead is in the whole signal, which may or may not be inside the Main Window displayed range. A missing playhead normally occurs when the RePitch Screen Lock is on.
You can double click in either the Main or Overview window to position the Playhead and start playback from the RePitch plug-in.
Single Click anywhere in the Overview Window to change the region selection and immediately reposition the main display.
In ARA mode, single clicking in the time-scale display at the top will position both the Repitch and DAW playheads.
NOTE: In the ARA versions, clicking in the Overview (or main) displays will move the Playhead in the DAW to the clicked position. This is useful for many reasons described later.
Note also that if the signal captured is longer that 5 minutes, in an upcoming release, there will be an additional control for moving the Overview Window through the longer signal, in order to maintain a useable view to work in.
Top Controls
The Macro Controls have already been discussed in this section, but the remaining controls here are:

Processing Status
will display the yellow symbol shown above when any processing has been completed, or it will show a spinning symbol when processing is taking place - which will also be accompanied by a red line below the top border of the Main window. The red line will also disappear when the processing is done.
If an exclamation mark is shown in red as in image below, it usually means something needs to happen, such as capturing audio or that something is wrong. Below, the Realtime Capture version of Repitch is showing that audio needs to be captured.

Undo and Redo Buttons
(shown below)

also have Key Commands (below). These are standard commands that will undo or redo most (but not all actions).
| Action | macOS | Windows OS |
| Undo | CMD Z | CTRL Z |
| Redo | CMD SHIFT Z | CTRL Y |
Bypass indicator
 RePitch is Active
Indicates that you are hearing the processed RePitch audio during playback started in RePitch or the DAW.
 RePitch is ByPassed (but ONLY when playing back from your DAW)
The Bypassed state will also be indicated by the audio in the Main Window going grey.
You can quickly bypass the plugin by pressing the 'B' key. Press 'B' again to re-activate RePitch.
Screen Lock
 OFF
OFF  ON
ON
Screen Lock ON stops the movement of the Main Window when playing back audio.
This lets you apply editing tools in the Main Window and playback check the results, and the screen will not scroll.
However while Screen Lock is ON, the viewing area can still be modified by using the various zoom and scroll controls which are described in the Navigation section.
There are TWO ways to turn the Screen Lock ON, and it is helpful if the user remembers which method Locked it in order to Unlock it.
To turn Screen Lock ON
- Click the Screen Lock button (shown above left) or press the E key (think of "scrEEn lock")
- If you have turned Screen Lock ON this way:
you can only turn it OFF by clinking the (red) Screen Lock button or pressing the "E Key" again.
- If you have turned Screen Lock ON this way:
- Select a Note Block (or Group)
- If you have turned Screen Lock on this way:
you can only turn it OFF by clicking in an empty area of the Main Screen to turn it OFF
(i.e. do not click on another note).

If you cannot turn Screen Lock OFF by clicking the Screen Lock button,
then click in an empty area of the Main Screen (not on a note). - If you have turned Screen Lock on this way:
 |
You MUST remember which way you turned Screen Lock ON in order to turn it OFF. |
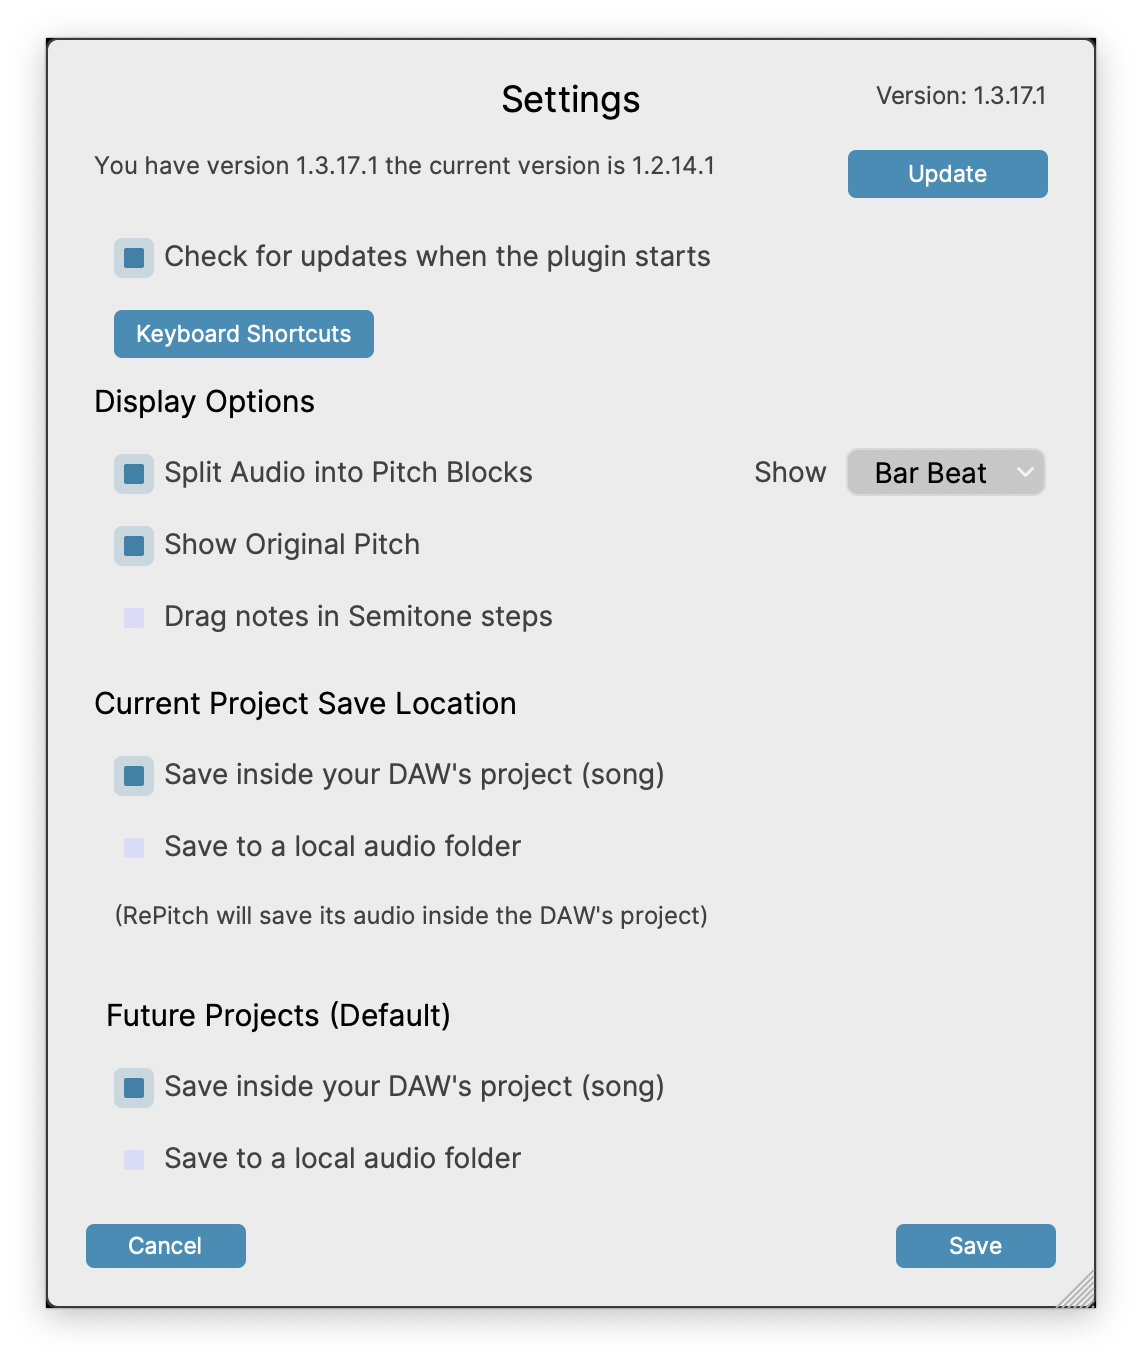
Settings

Clicking the Settings button shown above opens the Settings menu below, which varies with what DAW your are using and whether you are using ARA (shown for Logic Pro below) or Real Time Capture (shown after).
ARA version
Real Time Capture Version

ALL the versions will have options for showing that an Update is available and where the Display and Audio Storage locations are (described previously).
When an Update is available, the Settings button will look like this:

Other settings will be described when discussing the relevant topics.
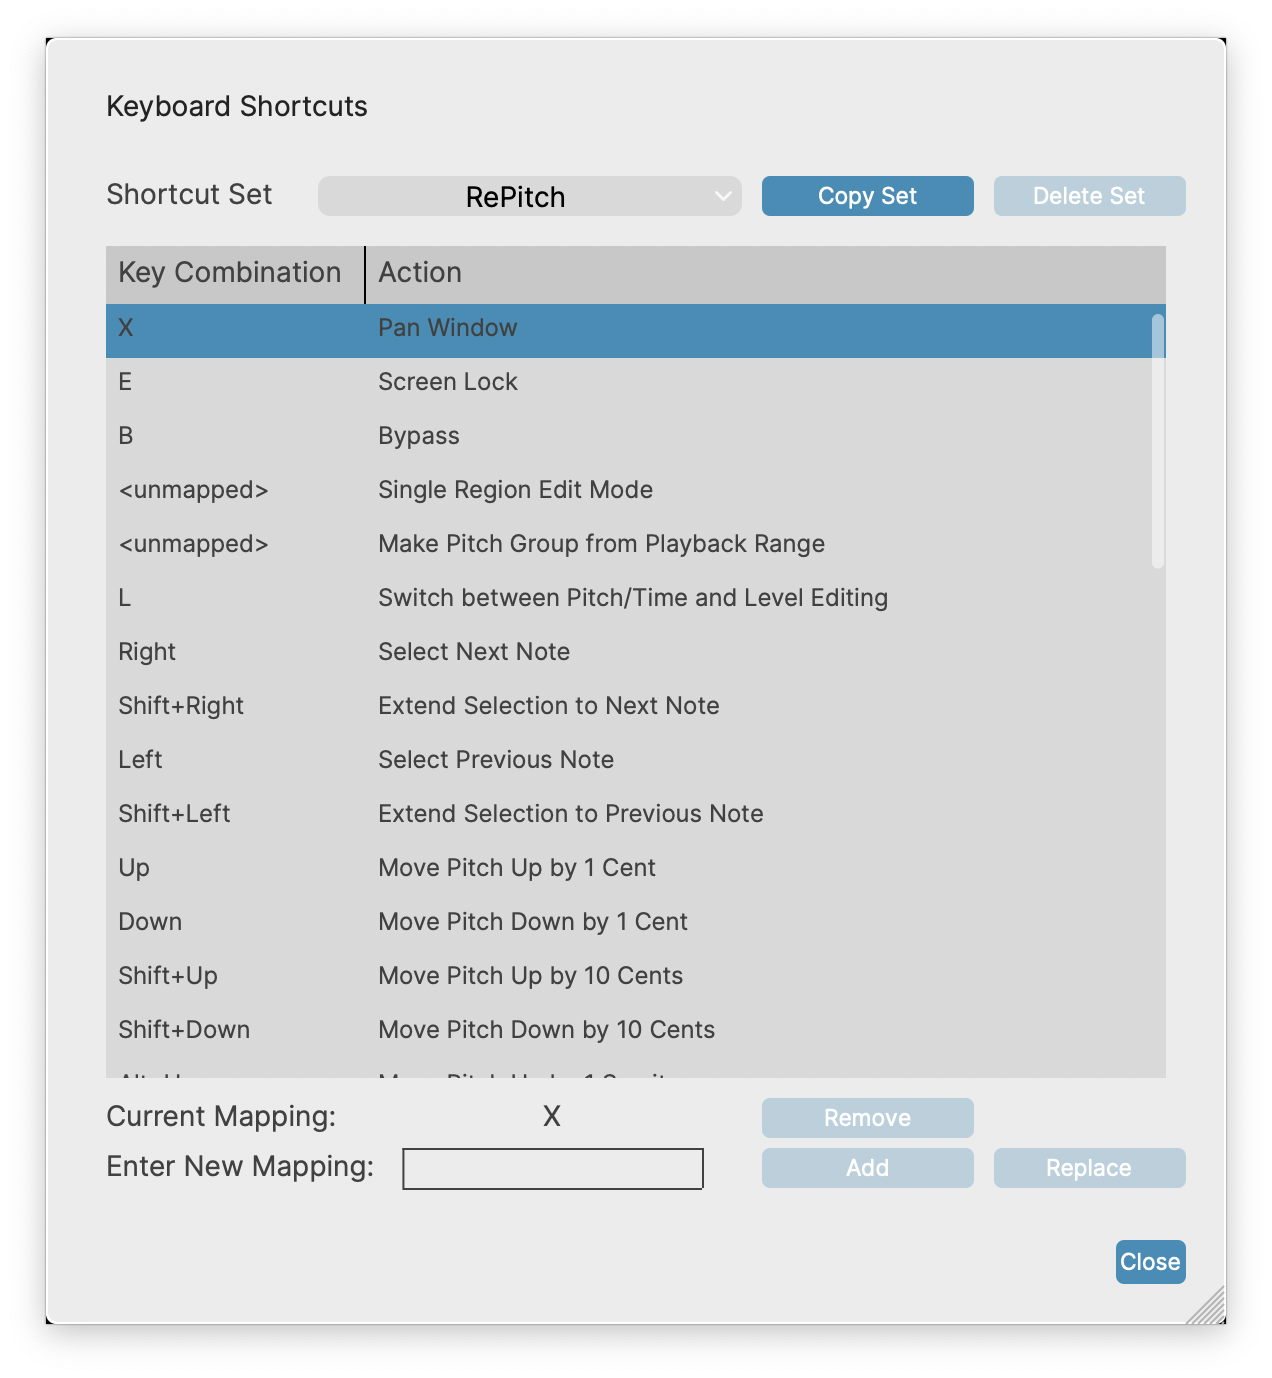
Keyboard Shortcuts
Keyboard shortcuts can be edited in the settings window. You can do this to customize your workflow, or to change keyboard shortcuts that might conflict with your DAW or other applications in your workflow.
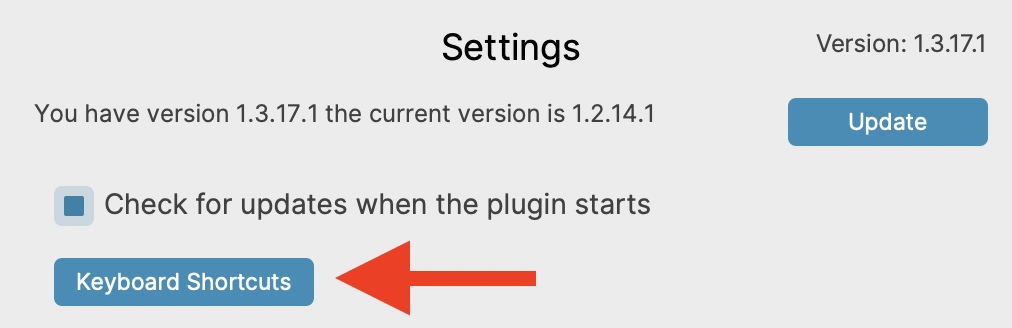
To do so, first open the settings panel as shown above, then click 'Keyboard Shortcuts'
This will open the Keyboard Shortcuts list as seen below.
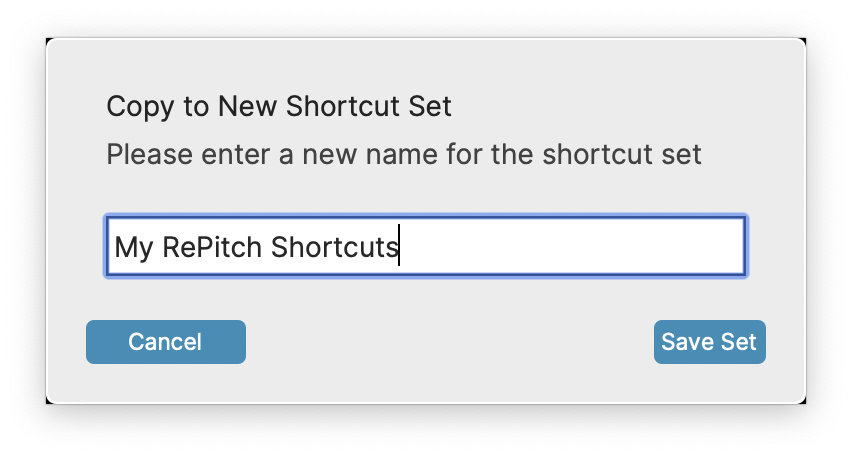
In order to customize your shortcuts, you will first need to click the 'Copy Set' at the top right of the window. This will open the window shown below, where you can give your shortcut set a name.
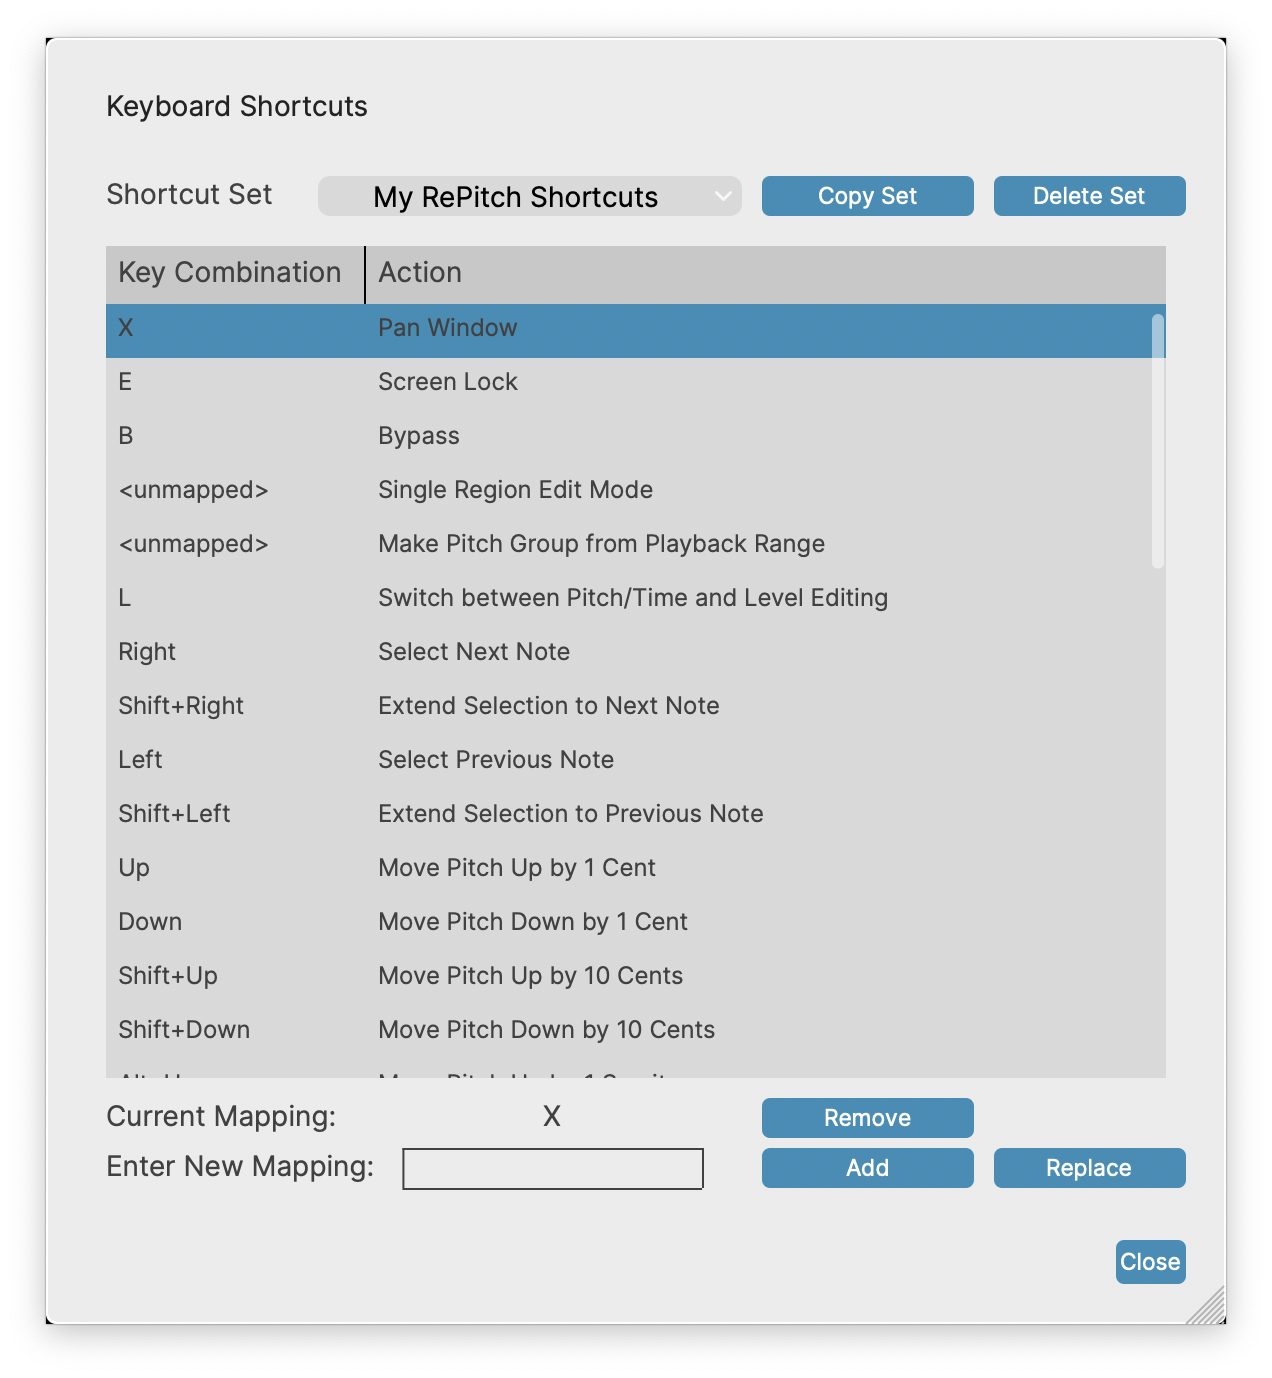
Once the new set is created, you can modify the keyboard shortcuts as needed. The dropdown beside 'Shortcut Set' will contain any sets you create, as well as the default set called 'RePitch' which cannot be modified. You can create new copies or delete sets as needed.
Help Button
The Help Button shown below will take you to the latest on-line version of this RePitch User Guide.

Resize controls
The RePitch interface is freely resizable to suit any size or resolution of monitor. Different DAWs allow different resize dragging options.
The main control for clicking and dragging the plug-in's sides that works in all DAWs is in the bottom right corner

Some DAWs allow independent dragging of the interface sides, but this depends on the DAW and OS.
The interface can be made very small and this might be useful if you have a lot of tracks on the screen that you need to see and are happy to operate the plug-in with Macros alone and expand when needed.
Multichannel audio
RePitch will operate with mono or stereo signals. Note that channel 1 (the left channel in a stereo pair) is always used as the main signal being analysed to extract pitch and define waveform editing positions.
If the stereo signal contains two different signals, they should be separated and processed independently.
Heat Map of Processing Effort
Below the Time scale at the top of the Main Window is a track that contains the Playback Loops (in ARA versions only) and a display which shows a ‘heat map’ that provides insight into the amount of processing being applied to the audio along the timeline. In the picture below, the further the white pitch (current) trace is from the red pitch (original) trace, the heat map "glows" brighter.
Both pitch and time changes in the picture below are contributing to the intensity of the yellow mapping of the amount of processing.
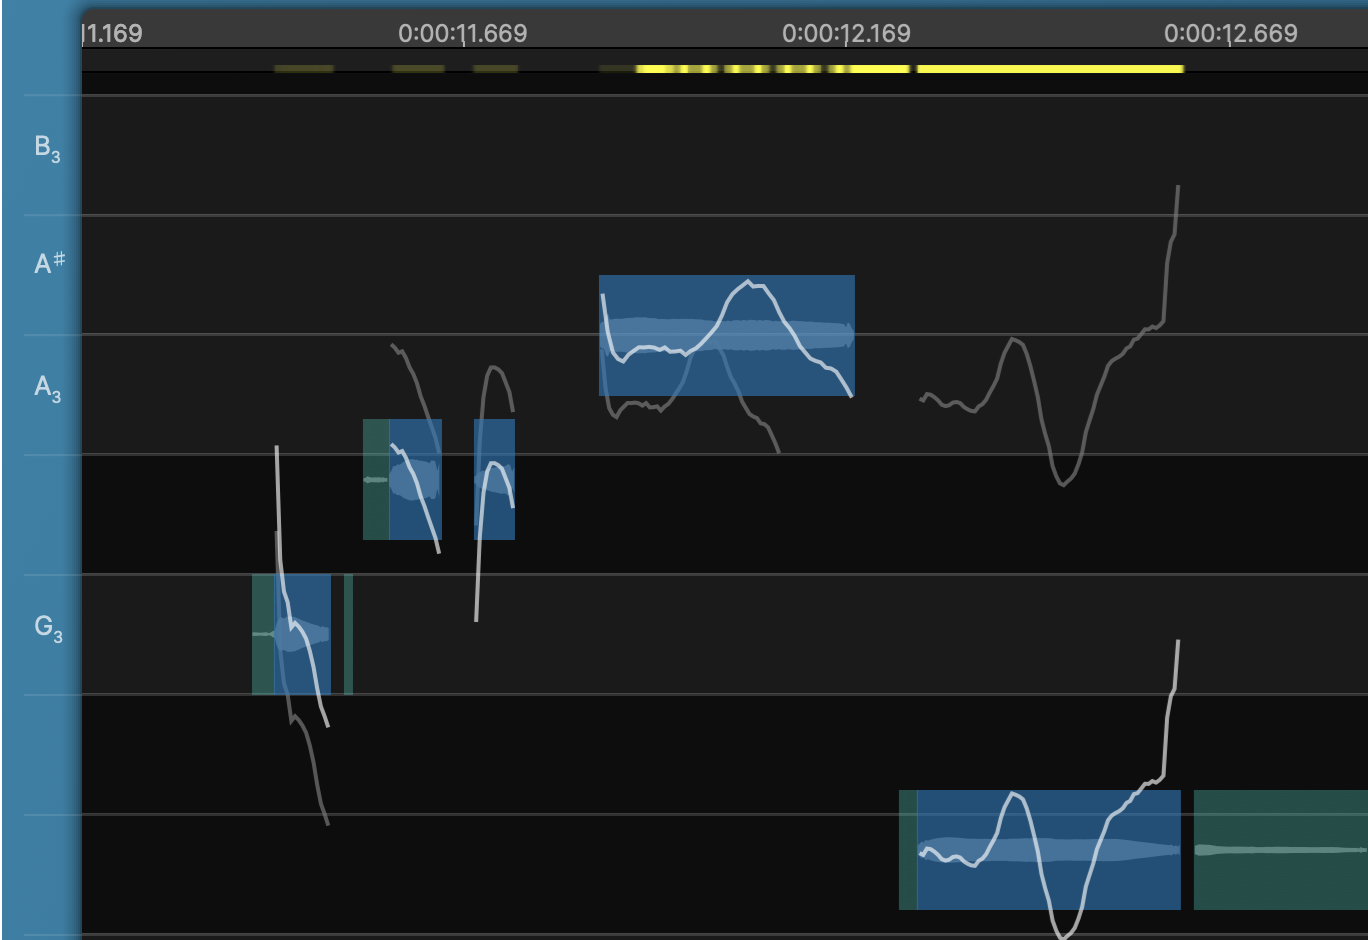
This visual information is useful while auditioning the processed signal, as it directs your attention to the brightest areas showing the greatest changes and processing effort.
It is usually a good idea to listen to the audio where these markers are to ensure there are no significantly audible artifacts.