User Interface and Operation
Using VocAlign Project 5
Now that you’re up to speed with the fundamentals of VocAlign Project 5 – importing and exporting audio and loading presets – let’s get into the details, looking at preset management, the two display switches, the editing controls and more.
Interface overview
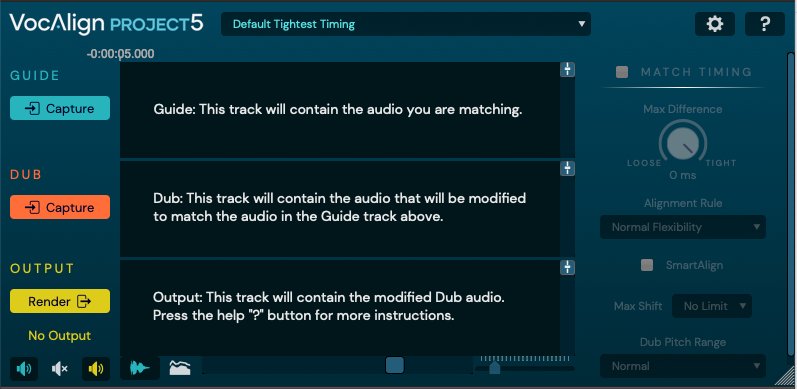
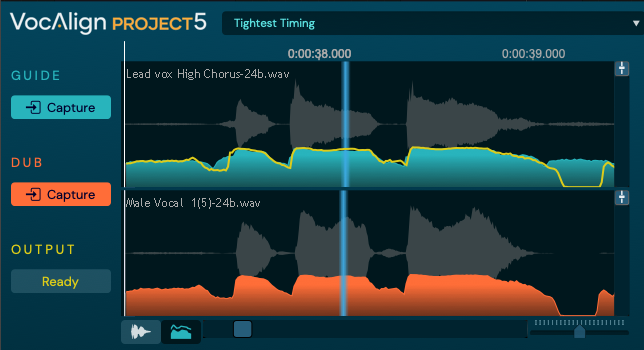
The VocAlign Project 5 interface is divided into two main sections.
-
The left-hand side contains the Guide, Dub and Output Capture/Render controls and displays.
-
The middle contains 3 view windows.
- The right-hand side is home to the controls that guide the all-important alignment algorithms.
Note that there will be differences in the left side's Guide, Dub Capture and Output Return controls, because these depend on the way your DAW exchanges audio with VocAlign Project 5. The three different audio capture and return methods are AAX (Audio Suite), VST and AU Realtime capture, and VST and AU ARA2 capture.
When you first open VocAlign Project 5, you will see a window something like the AAX version below, with explanations of what will be in each of the "track" windows.
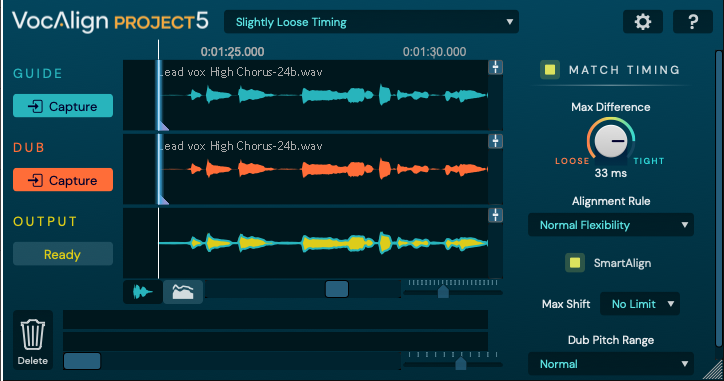
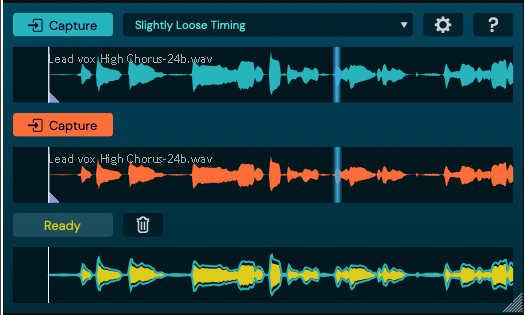
Because the ARA, VST and AU versions of VocAlign Project 5 support sequential capturing of multiple regions along the session timeline for independent alignment, there is an extra panel at the bottom which displays an overview of the captured Guides and Dubs along the timeline.

The overview shows the currently selected Guide and Dub signals in Blue and Orange, and all the not-selected regions in grey. Click anywhere in the overview to change the region selection, immediately jumping to it in the main display as well and updating the controls to the settings used to create the output for that section.
Click the bin/trash icon at the left-hand end to clear the selected Guide and Dub pair regions from the plugin.
NOTE: In the ARA versions, clicking in the Overview (or main) displays will move the Playhead in the DAW to the clicked position. This is useful for many reasons described later.
Along the top of the interface (shown below) are the Preset Selection drop-down, and the Settings  and Help
  buttons.

The interface is freely resizable to suit any size or resolution of monitor by dragging the bottom right corner or sides, depending on how the DAW and OS support resizing.
Below, we have compressed the width.
And below, we have compressed both the width and height.
This shows that the control panel and control details can shrink out of sight, while the Guide, Dub and Output displays adapt their shape and size to fit the remaining defined space.
This is useful if you have a lot of tracks on the screen that you need to see and are happy to operate the plug-in with minimum controls as as shown above.
Guide, Dub and Output display modes
The display section offers two modes of visualising the Guide, Dub and Output signals, selected using the two buttons at the bottom. These switches select the Waveform display (left) and the Energy Display (right). The coloured icon on the dark background indicates the selected button.

The above choice of the Waveform Display switch will show the waveforms and Guide outline in the Output track as shown below.
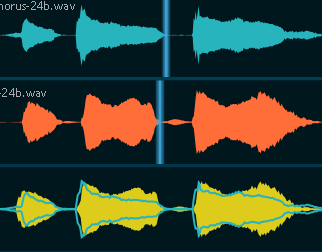
Clicking on the Energy Display switch shown below on the right

will show (as in the picture below) the Energy profile of the Guide in blue in the top track, and the energy display of the original Dub in orange.
Most importantly, the time-modifed Dub Energy Profile (Output energy Profile) is shown as a yellow outline over the Guide Energy profile in the top half of the window.
This display is similar to what was used in the original VocAlign displays since its introduction in 1995.
The user, however, may wish to always use the waveform display to make a quick visual check that the alignment is roughly what is expected, before actually listening to it.
In both modes, the time-modified Output audio can be visually compared against the timing updates to reflect changes made to parameters as they’re applied. Also, consistent colour coding is used throughout the three views: blue for the Guide, orange for the Dub, and yellow for the Output.
Stereo and Multitrack signals
Although you’ll likely be using VocAlign Project 5 with mono signals the vast majority of the time, multi-channel signals – 2-channel stereo to 7.1 surround – are also supported, with all channels stacking up in the display. Note that channel 1 of the Guide (the left channel in a stereo pair, for example) is always used as the time alignment source:
Dub channel 1 is aligned to Guide channel 1, then all subsequent Dub channels are aligned using the same alignment calculation results. Also, only channel 1 shows the Guide outline.
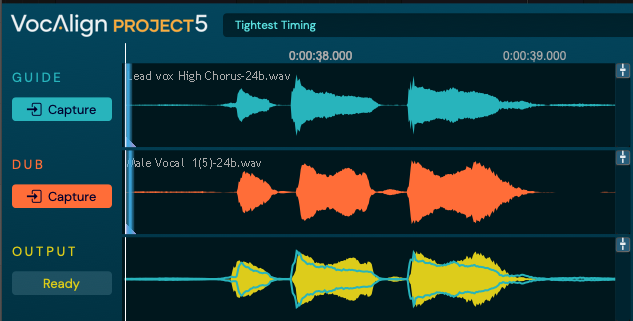
Offset Indicators:
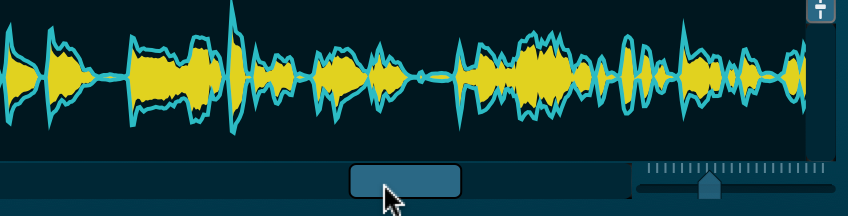
Although you can see and compare the resulting time-alignment of the Output waveform with the outline of the Guide waveform to assess the temporal alignment applied by the current parameter configuration, this doesn't show where the detailed Dub features have been moved to.
In VocAlign Project 5, the two blue lines in the Guide and Dub tracks (as seen in the picture below) show the result of the "thinking" that the time matching algorithm has done. When you move one of these blue lines along the timeline of one signal, the other blue line will show you what part of the other signal is matched.
In the example above, the marker at the end of the one sound in the Guide occurs later than the corresponding sound marker in the Dub. As a result, the two blue lines show the algorithm has matched these two features and this leads to the shorter Dub audio being time stretched (as shown in the Yellow Output in the bottom window) to match the Blue Guide outline in the bottom track.
In other words, these floating blue Offset Indicators follow movement of the mouse pointer over either waveform, showing the continuous mapping of the position under the pointer to its counterpart in the other waveform.
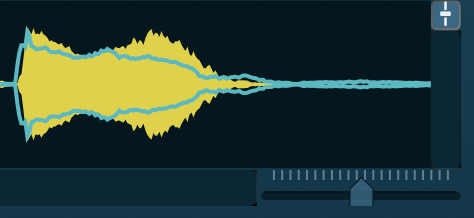
Energy Profile Display
The Energy Profile view (which will be familiar to users of VocALign Pro or previous versions of VocALign Project) displays the Guide and Dub as solid energy contours over time, and the Output energy as a yellow trace over the Guide. Again, the Offset Indicators show the temporal mapping of Guide to Dub, as described above.
Scrolling in the display
The horizontal scroll bar at the bottom of the display (with the mouse cursor on it) enables horizontal scrolling. You can also scroll left and right with your mouse or trackpad.
Zooming the display
Time scale
There are several easy ways to control time scale (x-axis) zooming:
Using your keyboard:
If the VocAlign Project 5 plug-in is selected, you can quickly
- Zoom IN by pressing the T key
- Zoom OUT by pressing the R key
Using your with your mouse wheel (or equivalent)
- To zoom with the left edge of the display held in place - hold down your keyboard Option/Alt key and use your mouse wheel.
- To zoom keeping a position in the waveform held in place (as the centre of the zoom) - hold down your keyboard Control key and use your mouse wheel.
Or you can use move the horizontal zoom slider control at the bottom right of the display shown below.
Amplitude Scale
Amplitude or vertical (y-axis) zooming is handled on a per-pane basis by clicking the small level control icon  at the top right of any the three Waveform view panes or either of the two Energy Profile view panes. This will pop-up the actual vertical zoom slider for that pane. Use the mouse wheel or drag the pop up control up and down to scale the height of the waveform or energy display.
To zoom all waveforms or energy profiles together, hold down your keyboard Shift key when you click  and then click directly on the pop-up slider and move it up or down.
This increase in the waveform height is only visual and the gain of the audio is not affected.
How to check that the Dub is aligned with the Guide
VocAlign Project 5’s two display views provide comprehensive visualisation of the Guide, Dub and Ouput signals.
To check the timing alignment of the Dub with the Guide, focus on the Output display in the Waveform view.

This layers the Guide (blue waveform outline) and Dub (yellow solid waveform) on top of each other, giving an excellent overview of their positional relationship.
The Energy Profile is also helpful here, and offers a “legacy” view option of alignment quality as a counterpart to the waveform display.
Visual references aside, of course, the best way to check the alignment of your Dub is to audition the Guide and Output signals.
To do this with VST3 and AU versions of the plug-ins, use your Solo controls in the host DAW to listen to the returned audio.
In the AAX AudioSuite version, if the Guide and the Dub have exactly the same starting times, you can use the Audio Suite Preview system and the Solo buttons in VocAlign Project 5 plug-in at the bottom left (show below) to select which signals to include in the audition.
Start and End Markers
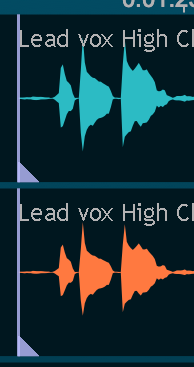
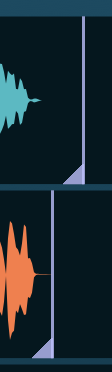
At both the start and end of the Guide and Dub signals, the blue vertical markers with triangles at the bottom (shown below) define the signal Start and End points, as used by the processing algorithm to work out the signal alignment.
START END
If the Guide and Dub start at very different points on the timeline, the SmartAlign function ensures that alignment is applied correctly. In a nutshell, this tells VocAlign Project 5 to use the presence of audio in the Dub, rather than the Guide, to decide where any alignments should start and end.
With SmartAlign OFF:
if your Guide and Dub start and end at roughly the same points on the timeline, you probably won't need to touch these markers. However, if you have, say, a large amount of silence or a loud breath sound or cough before the vocal starts in one signal but not the other, moving that signal’s Start Marker past the offending intrusion will prevent the algorithm misinterpreting it as the start of the vocal.
If the Dub continues beyond the end of the Guide, VocAlign Project 5 will simply add the extra Dub after the Guide ends, unless you move the Dub's end marker.
If the Guide is longer than the Dub, you might wish to move the Guide's end marker to the end of the corresponding Dub audio, to keep the Dub from being stretched unnaturally to match the continued energy of the Guide.
To move the Start and End Markers, drag their triangular handles or the vertical lines.
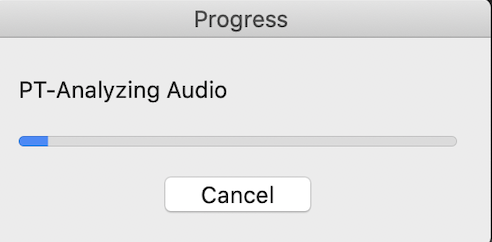
How do I know when VocAlign Project is Processing?
If you select Guide or Dub audio longer that a minute, the processing can take several seconds. Here's what you will see when that is happening.
In the pictures below, the Guide is 2:30 long and processing has started. There are 4 indications that processing will take more than a second or so.
- There is a Progress Indicator for the Analysis pass of VocAign Project 5.
- At the bottom left of the Output track (shown below), under the Render button, a red circular "process running" display will be spinning.
- A red line will appear above the Output waveform showing the Output is not yet computed.
- The yellow Output waveform will not have yet appeared in the Output track.
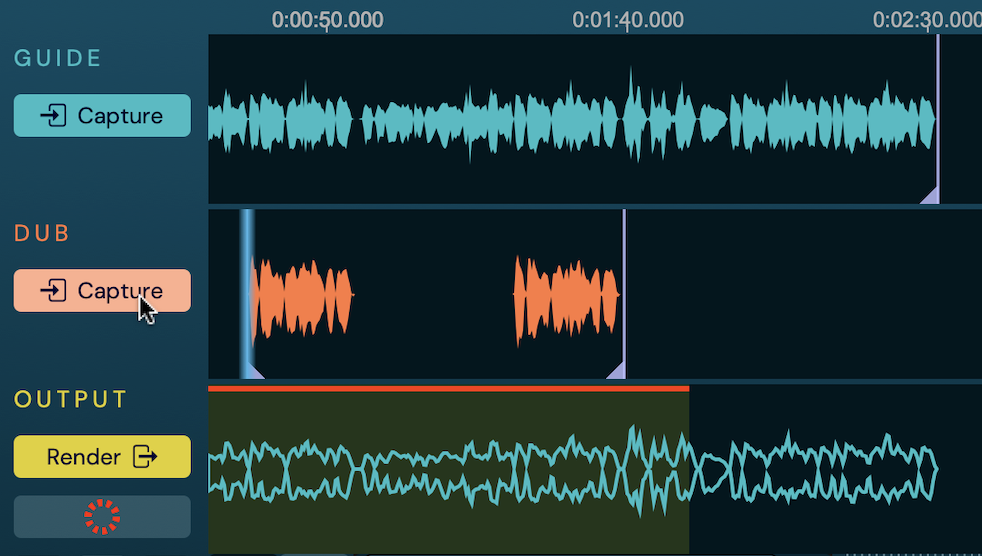
When you see any of these indicators, DO NOT try to render or audition the Output audio. Just wait.