Adjusting the Automatic Time Matching
Capture Sequence

|
If you are going to use a different preset on a new Guide and Dub, if you change the preset before you capture the new Guide, it will be applied to the current Dub, which you might not want to happen. |
Here is the safest order to do your operations:
- Before you move on to capture a new Guide, don't change the preset!!
- Capture your new Guide
- Change the preset now (if you want to)
- Capture the Dub
Having captured the Guide and Dub, you will sometimes need to make at least minor adjustments to the controls after starting from your chosen preset to adapt the processing better to your source material, or modify the results you hear in the Output to get a better or different results. Here's a guide to what the controls do:
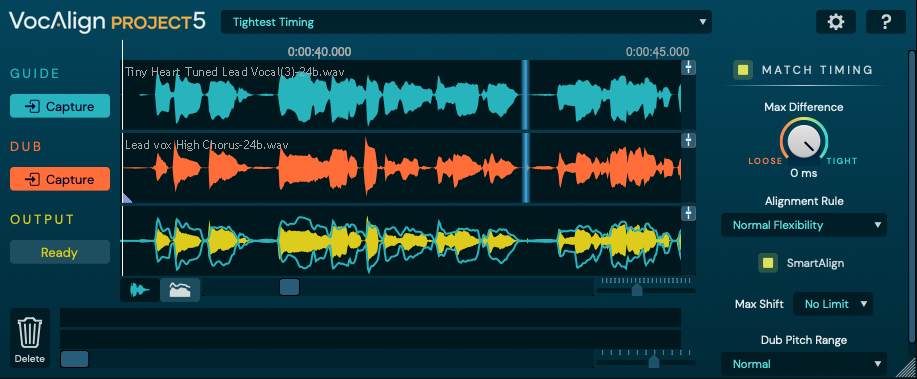
Match Timing: Turn this ON to activate VocAlign Project 5's time alignment. Turn it OFF and the plugin will have no effect. This can be useful for A/B comparison of with and without processing.
Max Difference: Determines how tightly the timing of the Dub is aligned to that of the Guide, from perfectly locked at the Tight (fully-clockwise) setting, to deviating by no more than 200ms at the Loose (fully-anticlockwise) setting. In essence, the further clockwise you turn Max Difference, the tighter the alignment becomes, all the way to totally locked at the fully-clockwise ‘Tight’ end of the knob’s range.
As you would expect, when the timing difference between similar events in the Guide and Dub is less than the Max Difference, no time alignment is applied.
Alignment Rule: The selection in this drop down menu determines the amount by which the internal editing system is permitted to time stretch and compress the Dub.
- Lowest/Low Flexibility: The editing algorithm is only allowed to make small adjustments to the Dub, so alignment will comparatively ‘loose’
- Normal Flexibility: This is the setting you should always try first, as it will be the most effective one in most cases.
- High Flexibility: The algorithm is allowed to stretch and compress the Dub much further than Normal Flexibility, resulting in comprehensive alignment at the possible expense of compromised sound quality – there’s only so far an audio signal can be stretched before it starts to degrade.
- Maximum Compression: The algorithm is allowed to compress the aligned audio as much as required to align it, but stretching is limited to the same amount as the Normal Flexibility setting. This setting should only be used when the timing of the Dub is way off – think of it as an extreme fix for use when all else fails.
- Maximum Expansion: The algorithm is allowed to stretch the aligned audio as much as required to align it, but compression is limited to the same amount as the Normal Flexibility setting. Like Maximum Compression, this is a setting you’ll only want to use in the most extreme cases.
- Normal Flexibility + Pitch: Intended for use with legato voicing, where the pitch of the Guide and Dub varies over time, but their energy doesn’t. The algorithm uses pitch changes as the basis for alignment.
Max Shift: Normally only used for use with the Preset ‘Dubs with Gaps’, the Max Shift parameter sets the maximum amount of time ( from 10-150ms, or 'No Limit' = OFF) that the editing algorithm is allowed to move any given point in the Dub from its original position. This is helpful for preventing audio that starts at the end of a gap in the signal from being erroneously matched to the gapless Guide and thereby moved too far forward. This setting should NOT be needed when using SmartAlign.
Dub Pitch Range: Set this self-explanatory field to the most appropriate option for your Dub source material to optimise the accuracy of the editing process. Note that often, depending on the actually Dub signal pitch range, changing this setting will not result in any audible differences.
- Normal: The default ‘general purpose’ setting, for spoken word, vocals in non-extreme registers and the majority of instruments.
- High Pitched Vocal: Sung vocals in ‘higher-than-average’ registers.
- Low Pitched Vocal: Sung vocals in ‘lower-than-average’ registers.
- High Pitched Instrument: High-frequency-dominant instruments such as violin, flute, lead guitar, lead synth, etc.
- Bass Instrument: Low-end instruments such as electric and acoustic bass, cello, bass synth, etc.
SmartAlign: Normally, you should leave SmartAlign ON, particularly if the audio you want to match in your Guide and Dub don't start and end at approximately the same points on the DAW timeline. SmartAlign lets VocAlign Project 5 intelligently use the presence of matchable audio in the Dub, rather than the Guide, to determine where alignment of matchable Guide audio should start and end.
Other Controls
Plug-in Settings

Clicking the button shown above reveals various preferences depending on the plug-in Version being used at the time.
For example, the Logic Pro ARA version will show this window, some entries of which will not be present in other plug-in Versions:
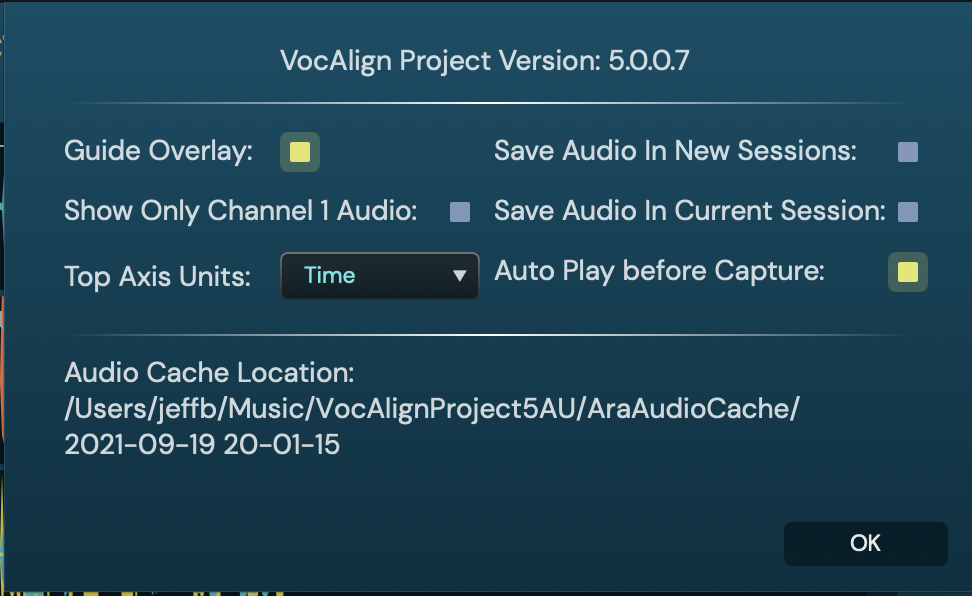
Common Display Settings
- Guide Overlay: Hide and reveal the Guide overlay in the Output section of the Waveform display.
- Show Only Channel 1 Audio: When signals of two channels or more are being aligned, activating this option hides the waveforms of all but the first channel of each signal, reducing visual clutter.
- Top Axis Unit: Switch the scale on the X axis of the display Waveform/Energy Profile view display between Time and Samples or Bar/Beats in some DAWs.
Other settings if the plug-in is in ARA mode
This is discussed in depth in the next section, but here are the basics of these switches.
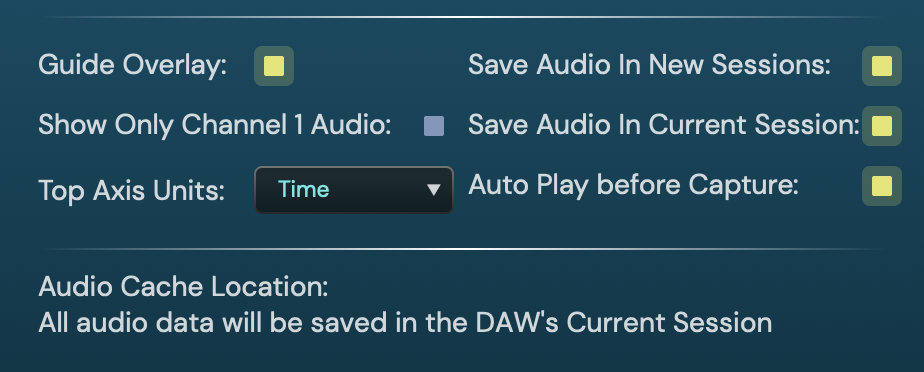
- Save Audio In New Session: When activated, the audio files created by VocAlign Project 5 will always be be stored as part of the host DAW project, rather than independently of it in the Audio Cache Location.
- Save Audio In Current Session: When activated, the audio files created by VocAlign Project 5 will be be stored as part of the current host DAW project, rather than independently of it in the Audio Cache Location.
As shown below - this switch is on and the Audio Cache Location now shows that the audio data will be saved in the DAW's Current Session.
Open Help

The above button opens the online version of this User Guide and/or the Quick Start Guide for your DAW in your browser.