VocAlign Project 5 Quick-Start Guide for Logic Pro X
- Quick Start for Logic Pro X and DAWs using AU Plug-ins
- Two Plug-in Versions
- Installation and Initial Setup
- Using the ARA version of VocAlign Project 5
- Let's Start Processing
- Using the real-time AU version of VocAlign Project 5 in Logic Pro X
- More details on saving my output audio
Quick Start for Logic Pro X and DAWs using AU Plug-ins
Overview
In this Quick Start Guide you will learn how to set up Logic Pro X and VocAlign Project 5 to transfer audio into VocAlign Project 5, process the audio, and have the processed output returned to Logic Pro. Other DAWs using AU plug-ins should have similar workflows.
 |
Ableton Live users: Do NOT use the AU version of VocAlign Project 5, use the VST3 Real-Time Capture Version. Click here to go to instructions. |
The procedure might seem a little complex at first because you have to tell the plug-in which track contains the Guide and which track(s) need their timing adjusted by VocAlign Project 5 to match the Guide's.
In this Quick Start Guide, we won’t go into details about the control panels or displays, since those are described in the "Using VocAlign Project 5" sections.
One last note - because we started long ago in the film industry, we call the audio to be modified a “Dub”.
Two Plug-in Versions
VocAlign Project 5 installs two versions of the Audio Unit (AU) plugin used by Logic Pro X (and some other DAWs):
- VocAlign Project 5 AU (ARA) - which only runs in Logic Pro X 10.5.1 or later.
VocAlign Project 5 AU (Real-time capture) - which runs in Logic Pro 10.0.0 and later.
Both these plug-ins versions feature the same processing controls, presets and parameters, and are identical in terms of the end results they deliver.
The versions only differ in the way audio signals are brought into VocAlign Project 5 and how the Output is returned to the DAW.
- The AU (ARA) plug-in is applied to the track and the user “Captures” the digital audio directly as the designated Guide or Dub in an instant transfer process.
- The advantages of this approach are that the capture is faster and you can bounce the processed audio to disc.
- It's important to understand that the ARA version loads as a single 'extension' in Logic Pro, and although it might appear that you're adding the plugin to each discrete region being processed, you are in fact adding those regions to the same single instance of VocAlign Project 5 ARA.
- The AU (Real-time capture) plug-in version is also a track insert plug-in and involves making a real-time playback to capture both the Guide (as a side chain input) and the Dub simultaneously.
- The main advantage of this approach is that you can start and stop the capture of the Guide and Dub at any points in your session.
- The main disadvantage is that if you export the Output to replace the input Dub it removes the plug in, and there is no undo to restore the plugin to modify the processing.
- The main advantage of this approach is that you can start and stop the capture of the Guide and Dub at any points in your session.
NOTE: If you have both VocAlign Project 3 and VocAlign Project 5 installed, you’ll see both of them listed in Logic's Audio FX menu, as VocAlign Project and VocAlign Project 5, respectively.
Installation and Initial Setup
- You should have already downloaded, installed and authorised the VocAlign Project 5 plug-in on your Mac computer.
See Installation and Authorization if you haven't done this. - Download the Logic Pro ‘Tiny Heart’ session from Logic Pro Tiny Heart Demo Session and follow along with the operational instructions below.
- It’s also necessary to make Logic's track selection automatically follow the selection of audio regions.
- This may already be set up, but if not, in Logic Pro, open Preferences > General, and select the Editing tab at the top.
- In the Editing page, enable ‘Select tracks on Region/Marquee selection’.
Using the ARA version of VocAlign Project 5
 | THE FOLLOWING ARA INSTRUCTIONS ARE ONLY FOR: Logic Pro X 10.5.1 and later. NOTE: The AU (ARA) version only works with recent versions of Logic Pro and operates differently than the AU Real-time capture version. You can skip the ARA instructions and click HERE to jump to AU Real-Time Capture instructions for Logic Pro 10.0.0 and above.
|
 | If you’re using an Apple Silicon Mac, rather than an Intel-powered model, you’ll currently need to switch Logic to Rosetta Mode to use the VocAlign Project 5 AU (ARA) plugin. To do this, right-click the Logic Pro application in your Mac’s Applications folder, select Get Info, and check the ‘Open using Rosetta’ checkbox. |
Let's Start Processing
Matching the Timing of doubles to a Lead Vocal
First, let’s align some vocal doubles using SmartAlign.
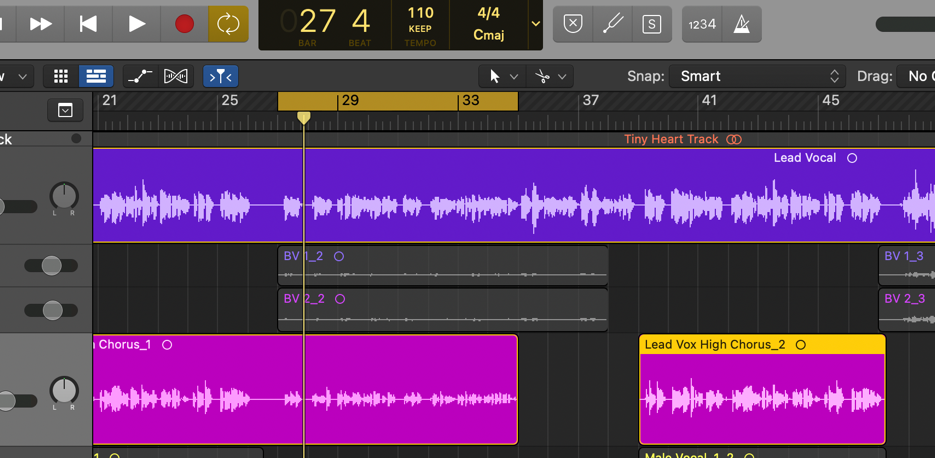
- Load the ‘Tiny Heart’ project in Logic and solo the Lead Vocal, BV1 and BV2 tracks, so you can hear what you're doing clearly.
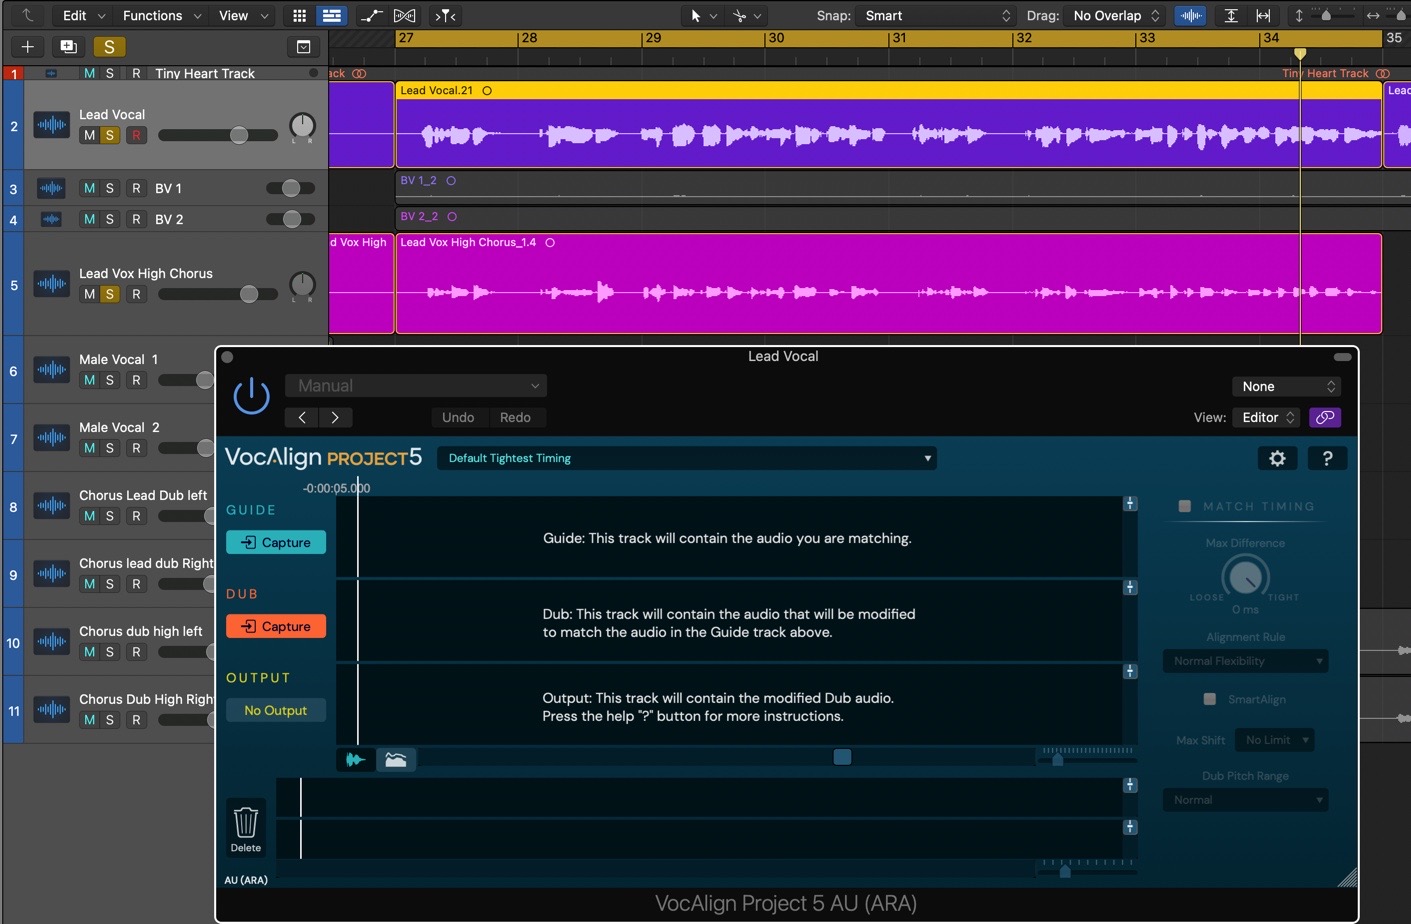
- Add VocAlign Project 5 AU (ARA) as an insert effect on the Lead Vocal Track – which we’ll be using as our Guide – by selecting Audio FX > Audio Units > Synchro Arts > VocAlign Project 5 AU (ARA).
- Click the Link (chain) button
 at the top right of the plugin to turn it ON – and the background will turn purple as shown below. This will ensure only one VocAlign Project 5 plug-in window appears instead of that multiple instances.
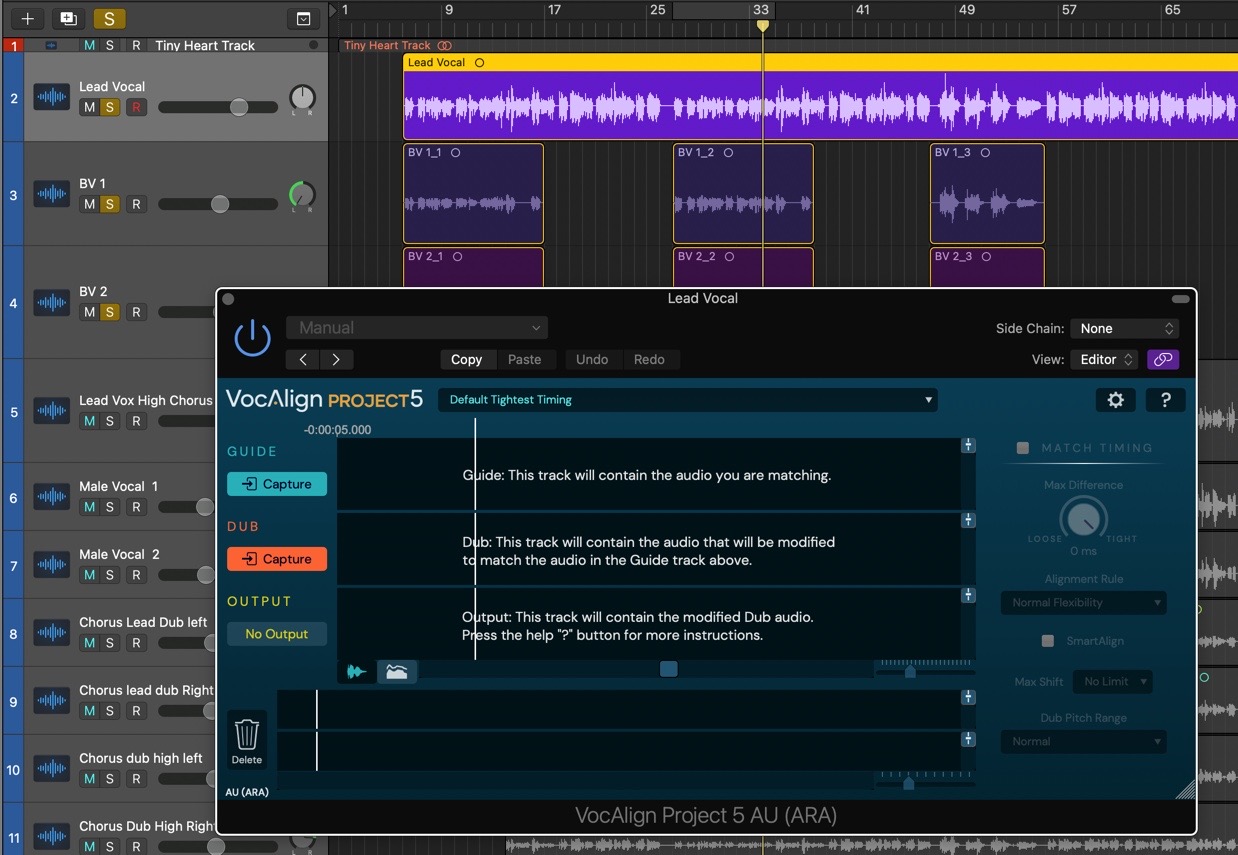
- Click the Preset menu and load the Slightly Loose Timing preset.
- Load VocAlign Project 5 AU (ARA) onto the BV1 and BV2 tracks. Although it might appear that you have three plugins open, they are all in fact a single shared instance of VocAlign Project 5 AU (ARA).
- Select the Lead Vocal region. In VocAlign Project 5 AU (ARA), press the Guide Capture button. The Guide audio waveform will appear in the Guide section and an outline of the Guide will also appear in the Output section to act as a timing reference for the processed Dub.
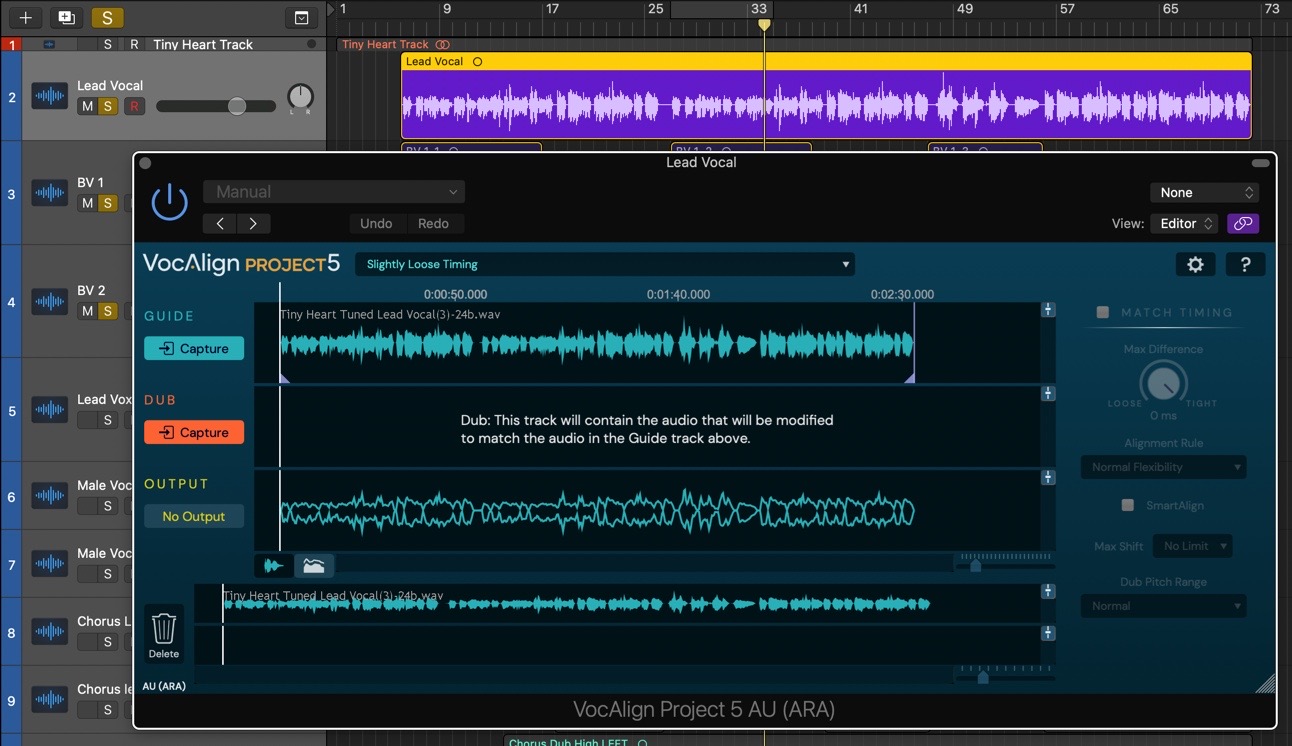
- The BV1 and BV2 tracks each contain three regions, and whichever regions are selected when you click the Dub Capture button will be captured for alignment. Select all six BV1 and BV2 regions and click the Dub Capture button. Both Dubs are captured and 'stacked' within VocAlign Project 5, appearing as orange waveforms. You can switch between them within the plugin, should you wish to change their processing parameters independently, by right-clicking in the Dub display and selecting from the Select Audio submenu.
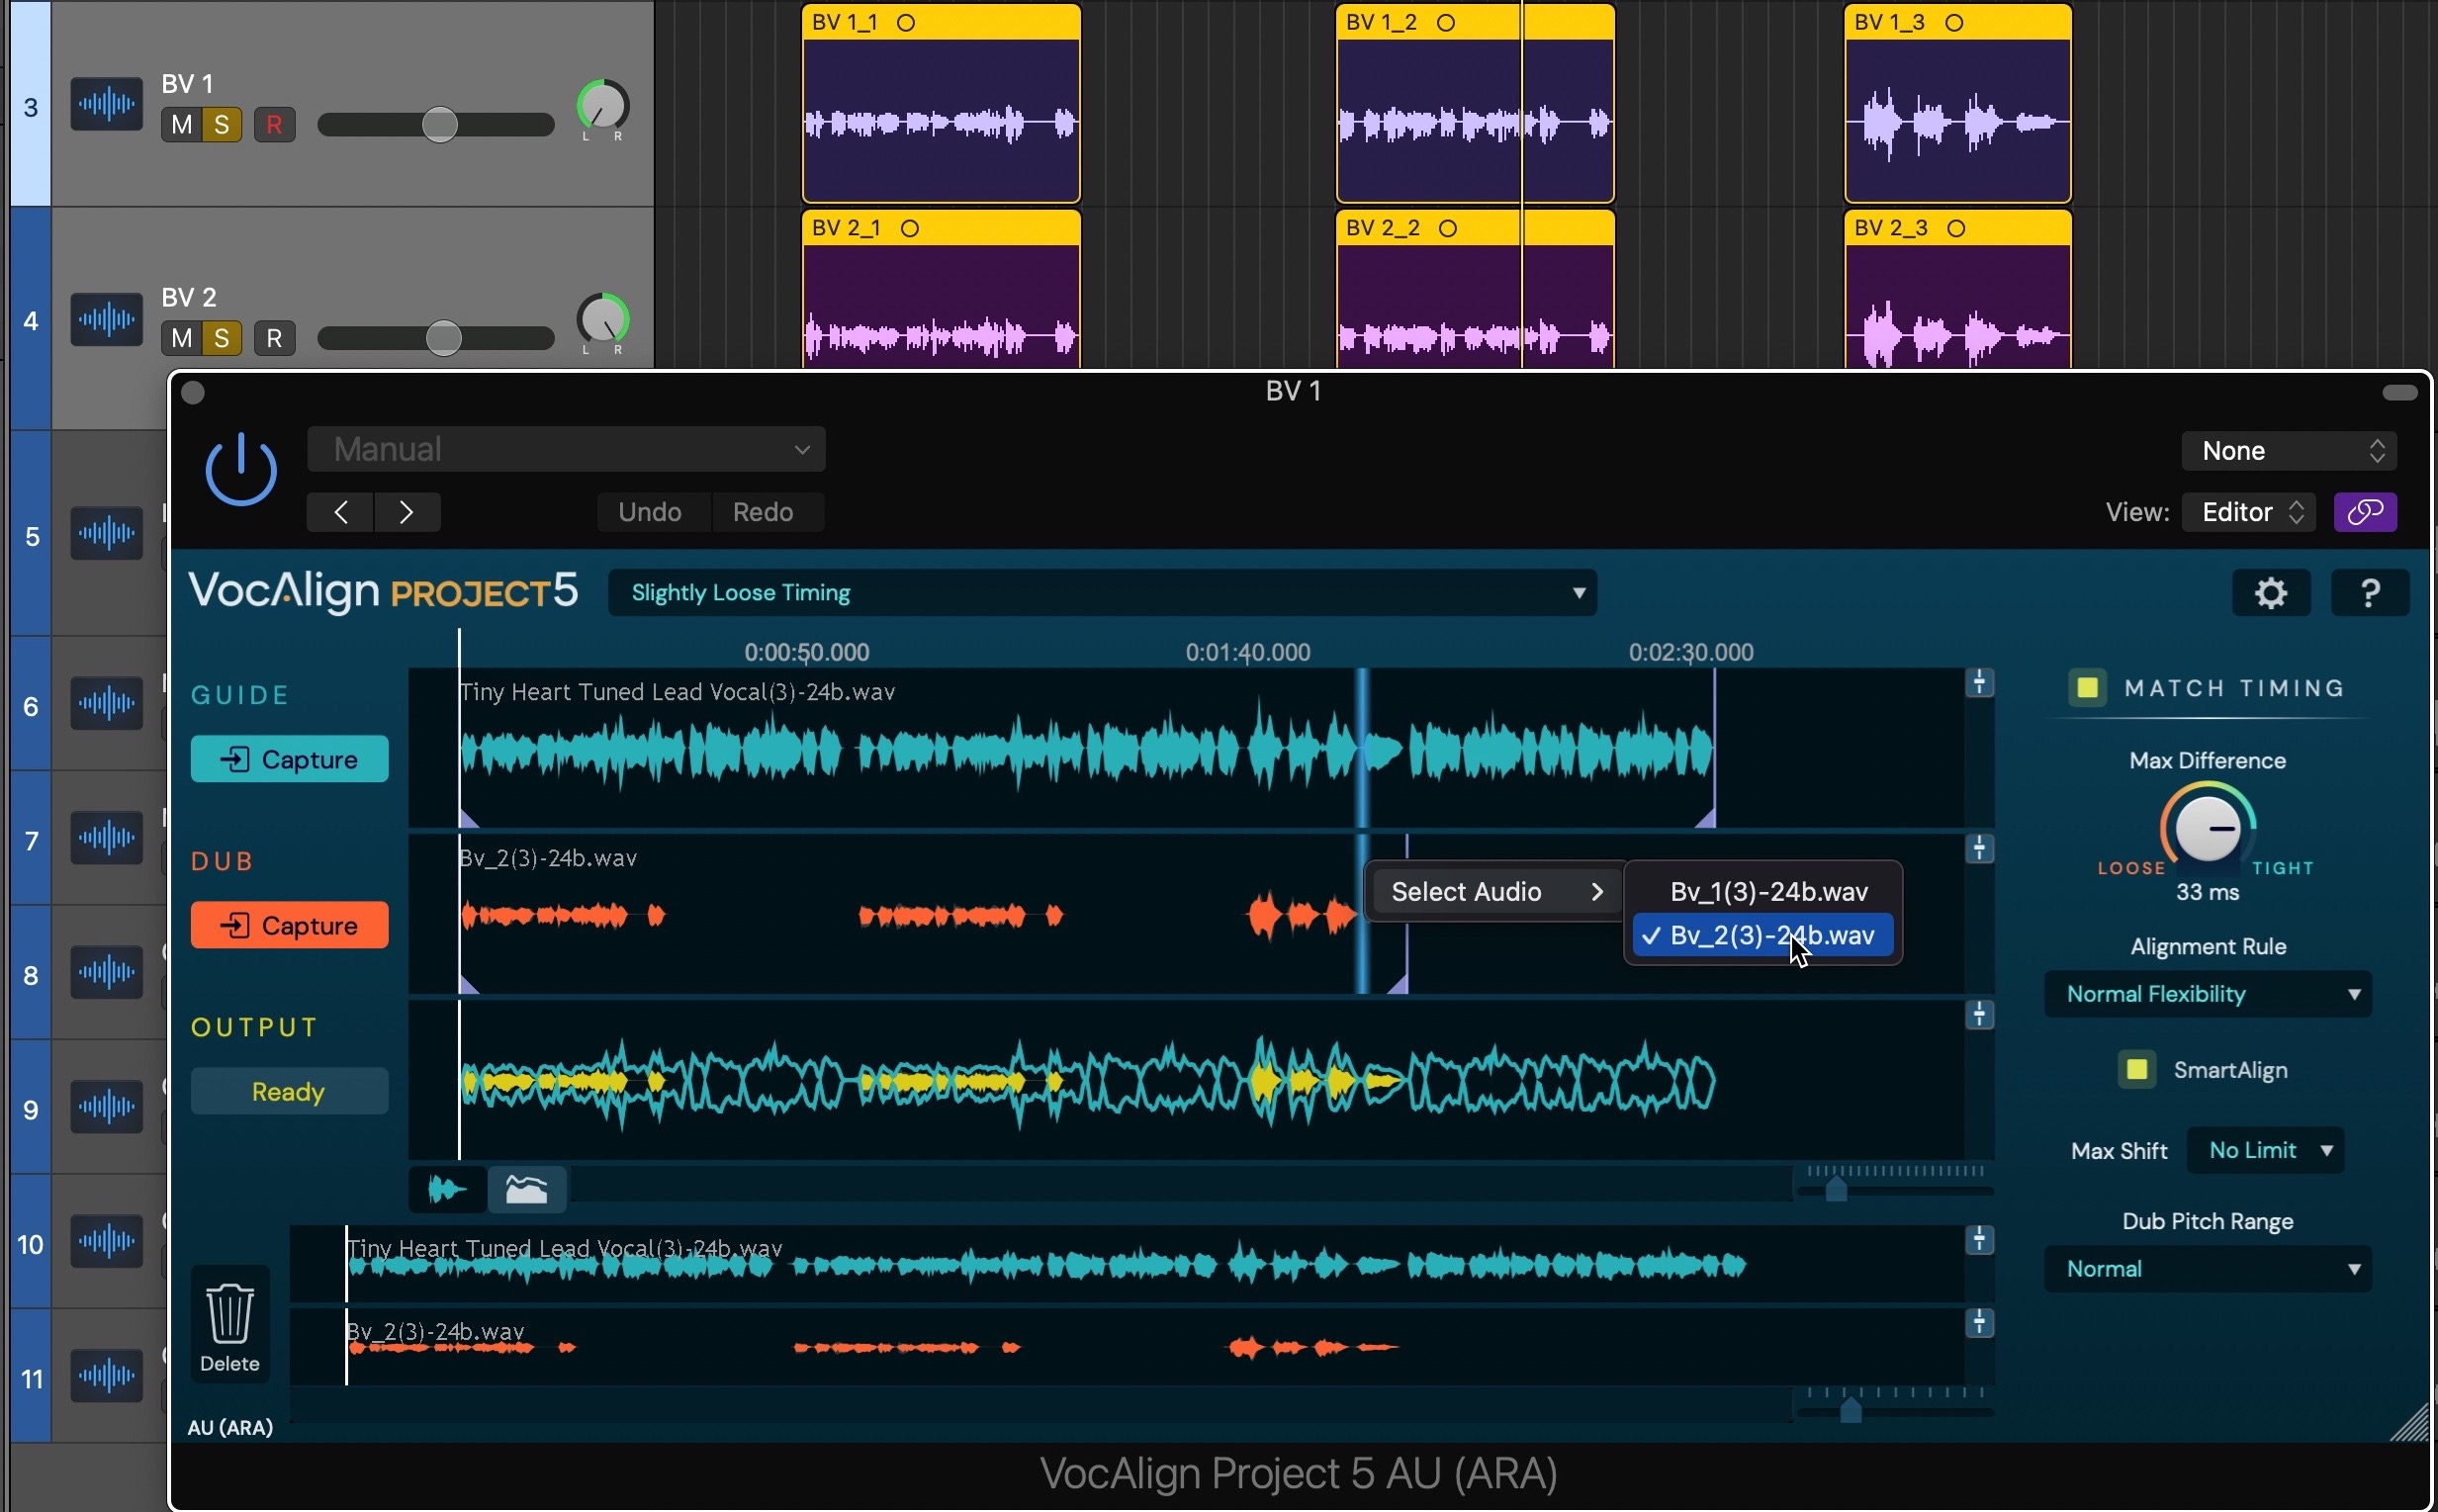
- When the progress indicator in the Output section stops spinning and becomes the Ready button, the yellow Output waveform will appear, showing the new alignment of the BV1 and BV2 Dub regions.
- For the curious, some explanation of what SmartAlign is actually doing will be in order. Thanks to SmartAlign, even though our Dubs and Guide don't start and end at the same points on the timeline, VocAlign Project 5 has aligned them correctly, based on the placement of the Dub regions, rather than the Guide. Turn SmartAlign off, and you'll see the yellow Output waveform jump to the wrong position, as the Guide is used to determine where alignment starts and ends instead – not good! Turn SmartAlign back on to reapply the correct alignment, then start playback in Logic to hear the perfectly aligned BV1 and BV2 Dubs.
| If you are going to use a different preset on a new Guide and Dub, if you change the preset or ANY control before you capture the new Guide, it will be applied to the current Dub, which you might not want to happen. Here is the safest order in which to perform your operations:
|
Aligning a Dub without using SmartAlign
If SmartAlign doesn't work for any reason (for example, if the start point of the Dub isn't correctly aligning with the start point of the Guide), there are two ways you can manually adjust the point on the timeline at which VocAlign Project 5 starts processing: a) by moving the Start markers within the plugin, b) by cutting the audio regions within Logic. We explain how to do both but strongly recommend you always try SmartAlign first.
Correcting start point alignment within VocAlign Project 5
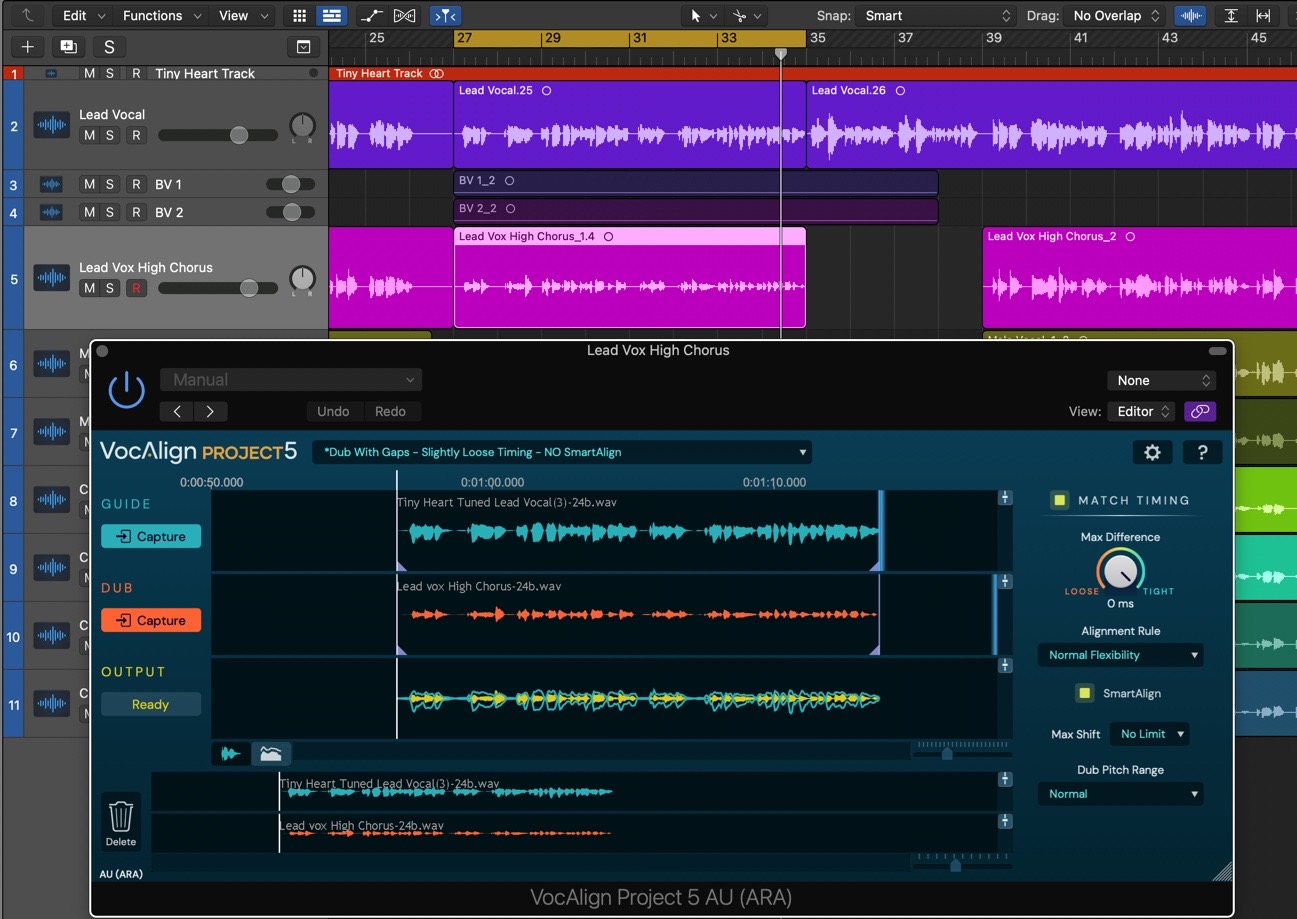
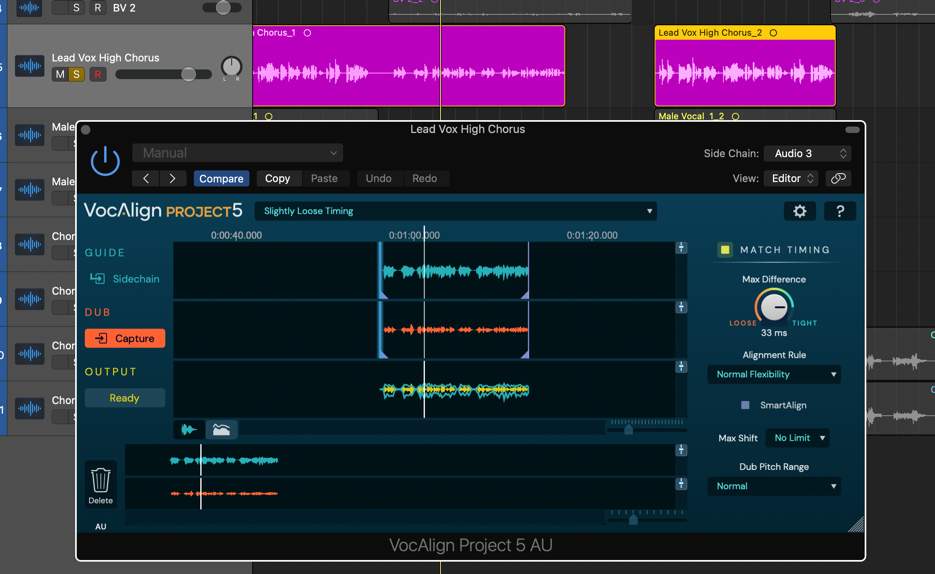
- Reload the 'Tiny Heart' project in its original state, and solo the Lead Vocal and Lead Vox high Chorus tracks.
- Add VocAlign Project 5 AU (ARA) as an insert effect on the Lead Vocal Track – which we’ll be using as our Guide – by selecting Audio FX > Audio Units > Synchro Arts > VocAlign Project 5 AU (ARA).
- Click the Link (chain) button at the top right of the plugin to turn it ON – and the background will turn purple.
- Add VocAlign Project 5 AU (ARA) as an Insert on Lead Vox High Chorus, as described in step 2. This will be our Dub.
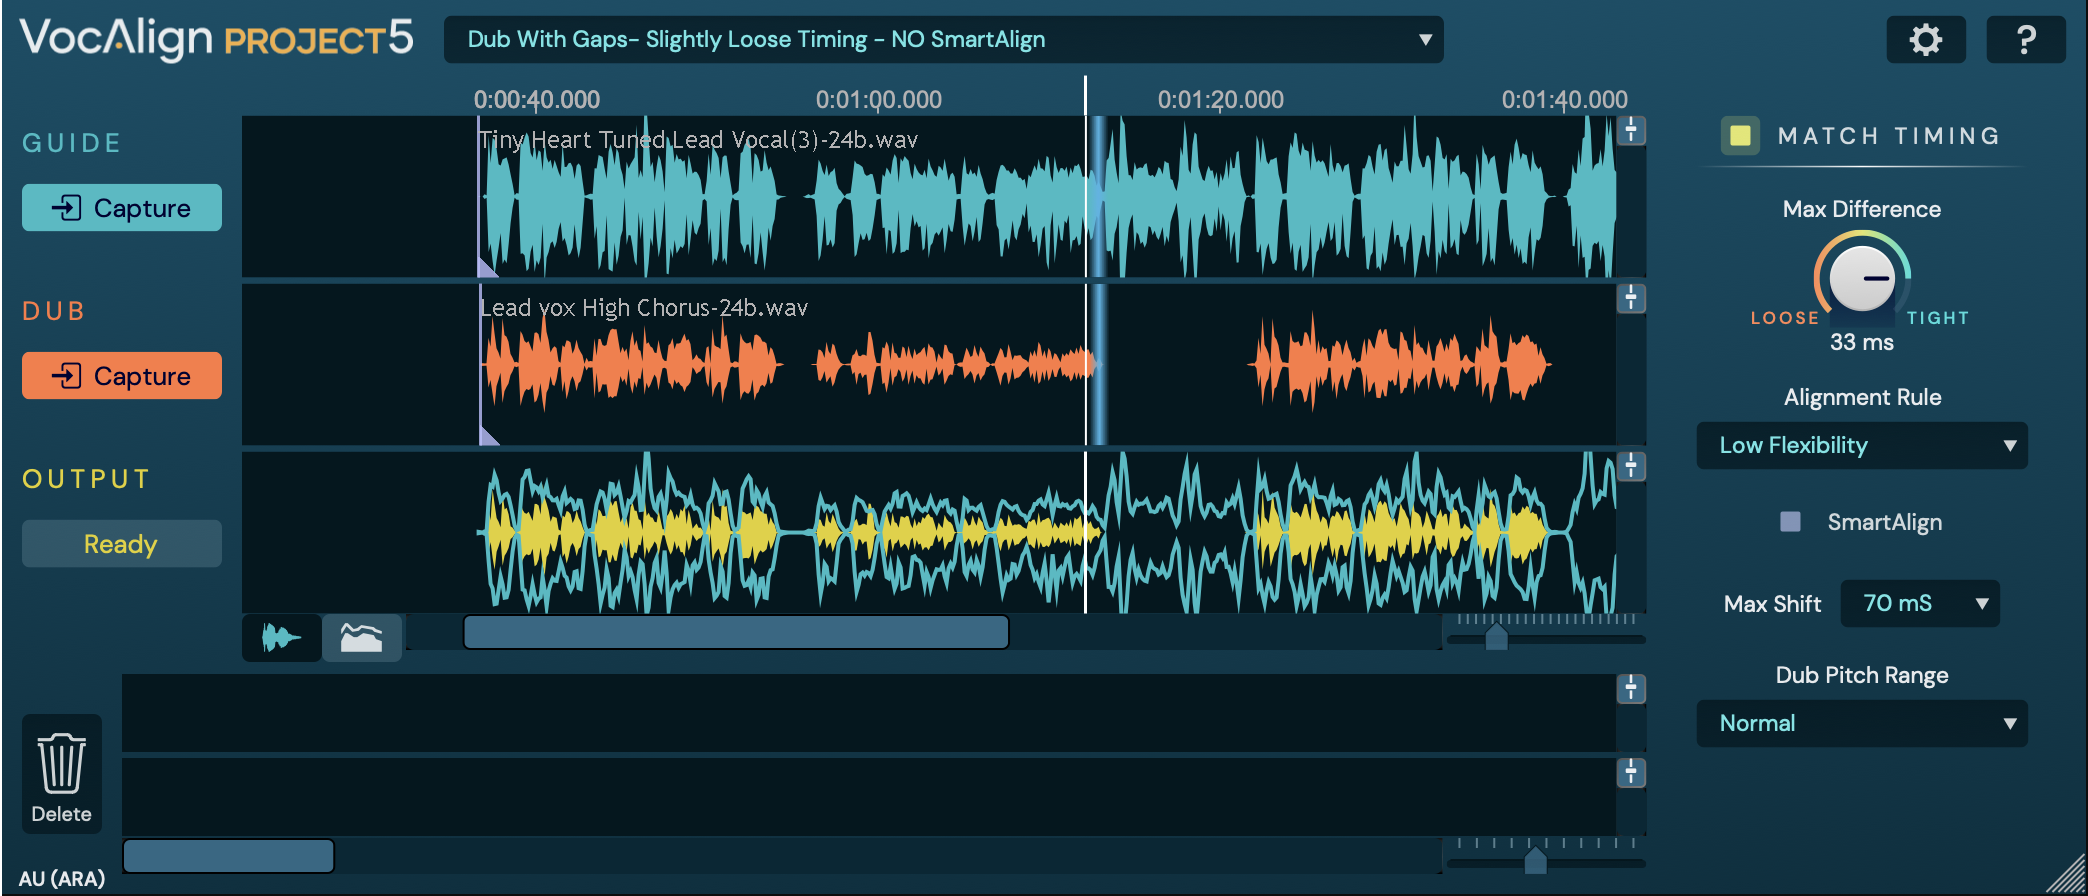
- In VocAlign Project 5, select the 'Dub With Gaps - Slightly Loose Timing - NO SmartAlign' preset.
- Select the Lead Vocal audio region and click the Guide Capture button. Then select all three Lead Vox High Chorus regions and click the Dub Capture button.
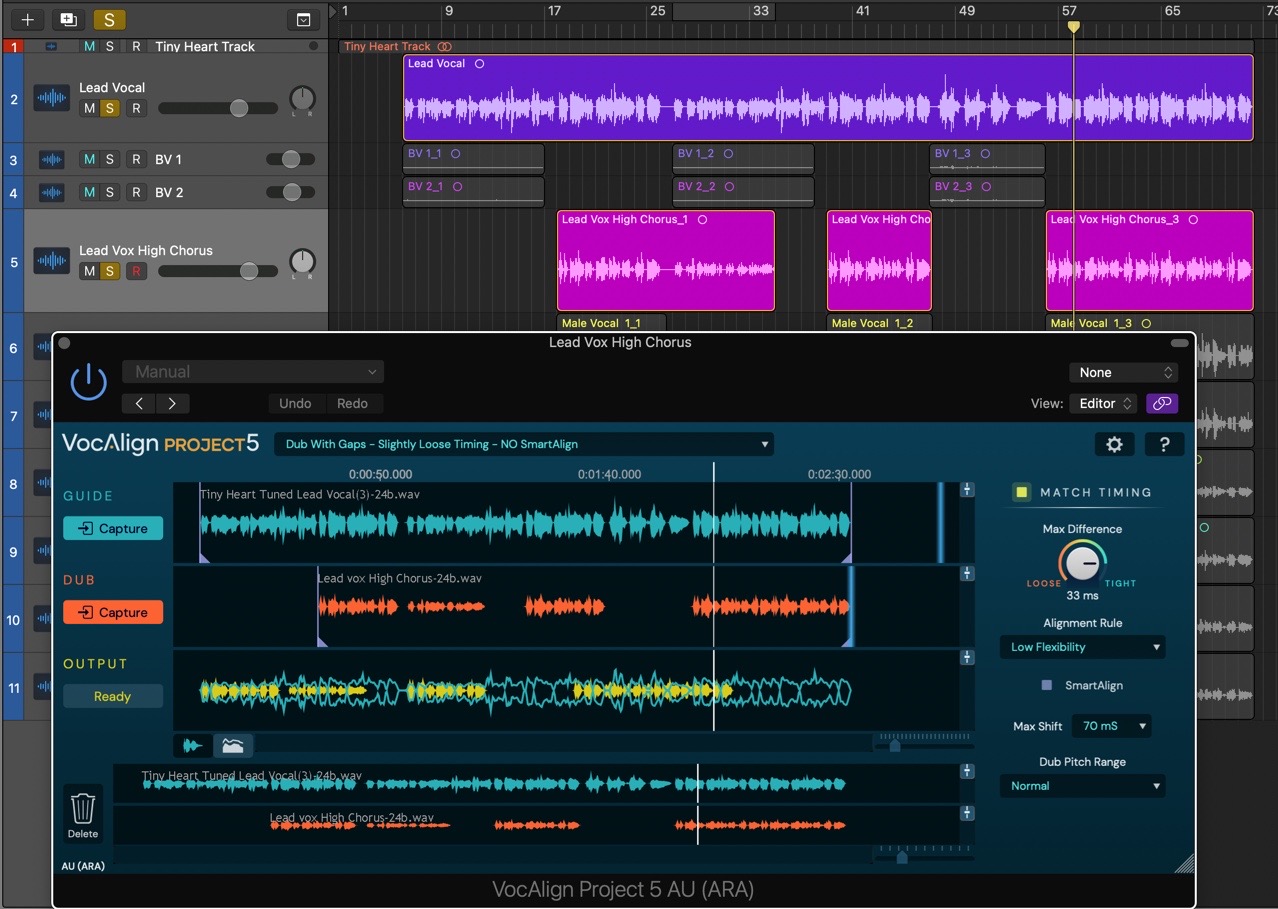
- Start playback in Logic from around bar 17, and you'll hear that the Dub and Guide are misaligned. This is because their regions start at completely different points on the timeline. This is also visible in the plugin – see how the Output waveforms are offset from the Dub waveforms. (Turn SmartAlign ON and the problem is immediately solved, but for the purposes of this example, we're pretending that our source material is beyond the capabilities of SmartAlign for whatever reason.)
- To correct the alignment, drag the Start marker of the Guide to the right, until it matches the position of the Start marker in the Dub, as shown below. Now, VocAlign Project 5 doesn't start processing until that point, thereby removing the unwanted offset.
- Switching to this Gaps in Dub settings changes Max Shift to 70ms and Alignment Rule to Low Flexibility, which generally work on such signals.
Second method for Correcting start point alignment in Logic Pro with SmartAlign OFF
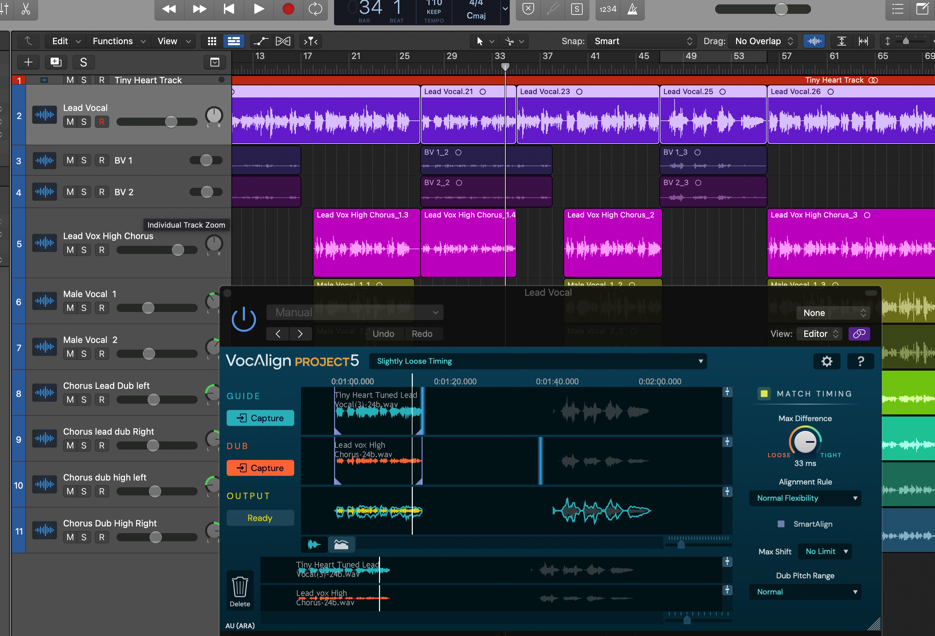
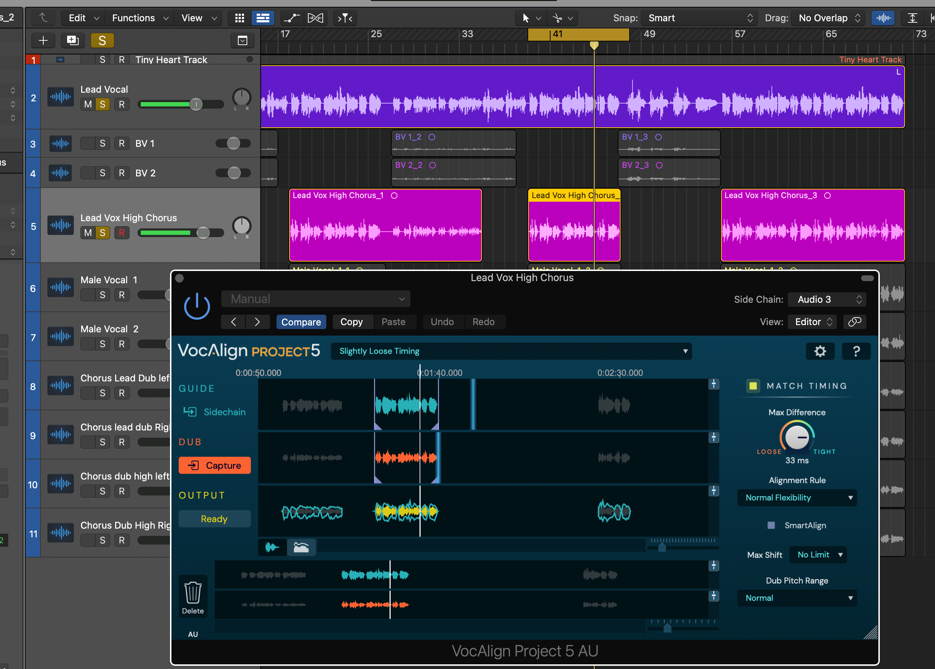
- Reload the 'Tiny Heart' project in its original state, solo the Lead Vocal and Lead Vox High Chorus tracks, and set Logic’s Cycle range from bar 27 to 35 to loop the section you’ll be working on.
- Add VocAlign Project 5 AU (ARA) as an insert effect on the Lead Vocal Track – which we’ll be using as our Guide – by selecting Audio FX > Audio Units > Synchro Arts > VocAlign Project 5 AU (ARA).
- Click the Link (chain) button at the top right of the plugin to turn it ON – and the background will turn purple.
- Add VocAlign Project 5 AU (ARA) as an Insert on Lead Vox High Chorus, as described in step 2. This will be our Dub.
- Split the Lead Vocal region at bars 27 and 35, and the Lead Vox High Chorus region at bar 27 to isolate the required sections.
- In VocAlign Project 5, select the 'Dub With Gaps - Slightly Loose Timing - NO SmartAlign' preset.
- Select the isolated Lead Vocal section and click the Guide Capture button.
- Select the isolated Lead Vox High Chorus region and click the Dub Capture button. The Dub aligns correctly with the Guide, thanks to the fact that they both start at the same point on the timeline.
| TIP: You can scale VocAlign Project 5 to almost any size to see the Logic Pro window better, by dragging the striped triangle in the bottom right corner of the plug-in window. |
Changing tightness setting
Sweep the Max Difference control in the Match Timing section around between Tight (0ms) and Loose (200ms) and you'll hear and see (in the Output display) the Dub align more (towards Tight) or less (towards Loose) rigidly with the Guide.
For longer signals, you might have to wait a few seconds for the processing to complete.
| REMINDER: If you want to change a Preset or Control to process the next Dub, change it AFTER YOU CAPTURE YOUR NEXT GUIDE !! |
Processing and bouncing audio along the timeline or down the tracks
You can continue to copy sections along a track and keep the same settings, or even capture Dubs sourced from two different tracks, with each Dub Capture set to a different preset. Switch between them for editing by clicking them in the main display or Overview, or by selecting their source regions in Logic Pro itself. The selected area will be coloured in, while all unselected areas will be greyed out.
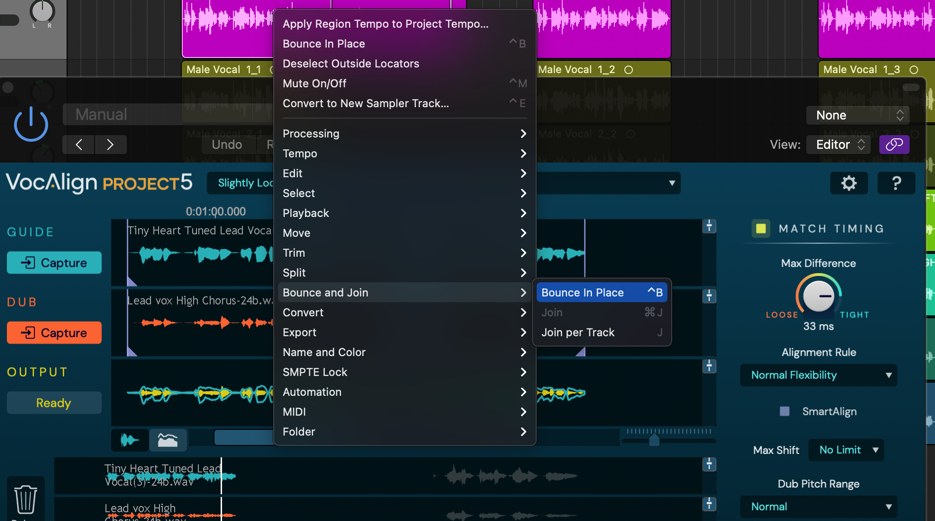
To export the Output from VocAlign Project 5 AU (ARA) to a track, select a Dub region in Logic Pro, go to the File menu or right-click the region and select Bounce > Regions in Place… (key command: Ctrl+B). Adjust the various options presented in the Bounce dialog, as required – replace the region on the track or bounce to a new track, mute the original track, etc.
Processing a "Stack" of Dubs at the Same Time
If you have several Dubs that all have similar audio that can be matched to the Guide (i.e. Doubles or Harmonies), you can select the Dub events and proccess them at the same time with the same settings.
However, you will have to change the process setting for them individually after that, by selecting either the Dub in your DAW or right clicking in the VocAlign Project 5 Dub window and selecting the Dub you wish to modify, one at a time.
Alternatively, you can use the Delete command to remove the Dubs and their Guide from VocAlign Project 5 and then recapture them with a different setting, which the Dubs will all receive at the same time and create new Outputs from with the new setting.
The video below shows how it's done.
THIS IS THE END OF INSTRUCTIONS FOR ARA MODE
Using the real-time AU version of VocAlign Project 5 in Logic Pro X
The ‘regular’ AU (Audio Units) version of VocAlign Project 5 captures the Guide and Dub in real time in two specified tracks, but only requires one instance of the plugin to be loaded on the Dub track, with the Guide captured at the same time via the plug-in's Side Chain input.
This might seem strange, but it is the Dub track that is being processed, and the processed audio is returned to the Dub track when the processing is finished.
Let's process some tracks
Aligning a Harmony With a Vocal Using SmartAlign
First, let's align a harmony, comprising multiple audio regions, with a lead vocal, comprising one long audio region.
- With the ‘Tiny Heart’ project loaded in Logic, add VocAlign Project 5 AU as an Insert effect on the Lead Vox High Chorus Track by selecting Audio FX > Audio Units > Synchro Arts > VocAlign Project 5. This will be our Dub, to be aligned with the Guide.
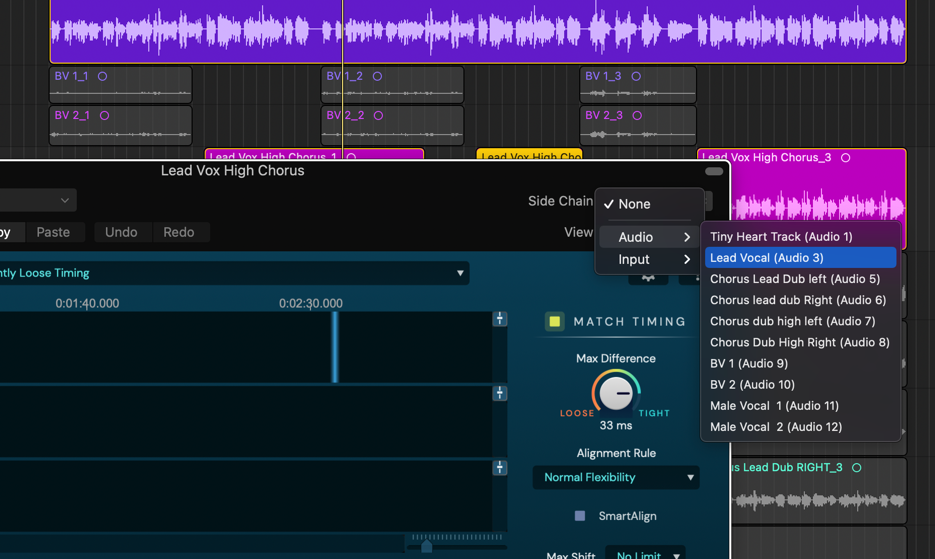
- At the top right of the VocAlign Project 5 window set the Side Chain input selector as shown below (with the word "None") to the Lead Vocal track, which we’ll use as our Guide. Also at the top right of the plug-in window click the Link (Chain) to ON which will have a purple background. This means you only will get one VocAlign Project 5 window, even though you may have created several instances.
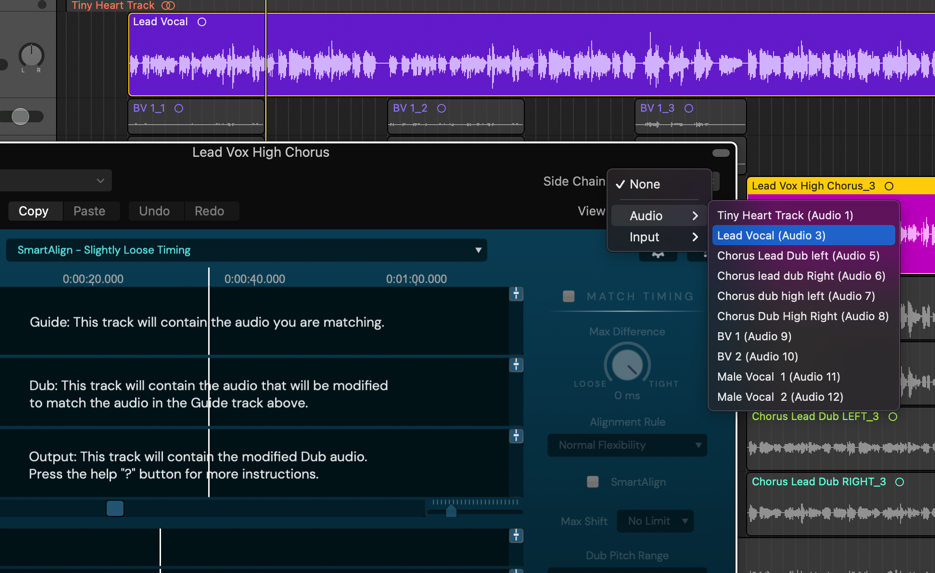
NOTE: If you don’t see the Sidechain control, click the gray button at the top right corner of the plug-in.
- Solo the Lead Vox High Chorus and Lead Vocal tracks if you want to hear them as you capture them. Set Logic’s Cycle range from bar 17-73, to capture all three audio regions on the Lead Vox High Chorus track as the Dub.
- Select the Slightly Loose Timing preset, if it isn't selected already.
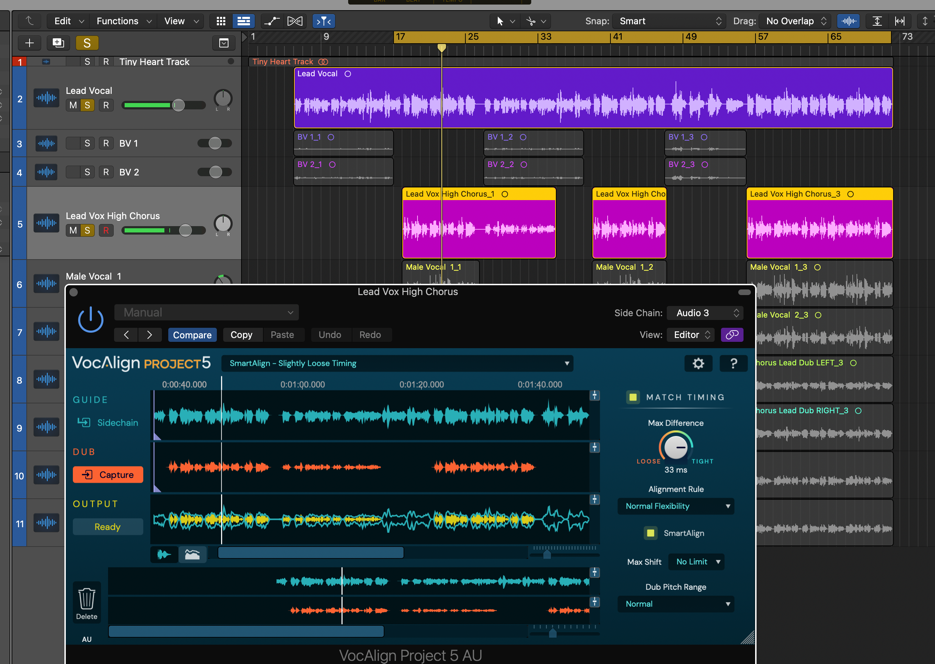
- Click the Capture button in VocAlign Project 5 and start playback of the Guide and Dub in Logic Pro – the button will change to Stop and capture will begin. The red lights in the Guide and Dub track will flash to show capturing is taking place.
- Press stop in Logic (or the Stop button in VocAlign Project 5) at the end of the range. The captured audio waveforms will appear in the Guide and Dub sections of the display, and the aligned Dub will appear in the Output section.
- For the curious, some explanation of what SmartAlign is actually doing will be in order. Thanks to SmartAlign, even though our three Dub regions and the Guide don't start and end at the same points on the timeline, VocAlign Project 5 has aligned everything correctly, based on the placement of the Dub regions, rather than the Guide. Turn SmartAlign off, and you'll see the yellow Output waveform jump to the wrong position, as the Guide is used to determine where alignment starts and ends instead – not good! Turn SmartAlign back on to reapply the correct alignment, then start playback in Logic to hear the perfectly aligned Lead Vox High Chorus Dub.
NOTE: As long as playback is within the captured region you’ll hear the Output signal from the plugin. When playback is outside the captured region (which doesn't happen in our example above), you’ll hear the unprocessed audio on the track directly.
Aligning a Dub without using SmartAlign
It is still entirely possible to align Dubs to Guides without SmartAlign, by capturing each individual section of Dub individually. Here's how it's done…
- With the ‘Tiny Heart’ project loaded in Logic, add VocAlign Project 5 AU as an Insert effect on the Lead Vox High Chorus Track by selecting Audio FX > Audio Units > Synchro Arts > VocAlign Project 5 AU. This will be our Dub, to be aligned with the Guide.
- At the top right of the VocAlign Project 5 window set the Side Chain input selector as shown below (with the word "None") to the Lead Vocal track, which we’ll use as our Guide. Also at the top right of the plug-in window click the Link (Chain) to ON which will have a purple background. This means you only will get one VocAlign Project 5 window, even though you may have created several instances.
NOTE: If you don’t see the Sidechain control, click the gray button at the top right corner of the plug-in
- Solo the Lead Vox High Chorus and Lead Vocal tracks if you want to hear them as you capture them. Set Logic’s Cycle range from bar 27-35, to isolate the required section.
- Select the Slightly Loose Timing preset, if it isn't selected already, and turn SmartAlign OFF.
- Click the Capture button in VocAlign Project 5 and start playback of the Guide and Dub in Logic Pro – the button will change to Stop and capture will begin. The red lights in the Guide and Dub track will flash to show capturing is taking place.
- Press stop in Logic (or the Stop button in VocAlign Project 5) at the end of the range. The captured audio waveforms will appear in the Guide and Dub sections of the display, and the aligned Dub will appear in the Output section.
- Now you can add further Captures to this (or any other) instance of VocAlign Project 5 by simply repeating the Capture process at a different point on the timeline, using the same or a different Sidechain input as the Guide. You'll then be able to apply different Presets and settings to each Capture, if required, by clicking any one to select it, then making your changes.
- To export the Output from VocAlign Project 5 AU to a track, select a Dub region in Logic Pro, then go to the File menu or right-click the region and select Bounce > Regions in Place… (key command: Ctrl+B). Adjust the various options presented in the Bounce dialog, as required – replace the region on the track or bounce to a new track, mute the original track, etc.
More about Bouncing
The video below discusses bouncing (saving) audio to disc using the Synchro Arts VocAlign Ultra plug-in.
These operations will be the same for VocAlign Project 5.
| Note that the Real-time Capture version (non-ARA) cannot reconnect the rendered audio back to VocAlign Project 5. |
More details on saving my output audio
For a complete explanation of the options for saving VocAlign Project 5's output audio read this chapter.